Del Orto jets for 120 Jota

OneThinBloke

Hero member
Location
Oxfordshire, UK
Hi all,

I am doing a little work on a 120 Jota. It has no been used for many years and is currently unwilling to run nicely off choke. The carbs have bee ultra sonically cleaned and all the jets have been replaced (not done by me!). The pilot jet was 65 and has been changed to 55, is this too small? The machine does not have the orginal airbox and as yet I have not tried with the supplied K & N filters.

TIA

James
 
Hi James,
If the pilot skrews are too small then one consequence will be that when you try and set the mixture
you'll have to turn the mixture skrews  right out to set .

Turn the mixture skrews say 3 turns to start with and turn clockwise to lean the mixtures until you
get a good tickover. Have you a set of vacuum gauges coupled up ?

All the best,
Andy
 
Pilot shouldn't be too small James.

Have a look at JLO's technical stuff for Dellorto's:
http://www.laverdamania.net/carbgb.htm

I will have a look what went into my Jota 120 when I get home.
 
SimonR501 said:
I will have a look what went into my Jota 120 when I get home.

These were put in originally:

K1 Needles
AB265 Needle jets
#130 Main jets
#60 Pilot jets (subsequently changed to 58 or 55 I think after Keith N picked up a rich shift)
 
Huh I run 58's on my 120's but they are not Jota's. They seem to be most happy there..
You need to be looking at around 1 and 1/2 to 1 3/4 turns on the mixtures ( or 1.5 to 1.75 turns as am told by some that fractions are an not accurate way to measure ????? ) ..

If in too far then you need to go down, if out more than that then you need to go up.

But first things first please ensure that your float heights are spot on as if they are not then will have a big effect at idle. Also make sure that the tiny idle bleed orifices are clear as I note that you mention bike had been sitting for a good while and now wont hold idle. Another thing I would do is drain the old fuel from the tank and start with fresh fuel........as if you have stale fuel then you are working with one hand tied behind ya back.
 
Hi James

well, we all have our own theories and opinions........... and different ways of expressing basically the same things.

Simon's listing of base jetting, as established by Keith Nairn, is bang on.

Brett is bang on about the need to get float height exactly correct, and fresh fuel in the tank.

Ignition timing and advance has to be perfect to get best result.

Valve clearances have to be very good and no vacuum leaks from the intake rubbers, and no leakage from the choke plungers, which absolutely have to have the rubber tips in good condition and the choke plunger height set properly to be sure of a good seal when the choke is off.

so, usually I check and set valve clearances, then dial in ignition timing for each ignition pickup, then put in place whatever air filtration is going to be used, make sure there are no vacuum leaks and that the choke plungers are seating, then do an initial carb synchronization with vacuum gauges. All of that will give you a solid base line to work from. Another thought, if you did not rebuild the carbs yourself, take out all three idle mixture adjuster screws, and fish out of their orifices whatever is left behind. Each mixture screw should have a rubber O ring seal, then a flat washer, then a spring, working from the tip back up the shaft. The rubber O ring has to be present, not perished, in good condition, and at the tip of the mixture screw. Also does not hurt to smear a bit of grease on the Or ring for even better seal. If the O ring is missing, you will never get your idle right due to the resulting air leak right through the mixture screw.

then, turn all three idle mixture adjuster screws all the way In, clockwise, until they seat on bottom, gently. Then turn each one out three half turns each, which is another way of saying a total of one and one half turns. If you have to, use the common mechanical idle adjuster on the cross bar of the carb rack to raise the idle so the engine continues to run, then individually turn each mixture adjuster screw in about half a turn, and out about half a turn with the engine running, and observe what happens to the idle.

having typed all that, my best guess is you are going to wind up around 60, maybe 58, 65 will likely be way stinky rich, 55 will likely result in a hard to start and slow to warm up engine that is hard to get to stay idling, but to a considerable extent the result will depend on state of tune, general condition of the engine, and even the altitude above sea level as well as the use of an air box or individual filters. My experience has been that a Laverda 120 ill comparatively run poorly with individual filters and will idle so much better(and in fact simply rum much better overall) with the stock air box back in place. No harm in cutting two round holes in the bottom of the 120 air box the same size as the ones in the front of the air box for the intake manifolds, in fact you can add extra rubber manifolds to the new bottom holes.....

my two cents..... ;)

Paul LeClair
 
Many thanks to one and all :)

This link goes out to "Major Tom" ;)

https://www.youtube.com/watch?v=RsxeqTqjWHE

Initiallially the bike wouldn't start, with no indications of starting anytime soon! Mixtures screws all set to 1 turn out. I set at 1 1/2. Then found a fuel delvery issue, not a lot in the tank, yet with another few litres still not a lot coming out the taps though to be fair just about enough for static running. Hence finding the uncharacteristic unwillingness to run on choke.

Plan of action is to remove and clean/replace the fuel taps. Whilst tank off check the valve clearances. Then maybe try running up and balancing with the mixtures maybe out to 3 turns or advise 'client' that starting with 60s would make more sense, and checking the carbs over inc. checking/setting the float height makes sense.

Now I am not expecting to find horrors, I am really not! This bike has a little over 10,000 on the clock and all the cursory inspection signs, e.g. wear on foot pegs and lever rubbers etc. ring true, no signs of being fucked with. :) It would not be appropriate to post pics or give details as yet but it will be for sale in the near future... but this will be a cracking buy for someone :)
 
I do not know too much the history of this as yet. Unused for maybe 10 years yet stored and kept in optimal conditions. At some point someone has spent a lot of money... Mechamex swingarm, braced swingarm frame pivot area, headstock gusset. Non standard bodywork but original fairing, (tank?), seat and tail cowling, and I believe all the original bits :o
 
Paul LeClair said:
Hi James

well, we all have our own theories and opinions........... and different ways of expressing basically the same things.

Simon's listing of base jetting, as established by Keith Nairn, is bang on.

Brett is bang on about the need to get float height exactly correct, and fresh fuel in the tank.

Ignition timing and advance has to be perfect to get best result.

Valve clearances have to be very good and no vacuum leaks from the intake rubbers, and no leakage from the choke plungers, which absolutely have to have the rubber tips in good condition and the choke plunger height set properly to be sure of a good seal when the choke is off.

so, usually I check and set valve clearances, then dial in ignition timing for each ignition pickup, then put in place whatever air filtration is going to be used, make sure there are no vacuum leaks and that the choke plungers are seating, then do an initial carb synchronization with vacuum gauges. All of that will give you a solid base line to work from. Another thought, if you did not rebuild the carbs yourself, take out all three idle mixture adjuster screws, and fish out of their orifices whatever is left behind. Each mixture screw should have a rubber O ring seal, then a flat washer, then a spring, working from the tip back up the shaft. The rubber O ring has to be present, not perished, in good condition, and at the tip of the mixture screw. Also does not hurt to smear a bit of grease on the Or ring for even better seal. If the O ring is missing, you will never get your idle right due to the resulting air leak right through the mixture screw.

then, turn all three idle mixture adjuster screws all the way In, clockwise, until they seat on bottom, gently. Then turn each one out three half turns each, which is another way of saying a total of one and one half turns. If you have to, use the common mechanical idle adjuster on the cross bar of the carb rack to raise the idle so the engine continues to run, then individually turn each mixture adjuster screw in about half a turn, and out about half a turn with the engine running, and observe what happens to the idle.

having typed all that, my best guess is you are going to wind up around 60, maybe 58, 65 will likely be way stinky rich, 55 will likely result in a hard to start and slow to warm up engine that is hard to get to stay idling, but to a considerable extent the result will depend on state of tune, general condition of the engine, and even the altitude above sea level as well as the use of an air box or individual filters. My experience has been that a Laverda 120 ill comparatively run poorly with individual filters and will idle so much better(and in fact simply rum much better overall) with the stock air box back in place. No harm in cutting two round holes in the bottom of the 120 air box the same size as the ones in the front of the air box for the intake manifolds, in fact you can add extra rubber manifolds to the new bottom holes.....

my two cents..... ;)

Paul LeClair


Am?n.
 
James, whilst the discussion about 120 set up was interesting, as I also have some issues of a similar nature on the old Argy in my shed.. I don't care as much as I really enjoyed that track man..
Almost cut my hair too one day back in the 70's.. shame I no longer have any, but I remember well my friend..

Thanks

8)
 
LaverdaIan said:
James, whilst the discussion about 120 set up was interesting, as I also have some issues of a similar nature on the old Argy in my shed.. I don't care as much as I really enjoyed that track man..
Almost cut my hair too one day back in the 70's.. shame I no longer have any, but I remember well my friend..

Thanks

8)

Hi Ian,

I did have all my hair cut off, July 2014 at the Laverda Club Breganze Raduono! Raising ?400 on the night and a final total of ?3,500 for a very small yet international charity helping young people with close family facing life threatening illness. Hairless For Hope. On the anniversary of the event I was whisked away at 3am Sunday morning to have another haircut  :o However it was just a trim but I got the full highend salon treatment! That was the only time since the big shave that it has been cut; it is growing back nicely  :D

James
 
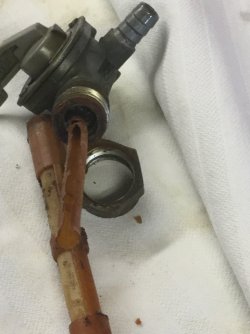
Today I took the tank off to investigate the fuel delivery issue...

The picture says it all, but the rust debris is a little surprising because the inside of the tank the is visible through the filler is stunningly shiney and rust free. The plastic tube is well fubar! I will be fitting new taps.

Then I took the cabs off. They have be nicely ultrasonically cleaned, all new jets and K1 needles, new black bodied 10g floats fitted and heights all good. New inlet rubbers, fuel pipe, clips etc. The electronic pick ups have all be set to 0.3mm, still running the original Bosch ign. boxes and coils. A good job has been done.

After removing the carbs I took the cam cover off to check the clearances. 4C cams fitted and they are near spotless and in fact is everything under the cam cover. Inlet clearances all at 0.2mm or near as damn it. Exhausts: LHS loose 0.20mm, Centre v.loose 0.15mm RHS 0.25mm, not quite ideal but is it worth taking the cam out for the centre exhaust shim??? Cam cover gasket is probably the original! Camchain is Regina, original? Engine oil a clean golden colour, but will be changed after all these years!

The more I prod and poke at this bike the more I am coming to the conclusion/realisation that the indicated kilometerage of 10k is the original mileage. There is no evidence of it having been messed about with underneath a set of new clothes (Stucchi seat unit (?), twin headlamp fairing and aero style filler for tank). No evidence for the motor to have ever been taken apart. Zero wear on the footrest, gear change and brake peddle rubber. Original discs... minimal wear. I am sure that this is an incredibly well kept low mileage original machine that has had a professional make over at some point. I am lead to believe all the original parts come with it; tail piece, seat, tank, Marzocchi shocks and fairing. I am sure the owner said that they are black, smoked black?

My plan is to button down the cam cover, with new copper washers and gasket. Fit new fuel taps, replace choke plunger and mixture screw O rings. I will install new 58 pilots with mixture screws at 1 1/2 as a starting point for balancing the carbs.

Once running sweetly or whilst waiting for parts ;) I will attend to some wiring issues. Currently main beam does work, 2 blown bulbs?? I think not! To be fair the majority of the wiring loom looks to be in good conditional original, however there has been a bit of messing around for the fairing and relays for dip/main beam, yet none for the horns which emit a much muted cluck... Building new sub loom with individual relays for the dip, main and horns will be quicker and much better than trying to patch up existing. Then MoT? The tyres fitted have plenty of tread but are old, how manys years? Bridgestone Battlax BT 17, anyone? They will probably pass but new rubber before using...

The owner has asked me to let it be known that it will be for sale as soon as ready. I will write up a more detailed for sale whatsit in due course.

Toodles,
James


Attachments

  • IMG_0103.jpg
    IMG_0103.jpg
    116.6 KB · Views: 26
Back
Top