gpzkat
Full member
- Location
- Mission Viejo, California
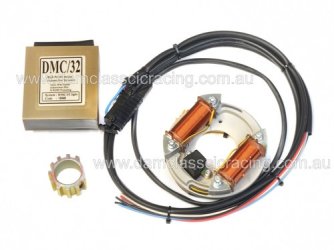
My bike is #2054 and was built in July 74, titled as a '75. I have installed the Moto-Witt DMC/32 with the charge coil, and it runs and charges, but I haven't been able to get the timing exactly right. It's close, but I have run out of adjustment on the assembly plate. It's retarded too much. Like me, I suppose. Right up to the end of advance adjustment, it's still about 7 degrees retarded.
The stator has a dotted line for TDC peened into it, and three faint rectangular glyphs about where the advance should be. Be that as it may, I've verified the advance with a strobe and a degree wheel, and it's advancing correctly.
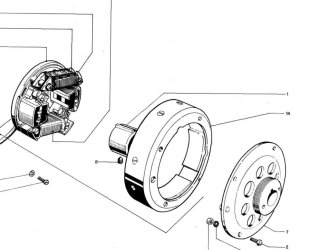
The Woodruff key on the crankshaft end ensures the stator rotor's positioning. Carefully checked TDC on 1&3 lines up the small slot on the engine cover to the dotted line on the rotor.
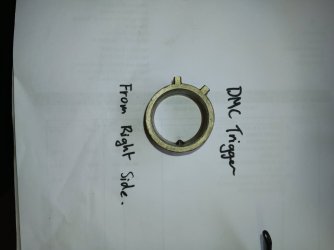
Here's my issue/question: My stator rotor has an inner metal U-shaped protrusion (U groove). It's for aligning the original single-tooth ignition rotor, which has no set screw.
The DMC's instructions say that the "pickup position should be close to the 4th tooth on the trigger wheel." I did that, as best I could, but given the stator's U-groove, it is tricky to set it so the stator rotor fits onto a tooth correctly and with the 4th tooth position right. I've done some measuring and have the stator on a tooth 'correctly'. It's in the only position it can be, and I think it's incorrect for the timing.
I suspect that this U-groove in the stator rotor isn't quite in the right position vs. the toothed ignition rotor. Since the new toothed rotor has a set-screw, the U-groove isn't needed for positioning, and I'm inclined to do away with it by some means (remove the two 'ears'). That would allow the adjustment I need. There'd be no going back to the HKZ! I'm a little hesitant to do surgery and wonder if anyone has advice on the matter?
The stator has a dotted line for TDC peened into it, and three faint rectangular glyphs about where the advance should be. Be that as it may, I've verified the advance with a strobe and a degree wheel, and it's advancing correctly.
The Woodruff key on the crankshaft end ensures the stator rotor's positioning. Carefully checked TDC on 1&3 lines up the small slot on the engine cover to the dotted line on the rotor.
Here's my issue/question: My stator rotor has an inner metal U-shaped protrusion (U groove). It's for aligning the original single-tooth ignition rotor, which has no set screw.
The DMC's instructions say that the "pickup position should be close to the 4th tooth on the trigger wheel." I did that, as best I could, but given the stator's U-groove, it is tricky to set it so the stator rotor fits onto a tooth correctly and with the 4th tooth position right. I've done some measuring and have the stator on a tooth 'correctly'. It's in the only position it can be, and I think it's incorrect for the timing.
I suspect that this U-groove in the stator rotor isn't quite in the right position vs. the toothed ignition rotor. Since the new toothed rotor has a set-screw, the U-groove isn't needed for positioning, and I'm inclined to do away with it by some means (remove the two 'ears'). That would allow the adjustment I need. There'd be no going back to the HKZ! I'm a little hesitant to do surgery and wonder if anyone has advice on the matter?
Last edited: