New guy and help with wiring

JotaRep

New member
Location
Great Pacific NW
Hello Laverdisti - its been many years since I have checked this forum and its good to be back and check in with fellow Laverda owners.

I am located in the Pacific Northwest and have owned my 1978 Jarama SN 10005896  since 1991 - which I now refer to as a Jota Replica.  When I bought it it was a clapped out neglected Jarama - and thru the years I have refurbished it with help from Wolfgang Haerter and Lance Weil (Rickey Racer) way back in the 90's.

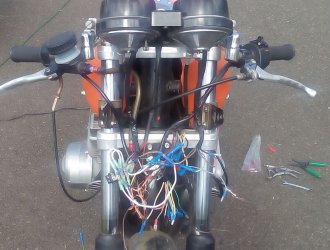
I have not ridden it in quite a few years now as I started to redo the "wiring"  - if you could call it that - or the spaghetti mess that resides in the headlamp shell, after one of the hot leads burned up and melted.  I have finally traced down all the wires and have them connected temporarily - but now I need to unhook them and bring them thru the headlamp shell.  I want to do this "sano" that is cleanly and nicely - and use the correct connectors/blocks whatever - so that it can come apart if need be in the future.

I have attached some pics of the current state of affairs and I am soliciting advice/suggestions on how to proceed.  I have thought of fabricating a small box to house these wires that would mount behind the forks to bypass the headlamp entirely - has anyone done this?

I will appreciate ideas and suggestions - Cheers!
 

Attachments

  • LaverdaWires.JPG
    LaverdaWires.JPG
    130.3 KB · Views: 94
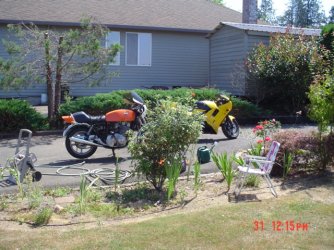
  • B-2bikes.jpg
    B-2bikes.jpg
    155.1 KB · Views: 49
Looks like a CDI type ignition bike so should have strip connectors as in the photo attached.
There is little enough room for things outside the headlamp shell so trying to find a home for a box  with all the connections in it would be a challenge.

2015-12-17 12.45.08 by Grant Duguid, on Flickr

Get a wiring diagram, number each connector as per the diagram and it suddenly becomes simpler.
Or get an expert auto electrician to design a neater, simpler system.
 
And above all, get rid of those nasty insulated "squash" connectors, they are a failure just waiting to happen.

Best to invest in a proper pair of crimping pliers and correct connectors, it will repay you with many trouble-free miles, electrical-wise. :D

With the strip connectors that Grant mentioned, you can achieve a high level of tidyness within the headlight shell without getting things too cramped.  Later bikes used multi-pin connectors that freed up more space, and is tidier still.

Locating the connectors elsewhere on the bike isn't really an option, not much space, looks horrible having even more thick sheathing running back and forth and usually opens another can of worms. :D

Grant, you're missing the spacers between headlight ears and shell on that 750... :D

piet
 
You can put wrap-around wire markers on the wires to reconnect in order If you pull all wires out, or decide to undo the spaghetti junction in one go. Saves a lot of time and hassle.

HTH
Gerald
 
Gerald said:
You can put wrap-around wire markers on the wires to reconnect in order If you pull all wires out, or decide to undo the spaghetti junction in one go. Saves a lot of time and hassle.

HTH
Gerald

I use a pocket Dymo label printer for that.

Paul
 
sfcpiet said:
And above all, get rid of those nasty insulated "squash" connectors, they are a failure just waiting to happen.

Ditto. I hate those bloody pre-insulated connectors. I dunno how the rotten things have achieved such market penetration when they're clearly rubbish.
 
If you don't want original, start again. I had 3 or 4 wires inside my headlight when I rewired my Jota. There are a lot of excess circuits in most Italian bikes, Moto Morini being the worst I've come across yet. Start at the alternator wires/regulator/fuse box circus under the seat and design circuits that make logical sense. I threw away everything and made a plate to house the regulator (I changed the charging system over to Redax's 3 phase replacement) /fuse box and relays.

Mine ran very few circuits straight off the fuse box. Power came in to the fuse box from the key and then there was a series of loops providing power to each fuse on one side and the other side was the take off for each circuit. I did this 7 or 8 years ago so my memory is a bit sketchy but I think I had a circuit/fuse for the alternator/ignition system/lights/horn/blinkers/starter and ran relays for the starter, horn & head light. If you have trouble (and we all did) just go talk to an auto electrician. My local bloke looked at the Laverda one and just shook his head. 

Look up the Laverda mechanic in Scotland (can't remember his name). He's done the neatest and most thoughtful under seat wiring job I've seen yet. It was a work of art.
 
Dellortoman said:
Ditto. I hate those bloody pre-insulated connectors. I dunno how the rotten things have achieved such market penetration when they're clearly rubbish.
Well at least they are more better than scotch locks ???? which believe it or not are still used by some "experts "
 
There are different versions of pre-insulated connectors available. The telecommunications world uses them without any issues, even in automotive applications. Motorola i.e. uses them when installing comm equipment in public authority vehicles, and I've never heard of any failures related to the connectors. Depends on who is performing the work and which type of crimp tool and die size is being used. Scotch Locks on the other hand should not be used on our old clunkers....

Gerald
 
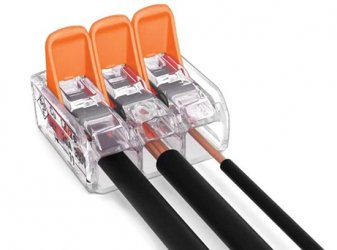
These connectors from Wago are pretty cool. A bit ugly, and not always a good fit as they're not an inline connector, but the connection is secure and complete, and easily removed and reused. They're UL listed here in the States to 600 volts and come in 2, 3 and 5-wire connectors, and in the rare case it matters, you can connect wires of differing gauge.
Richard
 

Attachments

  • WAGO jpg.jpg
    WAGO jpg.jpg
    29.7 KB · Views: 11
Gerald said:
There are different versions of pre-insulated connectors available. The telecommunications world uses them without any issues, even in automotive applications. Motorola i.e. uses them when installing comm equipment in public authority vehicles, and I've never heard of any failures related to the connectors. Depends on who is performing the work and which type of crimp tool and die size is being used. Scotch Locks on the other hand should not be used on our old clunkers....

Gerald

Gerald,

Those connectors might be fine when fitted with the correct equipment in a dry, vibe-free environment, something not often found on a Laverda, other when it's stood in a barn for a few years...  :D

In one of my previous lives, I converted regular automobiles into taxis, with all the associating electrical equipment.  Pre-insulated connectors, in decent quality, were quite ample and never gave any trouble over the normal lifespan of a cab.

Normal motorcycle use involving moisture and vibration plays havoc with the open ended construction after a few months/years, insufficient wire clamping through use of sub-standard equipment is a further issue.

piet
 
Thanks to all for your suggestions!  Love the stuff I am seeing and that's what I want mine to look like.  In my defense - those horrid connectors were actually done by an "automotive electric expert" who told me he could do the job and then fiddled around for 4 hour leaving me with the mess you see - I actually had to PAY him for that!  I had previously identified most of the major connection and had them connected and then the "expert" spent hours "tracing" the wires and it soon became obvious he didn't even know how to read a wiring diagram.  I am still mad at myself!  >:( Thanks for the links to suppliers - that's exactly what I needed.  I'll post some pics and may ask for more help.  Cheers!
 
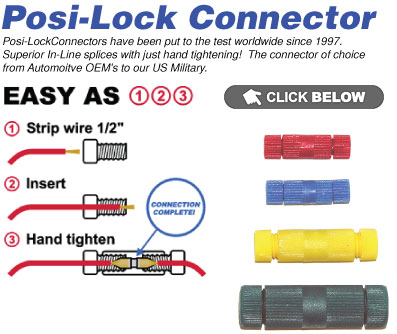
These are easy, secure, waterproof and reusable. They do different versions for connecting multiple wires and tapping wires. The only drawback might be size if you?ve got a lot in a headlight ;)

posilock.jpg
 
Back
Top