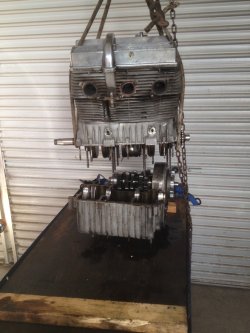
Splitting RGS 120 crankcase

murphus

Senior member
The frame on my RGS is painted and ready for the engine, but while the engine's out I'm thinking about splitting the case to rectify bad threads for the oil drain plug. I munged them up some 8 years ago trying to "fix" the original threads, which either by me or the previous owner had been compromised to the point I was afraid to tighten the drain plug. I ran a next size up tap through (coated in grease, slowly, cleaning thoroughly), and somehow managed to run it off-true, likely because I was working from below and with the bike on the ground. The threads are strong, but the drain plug and washer don't hit the boss square so I've been compromising with my own rubber washers. It kind of bugs the shit out of me, so I'm thinking now's the time to fix it. I planned to do this upside down of course, as the top end is completely redone and reassembled. It looks like I can leave the primary in place once the outrigger has been removed. Aside from the risk of the locating pin for the gearbox selector shaft dropping out, are there any other major concerns? Or does anyone have a clever fix for my bodge that doesn't require disassembly?
Richard
 
It's challenging Challenge is to get the surfaces cleaned/sealed properly and not blocking oil channels when working engine upside down. There's many very critical sealing positions, for example near the oil pump between cases. Probably impossible to see did everything went correct when working engine upside down.

The lower section of the engine is intended to be assembled on normal position. I would not do it any other way (I would also lift the shafts away) but I have heard it done also engine upside down. (I was going to say there must be a system to do it.)

At least following challenges if working engine upside down:
-You already mentioned the gear fork shaft has a pin under R/H gearbox bearing
-O-ring on front of the oil pump on lower case. Almost impossible to get it correct
if working engine upside down (that way it is sure it is there) --> See following comments
-Inner crank bearings are positioned by cylindrical parts (they are actually cylindrical bearing rolls)
-Clutch/output shafts have such positioning plates and grooves on their bearings
-Gear selector forks may be hard to get correct.
-Note the oil pump gear
And all of these should be get on place at the same time while the sealant is wet.

It would be easy to at least inspect everything when it is opened and change oil seals for example.
I also replaced a spring on the gear mechanism which is prone to fail.
 
Great feedback, thanks. Kind of diminishes my enthusiasm for doing it this way. Other than the already-mentioned fact that it bugs me, there's no reason I can't leave it as is ... until the day comes that I have to tear into the bottom end.
Richard
 
Richard,

The oil plug thread is immediately adjacent to an internal wall, trying to repair the thread with the next larger size, you hit the wall with one side of the tap, the thread turns out cock-eyed.  No way around it if doing it manually.  Once you have it apart, the thread can be bored vertically on a mill/drill press and an insert fitted (or welded up/rebored) to get it all straight and true again.

No problem at all to split the cases with the engine laying on its head.  I have done it often in order to save time/save tearing down the top end, especially when sorting gearbox issues. Cleaning the joint face is a pita, of course you need to try to keep the crap out of the upper case.  It is a bit fiddly replacing the gearbox though.  Easiest is to assemble the gearbox in the lower case and drop it all onto the top case.  Tie the shafts to the lower case with a long cable tie or wire through the (newly repaired :D) sump plug bore, once everything is in place, snip the wire/tie and remove through the plug hole.  Button it all up and Bob's your uncle.  Good opportunity to swap out the oil seals and the o-ring at the front LH corner.

piet
 
Great info, Piet, thanks. And especially for the insight on why my rethread cocked; it didn't make sense to me. And yeah, my thought was to weld up and rebore to get it right again, and I was looking at this as a good opportunity to swap out all the oil seals. I'll let you know what I do!
Richard
 
If you do choose this route, don't forget the M6 stud/nut hidden under the starter motor!  You wouldn't be the first to do so. :D

piet
 
Two wrongs don't necessarily make a right, however one option to correct the symptom (without fixing the cause) is to re-cut the sealing surface so as to be perpendicular to your crooked hole...  :-X
 
Key piece Hint for this kind of working is certain components are stick on exact correct positions. On Piet's system the only component that need to be kept stick is crankshaft.
--> I meant the crankshaft bearing races are sticked on correct position on upper engine case. Or if the crankshaft pops up, how to get the pins aligned to lower casing?

Also other key piece Another thing that may help is that Piet use certain type of engine sealant (was said earlier on some other thread). I use have used blue Locktite or Permatex in all engines which may be quite tricky on these engines (at least if engine upside down). I mean everything that should is surely sealed but not exuding where it should not.
--> It helps to use more suitable and such engine sealant that speads certain way between engine cases. To prevent some challenges that I encountered.

On my new gasket set the new o-ring was made of silicone rubber, not nitrile rubber as the original.
I suggest only way to keep it in position would have been to use very small amount of superglue if working engine upside down.
--> I tried to correct it is possible this problem (o-rings don't keep on place) were only on certain gasket sets. They were Centauro which are quite widely used.


MotoJouni said:
Key piece for this kind of working is certain components are stick on exact correct positions.
On Piet's system the only component that need to be kept stick is crankshaft.

Also other key piece is that Piet use certain type of engine sealant (was said earlier on some other thread). I use blue Locktite or Permatex in all engines which may be quite tricky on these engines (at least if upside down). I mean everything that should is surely sealed but not exuding where it should not.

On my new gasket set the new o-ring was made of silicone rubber, not nitrile rubber as the original.
I suggest only way to keep it in position would have been to use very small amount of superglue if working upside down.

Journi,

Your airings are exactly the type of half-truth that I referred to on another thread, and which caused you to jump at me...

As I have stated, I have used this method very often and it holds no special secrets.  A little bit of thought does help a long way though.

I've been inside these engines for almost 40 years, not much left that can really surprise me, or where I haven't been.  I am however, always willing to learn a little more, and, it turns out I often do!  When working under time pressure on racing engines, one needs to be innovative.  No use disturbing a perfectly well-working top end if only a gearbox issue needs attention.  This method also saves a customer a lot of money under real, everyday circumstances, so there is no reason why it could not be adopted by a DIY'er as well.

Strange, when I fit the o-ring into its recess, I could chuck the case through the workshop without having it dislodge itself.  No glue, or even grease, needed to hold it in place.  I'd suggest you review your choice of o-rings...

Why should one need to work upside down??  The engine is resting upside down on its head with the case as horizontal as possible, the crank does not need to be held in position.  The gearbox shafts, shifter drum and forks are assembled into the lower case and held in position with a wire or cable tie.  Not even the damn shifter axle locating pin can drop out!  Everything is prepared as usual, the lower case is lowered onto the upper, the restraining wire removed... simple as.

My preferred gasket goo is Loctite 510 or 518, as with many others here.

piet
 
The point that is missing here Richard is that you have a successful thread already in your crankcase, albeit slightly cocked over, what you can do with very little further distress is make a "bush" preferably a top hat type with a "tapered pipe thread" (BSPT) thread on the outside as close as you can get to what you already have, probably 1/2" BSP which is around 22mm od and a 12mm thread on the inside.
then the bush can be screwed in cocked, after adjusting the thread type/size in the cases, since it does not rely on the flange face to seal, some good thread sealer such as Loctite after a thorough clean will set and lock it in place, lockwire the bush as well, then a normal 12mm plug can be made (or bought) and  fitted. It also will be slightly cocked but the flange faces of the boss and the plug will be square.

I have done this in the past and it worked well for decades, and yes I did the crankcase thread in situ on the bike, a much better way would be to make an alloy boss and weld it into place , but that involves the engine strip, this does not.

CLEM
 
Great stuff gentlemen. Piet's insights on disassembly/assembly are especially interesting to me, and Clem, your idea of a bush is intriguing and not something I'd even thought of. The closest I came to being creative was thinking about machining a beveled washer out of a thickish piece of aluminum stock, with a fiber gasket either side.
Richard
 
Another way to split the case without disturbing the top end is lift the top half off the bottom case. You'll need to sit the engine on its head or side to undo the case bolts, but once you have all the bolts out, sit it right way up lift the top half off. Your lifting strop needs to go around the ends of the crankshaft so it doesn't drop out, taking rods and pistons with it!
Everything stays the right way up and the gearbox innards can be easily lifted out and replaced.
 

Attachments

  • crank lift 2.jpg
    crank lift 2.jpg
    148.3 KB · Views: 56
Back
Top