mauricejota7604
Hero member
- Location
- Victoria Australia
His name is Ken
Hi John, I knew you weren't the fellow I was trying to remember. I was thinking if he was still around, he may have been able to help you out with your clunking problem.For Chappo, I am a Florida native and my name is John Windham. Thanks all, Best Regards John
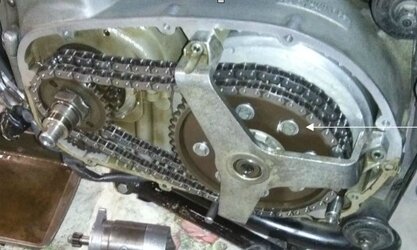
Piet, this is John. There is slack between the clutch drum and the large primary chain sprocket attached to it. Is there any way to alleviate that problem ? Could you also comment on where the cush rubbers are to be used at. I know almost mothing about this Laverda but I am slowly learning. I don't know where to learn about "threads" which is where I need info from.. Thank you for any help you can give me Best Regards JohnIf the mileage of the chain is unknown, replace it. Chains are cheaper than crankcases! The primary chains were specified for replacement at 25000km by the factory.
Other sources of clunking/clashing noises are worn clutch drums and hubs, knackered primary cush drive rubbers or loose crank sprockets, all, unfortunately, very common.
Laverda triples are generally hi-mileage bikes and many did not recieve the TLC that they demand.
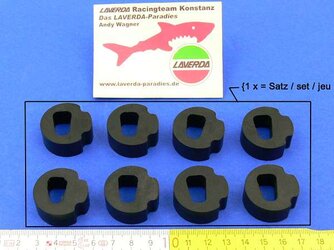
Hi John, the bolts* indicated by the white arrow in the attached picture pass through the cush drive rubbers. Number 23 in the exploded diagram.Could you also comment on where the cush rubbers are to be used at.
As this is a '74 triple, the clutch drum is most likely to still be rivetted and does not have the later outrigger support. Therefore, the Jesus nut will need to be removed in order to remove the clutch drum from the mainshaft. Use the tool of choice for the Jesus nut, my tool of choice is a 1/2" drive rattle gun with a 32mm socket, quick, clean and easy.Piet, this is John. There is slack between the clutch drum and the large primary chain sprocket attached to it. Is there any way to alleviate that problem ? Could you also comment on where the cush rubbers are to be used at. I know almost mothing about this Laverda but I am slowly learning. I don't know where to learn about "threads" which is where I need info from.. Thank you for any help you can give me Best Regards John
Ken McNicolHis name is Ken
I accepted a request from Ken to join my OIF triumph and BSA Facebook page yesterday so he appears to be okKen McNicol
Still registered as a member here but hasn't logged on for a while. Hope he's OK.
 .
.You call that OK? He's gone over to the dark side.I accepted a request from Ken to join my OIF triumph and BSA Facebook page yesterday so he appears to be ok
")
Piet, Finally got a chance to reply to you post. You are an absolute Gentleman and I greatly appreciate your help. My son is a great mechanic and takes pride in his work. He can help me with this and will help me when he gets a chance. I spoke to Phil, who has a Italian bike shop in Miami and he is looking for parts. If you have the parts I need, in stock, and the exchange rate is not too bad I would be just as well to get the parts from you. Would that be possible? I have Paypal and a major credit card. Hopefully I will hear from Phil in Miami. Once again, I want you to know I appreciate your help, Best Regards John WindhamAs this is a '74 triple, the clutch drum is most likely to still be rivetted and does not have the later outrigger support. Therefore, the Jesus nut will need to be removed in order to remove the clutch drum from the mainshaft. Use the tool of choice for the Jesus nut, my tool of choice is a 1/2" drive rattle gun with a 32mm socket, quick, clean and easy.
Simply driving out the rivets to replace the rubbers is a sure formula to terminally damage the drum, may as well throw everything in the bin and source new bits, fat chance. Proper method; with an angle grinder, grind the rivets from the outside down to the tin plate cover. Look closely and centre-punch each of the rivets, drill each rivet 15mm deep with a 4mm drill, preferably on a drill press. Tap the rivets GENTLY with a 4mm punch down the holes so the plate cover just comes free and remove. Remove the sprocket and rubbers. Tap the rivets back to full protrusion and grind off the protruding parts. Gently and carefully punch the rivets out of the drum, if due care is taken, none of the pillars locating the rubbers will have cracked. Clean/de-grease the whole caboodle. The holes in the plate cover can be taken out to 6.5mm and de-burred. The bores in the pillars will accept an M6 tap, if done carefully the thread will end up quite acceptable. Source 8-off M6x20 hex screws, slip the sprocket over the drum, spray it with a liberal coating of silicone grease and install the new rubbers, making sure the chamfer goes to the base of the pillars. Secure the cover with the screws, together with a drop of Loctite on each screw. Washers are not absolutely necessary, I use Schnorr-type washers (the same process applies to the 750s, NO washers should be fitted in that case, no space for them under the prinmary cover!) . Refit the clutch drum together with the front sprocket and the new chain, do up the Jesus nut with a new locking washer and you're set to button it all up and re-adjust the primary chain, hopefully eliminating most of the clatter.
Sometimes, the drum pillars are cracked upon installation of the rivets, ex-factory. This is of no great consequence, the bike's lasted almost 50 years with these cracks. Cut the threads and leave the cracks as they are. Of course you can have them welded if you're really anal, but it ain't worth the hassle... I've performed just about every imaginable repair on these drums and have yet to have a pillar fail completely. I've found a few completely snapped off, but only in conjunction with other damage, mechanical ignorance is quite widespread.
piet
Wolfgang in BC should have everything you may need in stock, possibly quicker and cheaper than shipping from EU.Piet, Finally got a chance to reply to you post. You are an absolute Gentleman and I greatly appreciate your help. My son is a great mechanic and takes pride in his work. He can help me with this and will help me when he gets a chance. I spoke to Phil, who has a Italian bike shop in Miami and he is looking for parts. If you have the parts I need, in stock, and the exchange rate is not too bad I would be just as well to get the parts from you. Would that be possible? I have Paypal and a major credit card. Hopefully I will hear from Phil in Miami. Once again, I want you to know I appreciate your help, Best Regards John Windham
If you don’t try other stuff you don’t realise how good what you already have isYou call that OK? He's gone over to the dark side.
 .
.Much Thanks JohnWolfgang in BC should have everything you may need in stock, possibly quicker and cheaper than shipping from EU.
Failing that, always pleased to oblige.
piet
Your wife sounds very understanding…If you don’t try other stuff you don’t realise how good what you already have is