Gold Valve Emulators for Ceriani

That's the Sports Valves advantage: they stay in the fork, and you use a tool to adjust them after pulling the fork cap. Plus, they work on Compression and rebound, where Emulators only work on compression, but they are twice the price of Emulators. Yes the springs must be correct or your pissing into the brezze.
I like the sound of that. I’ll keep them in mind if I ever buy a bike with damper rod forks.b
 
They're pretty clever; I guess if you fettled Mike Halwood's TT comeback, you're a pretty good Engineer. The tool is a big T bar that engages with either the compression or rebound adjuster down the fork's interior. They came on the market a good 6 months after the Emulators went into my 3c. The first set of Emulators I fitted was a few years earlier on my 1982 Husky Automatic. They were a game changer on that bike.
 
When I had my chassis and suspension shop I took the classes and got Race Tech certified. Installed a lot of emulators back then and always had good results. The adjustment process is messy and a PITA, since you have to pull out the springs and fish the emulator out of the tube to make a change. At a certain point the tendency is to just say “good enough” on your own bike.
Spot on - it certainly can be a pain in the ass. This is why I have been pretty detailed on the setup. If I had known about it at the start of this little project it would have been a lot quicker and easier. I have been close to say "good enough" but then I decided to gather all info I can find on the setup and that really helped to understand what I was doing.

Of course there are better solutions, cartridge forks, Sports Valve - you name it. Pricewise, the Gold valves and the proper springs are really good though. This, in combination with some modern radial tyres really did the trick for me. Different bike, better bike altogether. In the end the f%&§$ hassle was worth it.
 
The above is making me think that my Maxtonised Ceriani forks are much easier to live with.
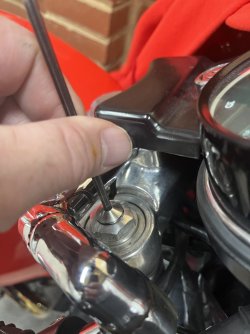
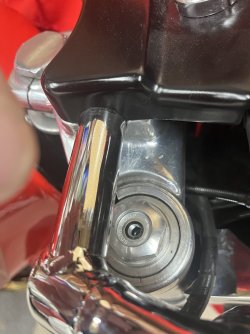
Damping adjustments are a less than five minute job.
Just unscrew the adjuster cover, click up or down. Spring preload adjustments, if required, mean taking the nuts off the bar clamps to move the handlebars out of the way. Remove the top nuts and, after loosening the locknuts, one turn adds or subtracts 1mm of ride height.
Simples!
Maxton Front Damper Adjustment 02.JPGMaxton Front Damper Adjustment 03.JPG

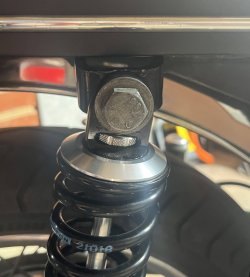
Damping adjustment on the rear shocks is also straightforward.
Maxton T260 Damping Adjuster.jpg
 
The above is making me think that my Maxtonised Ceriani forks are much easier to live with.
Damping adjustments are a less than five minute job.
Just unscrew the adjuster cover, click up or down. Spring preload adjustments, if required, mean taking the nuts off the bar clamps to move the handlebars out of the way. Remove the top nuts and, after loosening the locknuts, one turn adds or subtracts 1mm of ride height.
Simples!


Damping adjustment on the rear shocks is also straightforward.
OK - I'm jealous now...🧐😜
 
You and me both, I enquired years ago, but sending my forks to the other side of the Planet was not going to happen. And then last year, a bunch in the Sydney club somehow did a deal and got a bunch done. Sadly, not me.
 
It's fine, I consoled myself by acquiring Andy's Atlas. I eventually arrived at settings on The Emulators after years of trial and error that work pretty well. The issue for me was being an early buyer; nobody had cracked the appropriate setting, especially for my big bones. My Emulators came with only one high-speed compression hole predrilled. The set I bought a few years later for my Pantah had 2 holes predrilled. I eventually, on advice from Matt, the Race Tech vintage bloke I drilled all 4 high-speed compression holes, and that helped to get the compliant ride I wanted
 
Back
Top