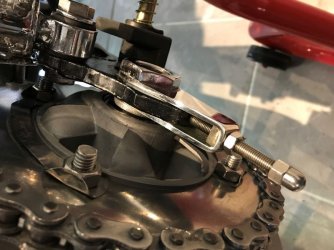
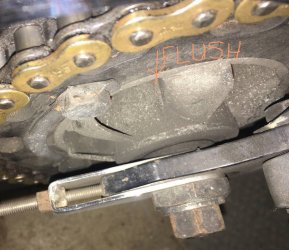
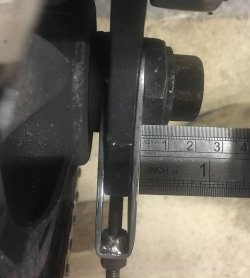
3c cush drive/sprocket carrier question

Spyder31

Junior member
Location
Dublin
When I took the rear apart I photographed the order and direction of parts (in fact I photographed everything multiple times when I take things apart because Im a moron  ::) )

The step on the spacer was facing the hub but there was an additional washer between it and the 36mm nut.
I cant see in the manual if the spacer was facing the right way and there is no additional washer shown.
Is the spacer is facing the right way (IE against the wheel bearing) any idea why the extra washer?
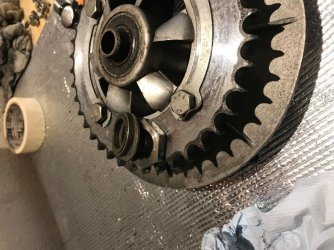
 

Attachments

  • Rear sprocket sml.jpg
    Rear sprocket sml.jpg
    103.7 KB · Views: 296
The narrowed side faces the bearing, you want as much surface bearing against the swingarm for rigidity, and to protect/preserve the chain adjuster.

Lots of bodging goes on in this area.  From an engineering point of view, the hollow axle should not protrude from the flat nut, the axle nut (with washer) bears on the surface of the flat nut, again for rigidity.  In reality, the hollow axle often protrudes from the nut, the axle nut then mangles the end of the thread and the axle needs a hammer to remove it... and the bodging continues.

The thickness of the flat nut varies, maybe from different suppliers/non-OE parts, etc.  Probably heaps of mis-matching gone on in various backyards over the past decades.

piet
 
Like Piet says lots of backyard mods from the past. that stepped washer is about 4 or 5mm thick on the large diameter there is no other washer between the drive and the chain adjuster, the large face against the chain adjuster,  then on the other side of the chain adjuster the washer and nut, but looking at your photo that nut and washer look too thin.
 
Another favourite is to leave the stepped washer out completely bolt the wheel up then ride away and wonder why the lower shock absorber nut breaks the vanes off the sprocket carrier...?
Also found the stepped washer used as a top yoke bearing spacer...? You can't make it up.....
 
Great info, thanks to all.

I assembled it with and without the washer, with the washer I was concerned that the 2mm washer left too few threads for the nut.
Pictured below is it assembled without the washer and the shaft is recessed by about 1mm so I think Im ok with regards interference on the axle nut.
However the clearance between the sprocket bolts and the swinging are is very tight and this may be why the 2mm washer was fitted in the first place.
Im gonna replace the M10 x 40mm sprocket bolts with M10 x 35mm bolts and build it again without the washer.
 

Attachments

  • Cush drive sml.jpg
    Cush drive sml.jpg
    73.7 KB · Views: 212
Yikes.
Bad practice and not very elegant those bolts.
The extra weight is also making you loose 100th of a sec every lap.

Paul
 
You've put the sprocket to hub bolts in the wrong way round, you should always have thread outside of the nut.
Regards Andy
 
Here's a couple of shots of mine for comparison.
It looks like the fitting is a little short. Does it have a washer fitted on the inside?
While you have it off, you might want to trim those bolts to the correct length and fit the nuts in the carrier.
Are you running a 520 chain? It looks like the sprocket is a little thinner than is usual.
 

Attachments

  • IMG_1198.JPG
    IMG_1198.JPG
    151.6 KB · Views: 197
  • IMG_1202.JPG
    IMG_1202.JPG
    94.3 KB · Views: 200
  • Cush drive sml.jpg
    Cush drive sml.jpg
    72.7 KB · Views: 200
laverdas said:
You've put the sprocket to hub bolts in the wrong way round, you should always have thread outside of the nut.
Regards Andy

Fatal flaw in my photograph everything during disassembly methodology, I didn't kook at the photo properly when I reassembled it  :-[
 
Cut the bolts down and refitted correctly, spacer fitted and no washer.
 

Attachments

  • Cush drive sml 2.jpg
    Cush drive sml 2.jpg
    68.3 KB · Views: 198
The Sock said:
Here's a couple of shots of mine for comparison.
It looks like the fitting is a little short. Does it have a washer fitted on the inside?
While you have it off, you might want to trim those bolts to the correct length and fit them nuts in the carrier.
Are you running a 520 chain? It looks like the sprocket is a little thinner than is usual.

Yup 520 chain
 
Don't want to sound padantic but you need thread on the outside of the spindle nut should be a couple of threads. It could be you have to many on the left and the spindle just needs centering.
Regards Andy 😁
 
laverdas said:
Don't want to sound padantic but you need thread on the outside of the spindle nut should be a couple of threads. It could be you have to many on the left and the spindle just needs centering.
Regards Andy 😁

Many thanks for all advice, the spindle isn't inserted as Im waiting for a couple of washers for the outer hardware on the drum to come back from chrome plating.
 
The engineers will be along soon, I'm sure  ;).  But in the meanwhile, I offer you this for your consideration:

1.  Naval Ships' Technical Manual, 075-7.5.1 MINIMUM THREAD PROTRUSION.
<snip>
"Threaded fasteners, when installed and tightened, should protrude a distance of at least one thread beyond the top of the nut or plastic insert."

2.  EN 13480:2002-05
?Nuts must be screwed down onto the bolt so that at least one full thread turn of the bolt protrudes.?

And elsewhere you can read up to 3 protruding threads...  :-X
 
Ventodue said:
The engineers will be along soon, I'm sure  ;).  But in the meanwhile, I offer you this for your consideration:

1.  Naval Ships' Technical Manual, 075-7.5.1 MINIMUM THREAD PROTRUSION.
<snip>
"Threaded fasteners, when installed and tightened, should protrude a distance of at least one thread beyond the top of the nut or plastic insert."

2.  EN 13480:2002-05
?Nuts must be screwed down onto the bolt so that at least one full thread turn of the bolt protrudes.?

And elsewhere you can read up to 3 protruding threads...  :-X
My threads are really sticking out  :P
 

Attachments

  • adjuster sml.jpg
    adjuster sml.jpg
    42.1 KB · Views: 155
Ventodue said:
The engineers will be along soon, I'm sure  ;).  But in the meanwhile, I offer you this for your consideration:

1.  Naval Ships' Technical Manual, 075-7.5.1 MINIMUM THREAD PROTRUSION.
<snip>
"Threaded fasteners, when installed and tightened, should protrude a distance of at least one thread beyond the top of the nut or plastic insert."

2.  EN 13480:2002-05
?Nuts must be screwed down onto the bolt so that at least one full thread turn of the bolt protrudes.?

And elsewhere you can read up to 3 protruding threads...  :-X

That is correct for "normal" fasteners, Craig.  For full load capacity, it is sufficient that all nut threads are completely engaged.  The protrusion stated in manuals is required so that untrained numpties don't use too short fasteners.  The protruding bit has no effect on the qualities of the fastening.

The rear hollow axle isn't normal in this context.  Spyders pics show how it should be.  The axle should have a sturdy washer under the nut, a washer that won't deform under pressure.  This washer should bear on most of the flat nuts' surface to atain as much rigidity as possible.  With the help of the chain adjuster, the hollow axle provides only positive location of the axle, it hasn't anything to do with axle tension, it can be regarded as a spacer.  The flat nut does need to be properly nipped up though. 

Should the hollow axle protrude from the flat nut, the axle nut would bear on the protruding bit only.  Not only is that far too narrow to carry any sort of load, it will deform under the pressure of the axle nut, jamming the axle. 

Ideally, the threaded part would protrude and the axle nut would bear on a washer with a rebate providing space for the protruding thread.  This would space out the RH axle nut even further, neccessitating the the RH silencer to be spaced further outwards to clear it.  It is sometimes quite difficult achieving symmetry and spacing silencers close to the centreline as it is, this would throw an additional spanner in the works.  The factory naver provided a special washer, they took the easy way out and made sure the hollow axle didn't protrude... :D

piet
 
sfcpiet said:
That is correct for "normal" fasteners, Craig.  For full load capacity, it is sufficient that all nut threads are completely engaged.  The protrusion stated in manuals is required so that untrained numpties don't use too short fasteners.  The protruding bit has no effect on the qualities of the fastening.

The rear hollow axle isn't normal in this context.  Spyders pics show how it should be.  The axle should have a sturdy washer under the nut, a washer that won't deform under pressure.  This washer should bear on most of the flat nuts' surface to atain as much rigidity as possible.  With the help of the chain adjuster, the hollow axle provides only positive location of the axle, it hasn't anything to do with axle tension, it can be regarded as a spacer.  The flat nut does need to be properly nipped up though. 

Should the hollow axle protrude from the flat nut, the axle nut would bear on the protruding bit only.  Not only is that far too narrow to carry any sort of load, it will deform under the pressure of the axle nut, jamming the axle. 

Ideally, the threaded part would protrude and the axle nut would bear on a washer with a rebate providing space for the protruding thread.  This would space out the RH axle nut even further, neccessitating the the RH silencer to be spaced further outwards to clear it.  It is sometimes quite difficult achieving symmetry and spacing silencers close to the centreline as it is, this would throw an additional spanner in the works.  The factory naver provided a special washer, they took the easy way out and made sure the hollow axle didn't protrude... :D

piet

I've never done up that flat nut more than slightly. It allows the chain to be tensioned without having to loosen it.
No problem in decades of use and numerous tyre changes.

Paul
 
Paul Marx said:
I've never done up that flat nut more than slightly. It allows the chain to be tensioned without having to loosen it.
No problem in decades of use and numerous tyre changes.

Paul
If it was only meant to be done up slightly, why do you suppose the Factory provided an extension handle in the tool kit?
 

Attachments

  • Laverda tool kit Hub Carrier Spanner(small).jpg
    Laverda tool kit Hub Carrier Spanner(small).jpg
    229.5 KB · Views: 123
Back
Top