
You are using an out of date browser. It may not display this or other websites correctly.
You should upgrade or use an alternative browser.
You should upgrade or use an alternative browser.
750 Zan? cam chain replacement - hints and tips?
- Thread starter Ventodue
- Start date


Ventodue said:Ciao a tutti,
Might finally get round to doing this job later this week. Not done one before, so thought I'd ask before starting :-*.
Any hints and tips beyond what is in the factory workshop manual?
TIA
Craig
One of the easier tasks Craig.

Don't know what the manual says, but I do it like this; remove plugs and find the crank/cam position where all the marks line up and the chain link is between the cam sprockets. Then turn the engine backwards until the link shows up again, split chain, turn the cams so all valves are closed and connect the new chain to the old. Turn the engine forwards, feeding in the new chain. The chain ends will then end up between the sprockets with the correct piston at TDC. Position the cams correctly, hook it all up and you're done. Attaching all the paraphernalia probably takes longer than the actual chain swap.
piet
sfcpiet said:One of the easier tasks Craig.
piet
Ta Piet. You're a good man. Appreciated.
Ciao
Craig
OK, a little more advice please  ...
"Remove the steel wire" is what the manual says. Well, as you can see from the first photo, that ain't gonna happen unless the wire is straightened first. And its good and high tensile ... Or am I missing something?
Which leads me to ...
When I fit the new steel wire - see second photo - am I meant to bend it like the old one? And if so, what's the best way?
..."Remove the steel wire" is what the manual says. Well, as you can see from the first photo, that ain't gonna happen unless the wire is straightened first. And its good and high tensile ... Or am I missing something?
Which leads me to ...
When I fit the new steel wire - see second photo - am I meant to bend it like the old one? And if so, what's the best way?
Attachments
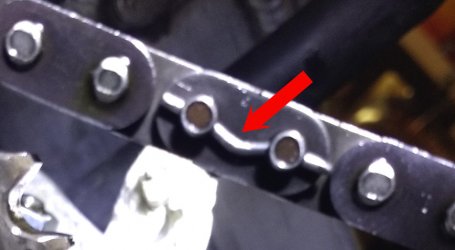
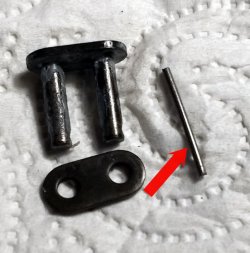
Thanks to the Yahoo Forum - and its contributors - :-*, I think I can answer my own question :
"The bit of wire is in fact very stiff and hard piano wire. With thin-nosed pliers, a bend is made between the pins after insertion, preventing any further movement of the wire. Special pliers were available from the factory, this system has been in use since the inception of the 350/500."
Piet
------------------------------------------------------------------------------------------------------------
"The wire needs to be bent down in the middle & at the ends as well. There is a special tool for doing this. The other option is to use a small chisel, grind a radius on the end so it?s not sharp and then bend the wire down, first in the middle, then at the ends. Have used this method on 668 and Monjuic with success."
Shane
-------------------------------------------------------------------------------------------------------
"There is a Laverda tool [0610008V01902] for putting a kink in the middle of the link wire. Same method was used on earlier Laverdas."
Paul Kelly
------------------------------------------------------------------------------------------------
"I've seen two ways to fit the wire:
1. Bend the ends around the pins like a $ (rotate the dollar sign a quarter)
2. Bend the middle up or down like this -o-/\-o- "
Armand
------------------------------------------------------------------------------------------------
Not a word about any of this in the factory manual, nat' .... Ho, hum. Now need to decide whether to:
a) Cobble up a wire-straightening and bending tool
b) Beg/borrow/steal the real thing
c) Leave the old chain in place.
:"The bit of wire is in fact very stiff and hard piano wire. With thin-nosed pliers, a bend is made between the pins after insertion, preventing any further movement of the wire. Special pliers were available from the factory, this system has been in use since the inception of the 350/500."
Piet
------------------------------------------------------------------------------------------------------------
"The wire needs to be bent down in the middle & at the ends as well. There is a special tool for doing this. The other option is to use a small chisel, grind a radius on the end so it?s not sharp and then bend the wire down, first in the middle, then at the ends. Have used this method on 668 and Monjuic with success."
Shane
-------------------------------------------------------------------------------------------------------
"There is a Laverda tool [0610008V01902] for putting a kink in the middle of the link wire. Same method was used on earlier Laverdas."
Paul Kelly
------------------------------------------------------------------------------------------------
"I've seen two ways to fit the wire:
1. Bend the ends around the pins like a $ (rotate the dollar sign a quarter)
2. Bend the middle up or down like this -o-/\-o- "
Armand
------------------------------------------------------------------------------------------------
Not a word about any of this in the factory manual, nat'
.... Ho, hum. Now need to decide whether to:a) Cobble up a wire-straightening and bending tool
b) Beg/borrow/steal the real thing
c) Leave the old chain in place.

Gravelroad
Hero member
- Location
- Central Europe
[...]
Not a word about any of this in the factory manual, nat' .... Ho, hum. Now need to decide whether to:
a) Cobble up a wire-straightening and bending tool
b) Beg/borrow/steal the real thing
c) Leave the old chain in place.
[/quote]
With a new chain already at hand, I wouldn't bother much with disassembly, pressing out a pin or getting the Dremel out, just choose your preferred weapon of chain destruction.
Grinding down a set of pliers to do the kink job on installment of the new chain shouldn't be that difficult either. :
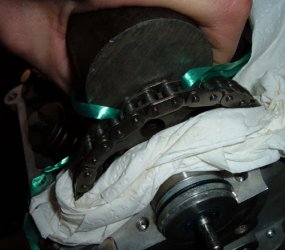
Just wondering about that strange connecting link. My Husky 350 has a DID 219 cam chain with similar tiny pitch like the Zane chain, but it has just a simple rivet link. I simply have to press on the plate, check for correct clearance with a feeler gauge and then two decent whacks with the hammer, job done. Picture below is taken just before the hammer came down. That four valve thumper puts alot of strain on its cam chain, but I have never seen one of those rivet links failing.
Not a word about any of this in the factory manual, nat'
.... Ho, hum. Now need to decide whether to:a) Cobble up a wire-straightening and bending tool
b) Beg/borrow/steal the real thing
c) Leave the old chain in place.
[/quote]
With a new chain already at hand, I wouldn't bother much with disassembly, pressing out a pin or getting the Dremel out, just choose your preferred weapon of chain destruction.
Grinding down a set of pliers to do the kink job on installment of the new chain shouldn't be that difficult either. :
Just wondering about that strange connecting link. My Husky 350 has a DID 219 cam chain with similar tiny pitch like the Zane chain, but it has just a simple rivet link. I simply have to press on the plate, check for correct clearance with a feeler gauge and then two decent whacks with the hammer, job done. Picture below is taken just before the hammer came down. That four valve thumper puts alot of strain on its cam chain, but I have never seen one of those rivet links failing.
Attachments

Gravelroad
Hero member
- Location
- Central Europe
Probably not for the faint hearted, but don't worry Pat, the counterweight does the trick. You only have to know how to handle a hammer. 250g hammer is big enough, just do not use a sledge hammer for this job.
You only have to know how to handle a hammer. 250g hammer is big enough, just do not use a sledge hammer for this job. 

Dellortoman
Hero member
- Location
- Tasmania, Australia
Ventodue said:Not a word about any of this in the factory manual, nat'
a) Cobble up a wire-straightening and bending tool
b) Beg/borrow/steal the real thing
c) Leave the old chain in place.
I wouldn't mess around trying to manufacture a special tool. You don't need to straighten the old wire pin. Just cut the bugger with side cutters, a Dremel or some other suitable implement of destruction. Make sure you have plenty of rags stuffed in the chain tunnel and over the engine to prevent any bits of pin or grindings getting anywhere it shouldn't.
New pin could be bent by giving it a whack with a cold chisel or screwdriver as per Piet's method.
Interesting retaining device. Never seen one like that before but it looks like it would be more secure than a spring clip.

LaverdaIan
Hero member
Been doing it for years with Monty..
Standard wire is pretty brittle though, kept breaking during use, particularly if I had used the blunt drift method...and so have been using some 1.2mm modelling piano wire with a pair of modified pliers to bend the wire.. seems to be a better solution for me..
8)
Standard wire is pretty brittle though, kept breaking during use, particularly if I had used the blunt drift method...and so have been using some 1.2mm modelling piano wire with a pair of modified pliers to bend the wire.. seems to be a better solution for me..
8)