best and brightest SILVER colour available??

?425 does sound a very keen price - last paint shop I spoke to wanted ?1k to do the SFC and that's just a plain red, no pinstriping or anything.

That was way too much so I dug out some black Hammerite & the roller I used on the fence  :D
 
I can get bodywork, frame plus brackets etc, wheels done for around ?1000 here.
 
sfc1000uk said:
?425 does sound a very keen price - last paint shop I spoke to wanted ?1k to do the SFC and that's just a plain red, no pinstriping or anything.

That was way too much so I dug out some black Hammerite & the roller I used on the fence  :D

He"s good about ?120 for a tank Dave Addis in Bromsgove in list of suppliers recommendations etc on ILOC forum, take my frames /bits to my welding mate who has a powdercoater too, usually around?100 cash.Have to say Bob I was pleased with his spraying invoice, :D,
 
so the project is now officially going to be silver, close to stock.

I cleaned up the bodywork in a large sink full of hot soapy water, first time I have really looked closely. The painted metal front fender is dented and tweaked and creased from the crash that parked the bike back in 1999, and will need some massaging after being stripped back to bare metal.

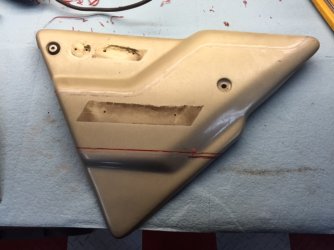
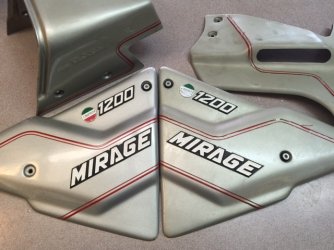
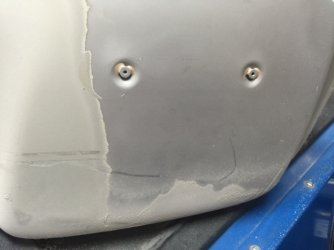
The bike was left outside for 14 years without being moved, up against an outside garage wall and partially under an overhanging eave. I hadn't noticed before, but al the bodywork on the side of the bike that was against the wall is actually pretty good, pin striping still in good shape, clear coat still shiny, silver still actually silver, while the bodywork from the exposed side of the bike is just toast, clear coat gone, pin striping dried out and shredding off, paint texture like sandpaper and a total colour deterioration to a sort of yellowish mud. The tail piece is the funniest in a sad sort of way, as it is sort of half and half.......

as the non exposed side panel is in pretty good shape, I washed and polished it and took it to the body shop paint supplier I use, for a colour reference.

The silver now chosen (from colour samples compared to the stock paint) is a slightly coarser metal flake and much" brighter" silver but in the same general colour range. For a silver I think it is quite attractive, although I was waffling to the very end over candy apple red instead........ :o I am committed now as the silver has been purchased.

this time around I am going water based paint and air dry clear. Long story short, for top quality etching primer, high build primer, two part urethane repair supplies for the various cracks in the GRP, colour coat, ultra high gloss clear and reducer, etc., it all came to $478 CDN at trade pricing. There is likely a week's worth of preparation work needed, or more, and I am going to spray the water based product in the side/downdraft rental paint booth, at $75 per hour. I am also going to be using a new "air dry" clear that apparently sets up quite quickly and can be cut and polished within an hour of having been sprayed, although I will likely still let it set up for a day or three before tackling the final polish. I chose it mainly for its quick dry time so I can get the parts out of the rental paint booth more quickly and keep my paint booth rental time costs under control.

I also found dual pin striping tape that is very very close in size, spacing, and colour, but of course I went a bit brighter red as well.......

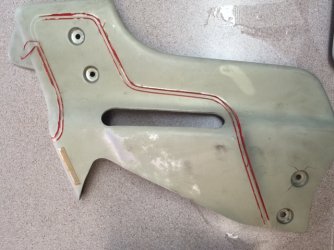
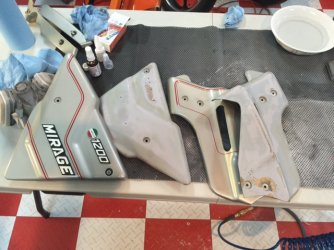
a couple of photos of what I am starting with. I am going to be painting the stock TS Mirage fairing, as well as a fiberglass 82 Jota fairing I also happen to have (damaged but repairable), so the bike can have three looks, without fairing, with stock TS fairing with stock blue windscreen, and with 82 Jota fairing. I have all the brackets, screens, turn signals, etc. Nice to have a parts bin at the back of the garage........... ;)

Paul LeClair

ps I just finished using the chemical stripper to take the rest of the paint and primer off both the fuel tank and the painted front fender. Astonishing how much rust was underneath the paint, same as all the rust under the frame paint when I stripped the frame for paint some time ago. I swear Laverda just painted right over rust at the factory......
 

Attachments

  • TS 1.jpg
    TS 1.jpg
    119.3 KB · Views: 17
  • TS 2.jpg
    TS 2.jpg
    73.6 KB · Views: 8
  • TS 3.jpg
    TS 3.jpg
    116.5 KB · Views: 12
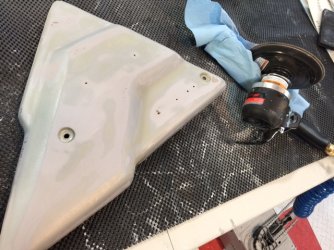
a couple of photos of paint prep progress being made.

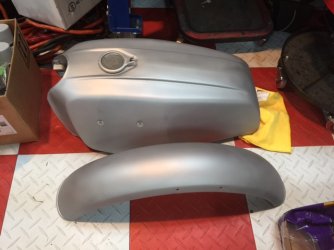
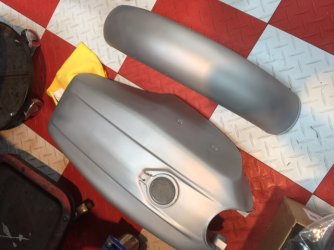
the steel tank and steel front fender are bare metal, ready for the first acid etch coat of primer. Took me a couple of hours of delicate bashing with various shaped dollies and various bodywork hammers to straighten the fender and take 98% of the crash damage out of it. Neither the tank nor the fender will require much body filler, just a dab here and there, then a sand, a spray of guide coat, and another sanding. I am going to try to get them both as perfect as I can before I even spray the high build primer.

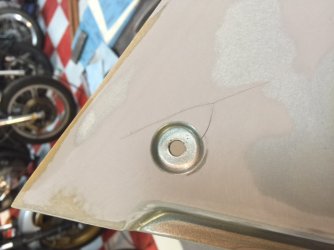
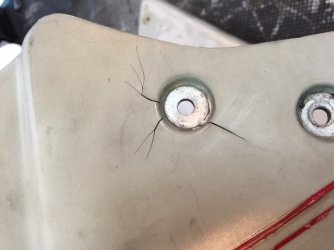
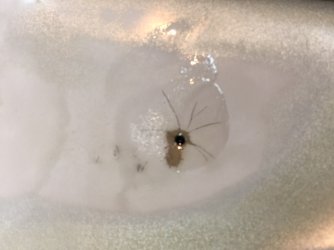
just starting on all the GRP panels, the pin striping and badging has to come off, then all the panels need to be sanded down through the clear coat into the colour coat. There are a fair number of spider type cracks in the GRP that need repairing, I have bought the proper two part adhesive filler to use after I sand down deep into the cracks, should prevent them from coming back. I also have a damaged TS fairing to repair, and a damaged 82 Jota fairing to repair, I picked up some fiberglass cloth and resin, and some fiberglass specific Bondo, and I will get to work on the two fairings after all the other panels are prepped. I suspect I am probably at least two weeks or more away from actually spraying any paint........ Most of the quality of the paint job is in the details of the actual bodywork prep, and I am a bit of a perfectionist.

I was astonished at how much rust was underneath the original paint of the steel tank, and how much rust was underneath the original paint of the steel front fender. It was a major project to get the prep to actual clean unblemished steel, it took aircraft paint stripper then a combination of bead blasting and a dual action air driven sander with 180 grit.

Paul LeClair
 

Attachments

  • paint strip 1.jpg
    paint strip 1.jpg
    89.3 KB · Views: 18
  • paint strip 2.jpg
    paint strip 2.jpg
    94.8 KB · Views: 16
  • paint strip 3.jpg
    paint strip 3.jpg
    113.9 KB · Views: 17
I started hand sanding one of the GRP side panels this evening. The material releases the strangest smell once I get down though the colour coat, I can't put my finger (nose) on exactly what it smells like, just very odd and very distinctive...........

Paul LeClair
 
Paul LeClair said:
I started hand sanding one of the GRP side panels this evening. The material releases the strangest smell once I get down though the colour coat, I can't put my finger (nose) on exactly what it smells like, just very odd and very distinctive...........

Paul LeClair

You are right Paul, I had the same experience with Jota side covers, smells like burnt PVC.
Buggered if I know why.
 
hand sanding the GRP panels got old really quickly. I went out and bought an air driven 6 inch dual action sander........ ;)

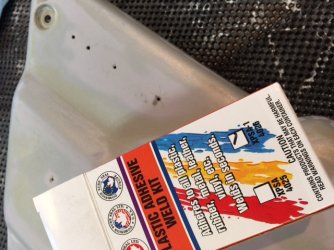
there are a lot of cracks in the GRP panels, I thought it might just be in the paint but they go all the way down into the GRP itself. So, bought some Plastic Weld, sanded down the cracks, washed them well, then soaked them in the super glue, flexed them as best I could to work the glue down into the cracks, then sprayed the weld activator which seems to cause the glue to kind of melt into the plastic itself.

the tank and front fender are in bare metal, and I have completed the sanding of the tail piece, both engine cover panels, one of the side panels and started on the second, so just the little under seat strips, the TS Mirage fairing, and the 82 Jota fairing to go and then I can spray the first coat of primer.......... both the TS Mirage fairing and the 82 Jota fairing have been crashed and need considerable repair work, I am going to use a really trick two part urethane adhesive the paint and body shop supply place highly recommended, we'll see how that stuff actually works.

Paul LeClair
 

Attachments

  • Prep 4.jpg
    Prep 4.jpg
    83.8 KB · Views: 8
  • Prep 3.jpg
    Prep 3.jpg
    83.3 KB · Views: 6
  • Prep 2.jpg
    Prep 2.jpg
    62.9 KB · Views: 10
  • Prep 1.jpg
    Prep 1.jpg
    125.7 KB · Views: 13
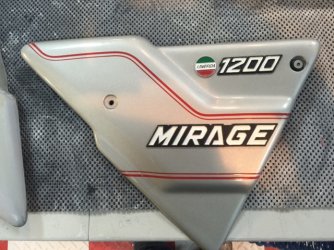
couple more photos, the "Prep 7" photo is of the very best panel/paint on the bike, it is what I used to colour match the red pinstriping and to pick a silver metallic from at the paint supply shop.

Paul LeClair
 

Attachments

  • Prep 5.jpg
    Prep 5.jpg
    132.2 KB · Views: 13
  • Prep 6.jpg
    Prep 6.jpg
    131.6 KB · Views: 11
  • Prep 7.jpg
    Prep 7.jpg
    155.9 KB · Views: 15
nicely done, paul - i'm interested in that weld activator. i presume it's a two pack of some kind and you just used the activator part by itself to get that 'melting together' effect - am i correct? do you know what the activator is? i can't find a product called 'plastic weld'
 
Hi Henry

the packaging just calls it "Activator", sorry, I don't know what it actually is. [EDIT looks from the safety info it is largely acetone with some undisclosed "proprietary" other ingredients]

I get all my stuff from a commercial autobody shop supply place where I have a wholesale account. The Plastic Adhesive Weld Kit is a commercial product packaged by The Dominion Sure Seal Group, apparently made in the U.S.A.

rather than me trying to describe the product, here is a direct product link to the website. The company makes a huge range of bonding products for commercial use.

http://dominionsureseal.com/index.php?option=com_djcatalog2&view=item&id=158:plastic-surgery-adhesive-weld-kit-&cid=14:plastic-repair

best practice is to apply it to both sides of the cracks, flex the cracks to try and get the bonding agent into the cracks, then spray the activator. Whatever the activator is, there is a really obvious chemical reaction, the bonding agent (some sort of super glue) sizzles, turns yellow then whiteish, and the stuff sets up solid in seconds. There is also an adhesive and flexible plastic specific body filler to be used with it, a flexible plastic primer, etc., a whole range of commercial plastic repair products.

apparently body shops use these products for a wide range of plastics, including bumper repair. I don't think it is readily available for retail sale, you would likely have to find a trade supplier or have me ship you some. The packaging has all sorts of safety warnings about being harmful to health, etc, and I have been wearing a high quality respirator when using the Plastic Adhesive as well as when spraying the solvent based acid etching primer for bare metal, and the high solids high build primer I am using.

I spent most of the evening spraying three coats of high build primer on GRP bodywork, and the first coat of acid etching primer on the bare metal fuel tank. I made a rudimentary spray booth to contain the overspray, but as the heated garage is attached to the house the solvent  vapours have been making their way into the house even with the door closed and I am none too popular in the household at the moment......... :o ;) For the colour coat and the clear, I am going to rent the use of a pro side/downdraft paint booth. I have a ton more prep and sanding to go, I am still a long way away from being ready to spray colour/clear.

Paul LeClair
 
moving on to paint prep for the 1200 tank. Stripped it to clean bare metal, used a torch to "pop" almost all of the dents out of it, then sandblasted it, then sanded it. I stripped the entire tank, including its underside, there is no paint, primer, or filler left on the tank anywhere, I am starting from a totally clean bare surface. Same with the metal front fender, which is prepped but not yet etch primed.

in bare metal, it looks like I will only have one tiny remaining dent to touch up with a small bit of filler, it is right on a point of two creases and I just could not get it all the way out. But, once I get the high build primer on the tank I will be able to really see how straight everything is or is not, and go from there.

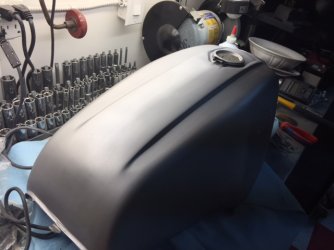
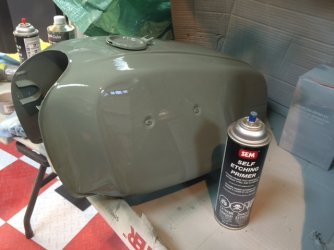
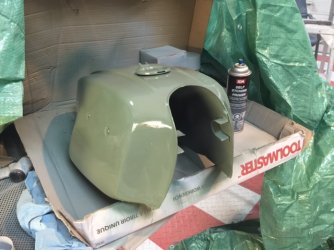
a couple of photos, tank in bare metal, and then first spray coat of acid etching primer, which is a peculiar shade of green....... As I am not building my own spray booth in my garage this time around, I am using pro spray cans in a very very rudimentary enclosure ( an old tarp and half a cardboard box) to contain the overspray from the primer..... :o 8). I will lightly sand the etch primer, then will spray two coast of high build primer, then a black guide coat, and start wet sanding. Once I know where filler is required, if any, I will do final prep, then a final and third coat of high build primer, then a final wet sand to 400 grit, and it will then be ready to take to the rental pro side/downdraft paint booth for colour and clear. I am using water base colour this time with a fresh appropriate tip in my anodized HVLP gun.

Paul LeClair
 

Attachments

  • bare metal 1200 tank.jpg
    bare metal 1200 tank.jpg
    84 KB · Views: 21
  • Etch primed 1200 tank 1.jpg
    Etch primed 1200 tank 1.jpg
    90.8 KB · Views: 27
  • Etch primed 1200 tank 2.jpg
    Etch primed 1200 tank 2.jpg
    110.5 KB · Views: 16
Paul-consider using 600-800 paper for final primer sanding as it will greatly reduce scratches in the final finish and also consider extending primer and clearcoat drying times well beyond manufacturer's recommendations.  Production body shops deal with the time/money equation and in most cases pound product on whereas your obvious concern is a top quality finish that looks great 6 months later w/o shrinkage or solvent bleed through. Remember to re-mask after each step. Looking forward to the finished product.
Bob-
 
Paul,

Could you explain more about "popping" the dents out with a torch. I've got several steel & aluminum tanks that I'd like to save, most dents aren't creased. But I've seen how pressurizing to get the dents out can ruin a tank.

Thanks,
Wayne
 
IAG said:
Paul-consider using 600-800 paper for final primer sanding as it will greatly reduce scratches in the final finish and also consider extending primer and clearcoat drying times well beyond manufacturer's recommendations.  Production body shops deal with the time/money equation and in most cases pound product on whereas your obvious concern is a top quality finish that looks great 6 months later w/o shrinkage or solvent bleed through. Remember to re-mask after each step. Looking forward to the finished product.
Bob-

Hi Bob

On my last three home motorcycle paint jobs I have done my final finish sanding of the high build primer with 800 grit, the body shop supply folks wince when we discuss that, their recommendation is to go to a maximum of 400 grit to leave some "teeth" for the colour coat to grab on to. After doing all this laborious prep, I want as close to a perfect surface to spray the colour coat on to, and I agree with your recommendation. For the primers, I spray consecutive coats about every 15 minutes, time enough for the solvent to do a basic flash, but before it cures. I wait at least overnight before touching anything with a sander, sometimes longer. I am also going to give all the final primed and final sanded pieces a "rest" of a couple of days before I go to the paint booth to spray colour and clear. I am using a quick set clear this time, first time to try this product, but at $75 per hour for paint booth time I need to be able to remove the parts relatively quickly. I will let them sit for at least a week, maybe longer, once I get them home before starting the final polish steps. Prep and care are the keys.

my very first Laverda paint job I did in 1999, high gloss black, it still looks superb, I re polish it every couple of years, I typically spray a LOT of clear so that I have a lot of material to cut and polish into the future.

thanks for the info and recommendations!

Paul LeClair
 
yup good point my sprayer guy does at least 15 layers of Lacquer.
 
Back
Top