best and brightest SILVER colour available??

SimonR501 said:
Sorry to hear of the damage to finger Paul!

I take it the Kia got the 'John Cleese' treatment after it wouldn't start one day, albeit without a tree branch?

Hi Simon

unfortunately no, the Kia was and is running fine, the "kid" was just bored and looking for something to shoot........ >:( >:( >:( :(

body work guide coat and final sand sanding is continuing today, I am still avoiding finishing the fiberglass work on the Jota fairing for now :o ;)

Paul LeClair
 
I used to work in a tool store. One local bloke decided to use metal cut off discs designed for a power saw on his 9 inch grinder because he couldn't be bothered driving to the store to get the correct disc. Arbor hole in the disc was way too big so he just did it up tighty tight. Disc wouldn't fit on with the guard so he too the guard off. Disc fragmented and nearly took his head off - deadydead.

A week later we had a carpenter working on the local hospital development come in to see if we could remove the guard from his power saw as he was sick of having to move it out of the way to start sawing - told him where he could go.
 
I'm sorry to hear what happened to Paul, and I can relate to his experience. 25 years ago a big 230mm angle grinder went into my left knee while I was cutting some Unistrut. I had taped the on/off button down so I could maneuver the beast easier with 2 hands. The grinder kicked back and made it's way into my knee. Still feel that day when the weather changes...

Problem with non-commercial grinders is the size of the grinders and discs. You want to work on something that's just to big for that 115mm blade and you remove the guard. The local DIY or Tool Shops don't carry the smaller grinders that Autobody or machine shops use, so the guards come off.

After one or more close encounters the safety googles (which have collected dust for years on the tool board) are finally used and possibly some decent gloves. Tell me it ain't so :-X
 
We got buggar all training on Power Tool as an Apprentice Carpenter at TAFE 35 years ago,nothing on table saws ,10 minutes using a Radial Arm saw,most of that ripping.In 35 years in the trade I have NEVER even thought of using a Radial Arm saw for ripping.On the last day we did get to see a safely film that stayed with me,don't know who did the special effects but seeing a bloke get most of his fingers removed in a jointer with plenty of bloody for good measure and another bloke have a length of 2x2 speared right through him coming out of a table saw with assorted guts protruing.This was right up there with John Carpenters film The Thing.They must have used a bloke with no fingers in the film,it was very effective.Never seen another film like it and haven't asked anyone else if they have.
 
One place I worked at banned electric grinders over 5".
Reason was simple as when the bigger electric grinders get something stuck in them - like a hand or leg,  they pull more juice and keep going + they have a lot of inertia with the weight of the rotor.

The electric versions were replaced with air grinders - when something gets jammed in them they just stop. Not saying you won't get hurt, but nowhere near so bad.
 
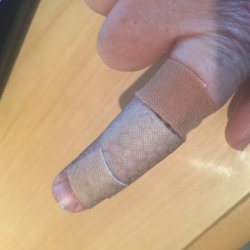
with my small grinder accident, I had not only taken off the guard, I had also removed the handle, and wasn't wearing gloves. As I was twisting the grinder around inside the circumference of the headlight opening in the Jota fairing under repair, I turned it directly onto the top of my own right forefinger..... My own fault. I was wearing safety glasses though so at least the blood spatter didn't get in my eyes ;)

it is absolutely astonishing how much work thorough paint preparation is. I have one side panel to finish repairing. It is from the side of the bike that sat outside facing the weather from 1999 to 2013 and was terribly weathered. It has taken a fair bit of plastic specific body filler to deal with the weathered plastic. Then I have the Jota fairing to finish repairing, then high build primer, then guide coat sanding, then final priming, then final sanding for the last side cover and the Jota fairing. Everything else is done. Then I will bring all the bodywork bits out into a really bright light and check everything over one last time. Once I am finally done, I will book the paint booth rental and get on to actually spraying. I figure easily 25 - 30  hours of body work and prep, should take maybe an hour and half to spray colour coat and several coats of clear, then let everything set for a few days, then begin the cut and polish process.

Paul LeClair
 
now have the splint off my right forefinger, but still banged up. Itching like crazy as it heals. Anyway, won't be doing that again, the guard is back on the grinder............. :-X

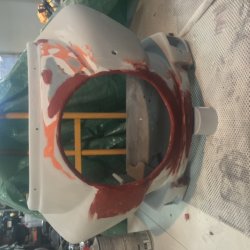
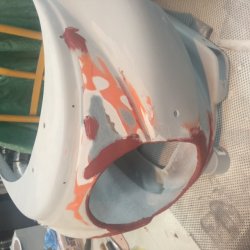
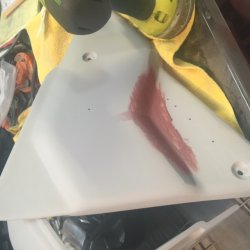
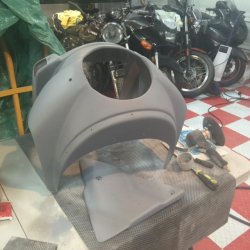
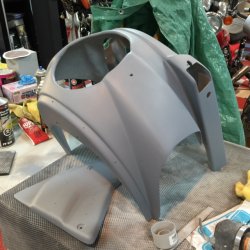
now back at the bodywork prep. The left side panel was facing the weather for 13+ years outside, and was quite weathered and degraded. It now weighs roughly twice as much as the other side panel with all the plastic body filler I have had to use to fix the degraded profile of the panel, but I am now to final detailing. Then the final thing to finish will be the Jota fairing, which was basically broken into three or four pieces from when it was crashed. All the heavy fiberglass and fiberglass filler repair is now done, I now have the headlight opening pretty good but needing some final fettling, and now I am doing surface prep with final surface filler.

a couple of photos.

I am almost ready to go to paint, problem at the moment is I can't pull the trigger of my paint gun, bloody hell.......... ???

a question - what were the inner side of the TS Mirage fairing and the Jota fairing painted with? I have seen them with some sort of black coating? I am thinking maybe a rubberized black automotive undercoating? What was used from the factory, does anyone know?

Paul LeClair
 

Attachments

  • finger.jpg
    finger.jpg
    88.3 KB · Views: 4
  • Jota 1.jpg
    Jota 1.jpg
    122.9 KB · Views: 12
  • Jota 2.jpg
    Jota 2.jpg
    114.1 KB · Views: 6
  • side panel.jpg
    side panel.jpg
    92.4 KB · Views: 7
nearly there, need several small touch-ups on the repaired Jota fairing, and to refine the headlight opening, then will spray guide coat and start final sanding prep. The final side cover needs the same. I figure another two days or so, max, then I will check everything over a final time under a very bright light, and start thinking about renting spray booth time......

Hi Simon

the crashed Jota fairing had some sort of black paint on the inside, whatever it was I blasted it all off. I am actually thinking about some sort of rubberized undercoating, would hide all the fiberglass repairs, and maybe quiet the fairing down a bit as well.

Paul LeClair
 

Attachments

  • nearly there 1.jpg
    nearly there 1.jpg
    55.8 KB · Views: 7
  • nearly there 2.jpg
    nearly there 2.jpg
    159.9 KB · Views: 12
All your tool stories boys show lack of respect for the tool, that is why they hurt you, it's either that or using excessive force generally, I see so may idiots using power tools it's not funny,  as Vince said no one takes the time to explain how to use them correctly, most recent was a guy drilling 25 mm holes through a ply template for hold down bolts. He had a perfectly good bucket that he was leaning his leg on so he could hold the template on his thigh to drill the holes, naturally I corrected his procedure, the ironic thing was he had inducted me 2  days before and duly informed me that he was the workplace health and safety rep for the job

Paul, air tools are soooo cheap, go buy some.....
 
Cosi said:
All your tool stories boys show lack of respect for the tool, that is why they hurt you, it's either that or using excessive force generally, I see so may idiots using power tools it's not funny,  as Vince said no one takes the time to explain how to use them correctly, most recent was a guy drilling 25 mm holes through a ply template for hold down bolts. He had a perfectly good bucket that he was leaning his leg on so he could hold the template on his thigh to drill the holes, naturally I corrected his procedure, the ironic thing was he had inducted me 2  days before and duly informed me that he was the workplace health and safety rep for the job

Paul, air tools are soooo cheap, go buy some.....

Hi Cosi

I have a three cylinder 80 gallon air compressor, an air distribution system all through the garage, and lots of air tools. I have been mainly using a dual action 6 inch air sander for the bodywork, as well as an inline small air driven "jitterbug" sander. I am not sure why I have never bought an air driven grinder before, I have added one to the shopping list......

Hi IAG

thanks for the references on the black undercoating products!

Paul LeClair
 
all the bodywork is now finished, all the high build primer is sanded out, everything is washed down with the appropriate paint prep cleaner, and everything is wiped down with painters tack cloth.

what a ton of bloody work!

ready to spray paint finally, but have to let my right forefinger heal enough that I can then use a paint gun, not a bad idea to let all the prepped parts "rest" for a few days anyways just to be sure everything is truly fully set, especially the major repairs to the previously crashed Jota fairing.

Paul LeClair
 
Paul LeClair said:
... but have to let my right forefinger heal enough that I can then use a paint gun

So what's wrong with your left hand? You don't need to be super dextrous to squirt paint in the general direction of your target.  :)

I like to do things with both hands to maintain a certain level of ambidextrousness (is that a word? how about ambidextrosity?). I started doing it in high school in sympathy with a school mate who lost his right hand in an accident.
 
Dellortoman said:
So what's wrong with your left hand? You don't need to be super dextrous to squirt paint in the general direction of your target.  :)

I like to do things with both hands to maintain a certain level of ambidextrousness (is that a word? how about ambidextrosity?). I started doing it in high school in sympathy with a school mate who lost his right hand in an accident.

I am just barely good enough spraying paint with my dominant hand, not ambidextrous enough to risk it, way to much work into the materials prep to add further risk to screwing it all up at this point.......  :o

I am today calling to see about what times/dates are available for the paint booth rental.

Paul
 
Did you test fit the headlamp in the fairing, mounted on the fairing bracket?
It doesn't take much repair work in the opening to make it a very tight fit.
 
Grant said:
Did you test fit the headlamp in the fairing, mounted on the fairing bracket?
It doesn't take much repair work in the opening to make it a very tight fit.

Hi Grant

yes I did a test fit, thanks for your original suggestion. That is partly what led to my small grinder accident, when the headlight did not fit in the fairing properly during the test fit, I was then using the electric metal grinder to trim up the headlight opening which had "shrunk" from the extensive fiberglass repairs. After my little grinder accident, I finished trimming up the headlight opening with a coarse file, much safer ;)

I have booked the professional side/down draft paint booth, at $75 per hour, for a couple of hours starting at 9:00 am Saturday March 07, 2015, fingers crossed my spraying of colour and clear goes OK, I have had considerable success with solvent based paint in the past, this is my first real attempt with the newer water base paint ...... Photos to follow after painting...... :-\

Paul LeClair
 
laverdakeith said:
$75 per hour  :o Does that come with a painter?
      Keith

Hi Keith

http://www.u-wrench.ca/default.htm

nope, $75 per hour for the pro side/downdraft paint booth for the time the big fans are running. There is only one paint booth, and it is the only rental pro booth in the City. There are four preparation bays, at $35 per hour for the prep bay, but I did all my prep and all my primer spraying, at home in my own garage.

It is apparently possible to hire a painter to do the actual spraying for you, for an additional $75 per hour, but where is the fun in that? Also, as far as I am concerned the actual spraying is the easiest part of the entire process. I have already done all the hard work, now I want the satisfaction of spraying all the bodywork myself as well...!!

Two coats of colour, then at least 5 or 6 coats of clear, if not more, I would say absolute max of three hours of paint booth time with the fans running. I am using a really quick set high gloss clear to reduce the amount of booth time. So, $225 max for the paint booth time seems like a pretty good deal to me, it would cost me at least that much to build myself another temporary spray booth in my own garage but I still would not get the kind of air flow of the rental pro booth.

I have done absolutely everything on this project myself, from sandblasting and painting the bare frame, to the complete engine rebuild (right down to honing the cylinder bores and hand lapping in the valves, welding on new battery hold down brackets, etc.), to absolutely everything else, even the seat re covering, and now the paint prep, and the paint. How many home rebuilders can say that? There is a certain pride in an amateur being able to do pretty much everything, and do it really well, with skills developed over 40 + years. Obviously not the machining skills you pros have, but still I am pretty proud of what has been accomplished here.

Paul LeClair
 
Back
Top