Best ways to shape fiberglass for faring repairs?

Paul LeClair

Administrator
Staff member
I figure some of you old pros know all the tricks and may be willing to share....

as I mentioned elsewhere here on the forum, my girlfriend recently low sided her beloved fully faired Kawasaki EX 250 Ninja, which if claimed through insurance would be a write off, so no insurance claim will be made.

I also have a 1982 Jota fairing sitting here on the shelf from a crashed Jota, which I have been meaning to repair and repaint, so I figure I will do all the fiberglass work at once on both projects.

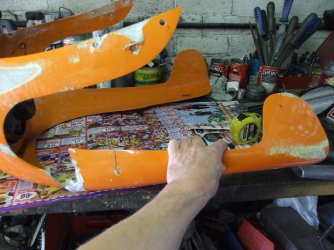
I usually work on the principal that "more is better" when laying up fiberglass repairs, and that will be especially true with my girlfriends 250 which is completely missing sections of the upper and lower fairings. So, I have gone ahead and used the broken windscreen pieces as gap fillers, cut to shape with a Dremel tool, then laid two layers of cloth and resin on the inside, and one layer (so far) on the outside.

I hate sanding. To repeat, I hate sanding. So, my major question is what is the best but quick way to smooth and shape fiberglass repairs with either power or hand tools? Once I get all the curves relatively close, I will use a premium bodyfiller to get the final surface before high build primer, but I have a fair bit of raw fiberglass shaping to do, so.....?

all suggestions and words of wisdom gratefully received, thanks.

While the fiberglass is drying, I am cutting and welding up new fairing mount brackets and headlight mount, and I just ordered a used headlight off of eBay for $30 plus $20 shipping, $50 is way better than the almost $300 the local Kawasaki stealer wants...... and with my recently honed painting experience, I am just debating what colour to do the presently black tank and all the bodywork, I am leaning to fluorescent day glow green myself with prismatic sparkle flake, but I guess I should ask my girlfiend........ :D

Paul LeClair
 
Wouldn't you accept the insurance write off then buy the bike back for a pittance? That's pretty coommon over here. Then you have some money to spend on the repairs.

As to shaping fibreglass, sorry but sanding whether by hand or machine is unavoidable. I would feather out any breaks or holes at least 2 inches back from the edges then lay up the glass, totally covering it for the first layer/s then sand it all level with an orbital sander. If you don't like being covered in itchy glass dust then you can get cheap paper coveralls.


when the insurance here writes a bike or car off, the title of the vehicle is annotated with a "written off" notice, which then stays with the vehicle for the rest if its life and dramatically downgrades its saleability and value. As well, the vehicle has to go through a costly and stringent inspection before it can be returned to the road.

bottom line is that to fix the little 250 with new parts from the Kawasaki stealer, without labour, parts only, would be roughly $3,500 -4,000....I am betting I can fix it for less than $350 including shipping (plus paint when I get to that this winter, another $100 + in materials) with cheap parts sourced off eBay. I have already found almost all the needed bits from one eBay seller in California and they are on their way...

I hate sanding, I went at the fiberglass with a belt sander and a coarse belt, made quick work of the rough shaping.... :o and the first coat of body filler is hardening as I type, I would rather sand body filler than fiberglass.

Paul LeClair
 
Sanding fibreglass,the worst job I ever had was grinding the fibreglass liner off an in ground pool for the 112 richest bloke in OZ,it took 2 weeks and was far worse than you would think
 
Unless the Ninja has recieved a set of aftermarket bodywork in its past history all of the fairing parts are plastic. If plastic is the case you have a couple of options. The first is to do plastic welding. This is fairly simple and requires a small Dremel (to cut a groove for welding material), a heat gun with a reducer tip (so the heat goes only where you need it to instead of everywhere), and the proper type of plastic welding rod. Practice first on scrap parts to get a feel for it but overall it is very straightforward. The key is using the proper plastic rod as there are several different types. Here in Germany all of this is readily available at almost all builder's supply type places. The second option is to simply glue the whole mess back together. The companies Berner and W?rth both offer two component glues that work amazing well for repairing plastic and I'm sure there are other suppliers for the same stuff. This stuff is designed to fix car bumpers (among other things) and afterwards the repaired area is stronger than the rest. The glue usually comes with two tubes together requiring a special mixer tube and "pusher" gun. You can most likely get more info of what's available in your neck of the woods from any car body repair shop/painter.

Tom
 
Hi Tom and all

first thing I did was check for aftermarket bodywork sets from China for the 250....turns out that the Canadian model is a ZZR 250 and the bodywork and brackets are all different than the U.S. 250 models for which the aftermarket bodywork sets are made.

I actually know how to plastic weld, and among other things in a past career plastic welded all sorts of plastic water holding tanks, etc. But, to plastic weld something you have to have the pieces to weld back together, and hittng the rock face just shattered and destroyed all the plastics, there are a lot of pieces, and a lot of missing pieces, which is why I pieced the stuff together as best I could with JB Weld, then used pieces of the shattered windscreen (same thickness as the plastic bodywork) which I cut to size with a Dremel to fill in the gaps of all the missing pieces in the fairings, then laid sheet fiberglass and resin over the entire mess to consolidate it al........

all the mechanical bits seem to be the same between the U.S. and Canadian model, so all the necessary mechanical bits are on there way from a bike wrecker in California, but the plastics is an entirely different story. I am concentrating on getting the bike back on the road quickly for my girlfriend for the rest of this summer riding season, likely as a streetfighter sort of thing for now, then I'll get serious about the rest of the plastics and the paint once the riding season ends and the bikes all get laid up for the winter.

I hate sanding, but the stage I am at now I have roughed the fiberglass into shape with a belt sander and done a heavy skim coat of body filler over the entire mess, I should be able to shape the body filler into an acceptable final result for the upper fairing that the headlight mounts into, I have welded up the new metal mounting brackets out of half inch solid mild steel rod, and I have the guages back into the new mounting brackets and functioning....the repaired body panels are going to be a lot thicker and heavier than the original plastics, and in the meantime I'll keep scouring the local bike wreckers for a Canadian 250 come to harm that could donate its plastics, hopefully......

and I hate sanding.......

Paul LeClair
 
Hi Paul ,
Sanding with a power tool on a small item like a fairing is quite tricky, they're just too fierce.
Here's a few tips regarding trimming fairings;

Goggles and mask are desireable

A Dremel with a diamond cut off wheel is fairly essential.

When cutting fibreglass or carbon I usually give my arms and face a liberal coating of barrier cream and wear rubberised gloves [I got bored of picking shards of carbon out of my fingers and bought some decent gloves]

I usually get an assistant to hold the nozzle of an industrial vacuum cleaner right next to where I'm cutting or sanding. This makes the whole job a lot more pleasant

Rubber or cork sanding blocks are useful items

Like you, I hate sanding.  :D
 
Hi Paul

I broke my SFC fairing at Spa, it came home in two pieces, I also broke the screen, bought a new one and Ive managed to break that since (but another story).

I got quite Heavy Duty with an Angel Angle grinder fitted with a flap wheel ? and most importantly cut back all the fractured and dmaged areas both sides until it was waifer thin. Figured I couldn't make an effective repair without replacing all of the damaged area and didnt want it looking twice as thick as original.

If the area being repaired gets too bulky I grind it back and lay a new err layer. The whole thing took 6 hours and I havent even laid any body filler on it.

I agree, with someones comments, GRP and fairing plastics dont usually mix very well, good luck.  

Here is a completely useless pic of a broken fairing !  Wish I could find the after ones ! I swear by an orbital sander for rough finishing, anything rougher and I grind it back with said flap wheel, always using a mask and goggles as a minimum and usually outside.
 

Attachments

  • Fairing broke.JPG
    Fairing broke.JPG
    101.5 KB · Views: 23
Rob,

Boba has Carbon fibre replicas of the SFC Fairing and seat at a reasonable price (given it is a small production number and made of CF). For sure even lighter than the original one, maybe even stronger?!?

I know budgets need to be controlled and some do like working on these things, but I prefer to buy a fresh one, as you never get it half as good as it was new...
 
Paul LeClair said:
I also have a 1982 Jota fairing sitting here on the shelf from a crashed Jota, which I have been meaning to repair and repaint, so I figure I will do all the fiberglass work at once on both projects.

Paul LeClair

post a pic of it, paul, let us have a squizz. for sure there is crazing and cracking in the gelcoat and you can't just fix that by putting a new gelcoat on top.

bob's advice is spot on and i agree with the observation that fibreglass and plastic don't work together. i've seen it tried many times and it always delaminates.
repairing a fibreglass fairing is not difficult, but it is very labour intensive and messy - no-one likes sanding. you can fix anything made of fibreglass if you're patient, but if boba does em cheap enough, go for that!
 
I found a set of replica bodywork out of China, $260 custom painted any colour(s) and/or design, plus $225 shipping. An extra $60 gets you enough extra paint with the bodywork to paint the tank as well.

I have almost all the mechanical repaired to make the bike rideable without plastics, I have a temporary fiberglass repair on the ABS plastic  headlight mounting fairing, just waiting for the used headlight to turn up from another eBay vendor, then figure out some temporayr front turn signals, then the bike can be ridden as streetfighter for the rest of the summer........

for the Jota fairing, I am going to grind all the fiberglass damage way back before starting repairs

Paul LeClair
 
Do those instructions for plastic welding apply to RGS fairings or is the Bayflex repaired by a different method ?

JG
 
Hi Paul,
I do'nt mean to hi jack this thread - but it sounds like your good lady could do with some TLC as well!
Hope she is not to badly bruised.

Happy sanding days,
Andy
 
Back
Top