
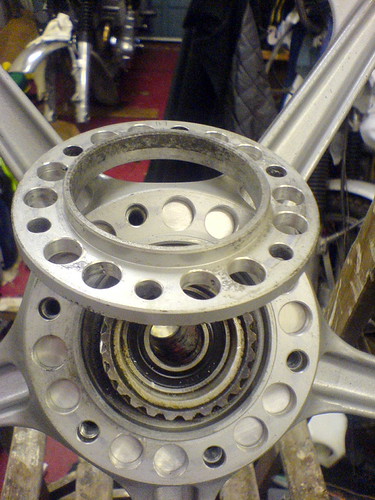
Before I hit something with a hammer I shouldn’t , are there any tips for removing this hub carrier thing? Heat? Something else? I note the wheel they are going onto has what look like locator pin holes. Having never done this simple task before just want to check. Didn’t really want to start trying to wedge a screwdriver blade between yet!

You are using an out of date browser. It may not display this or other websites correctly.
You should upgrade or use an alternative browser.
You should upgrade or use an alternative browser.
Carrier carrier removal?
- Thread starter cbertozz
- Start date


mauricejota7604
Hero member
- Location
- Victoria Australia
Hey Carlo why do you want to remove that spacer for?All good, found a spare pair!


Dellortoman
Hero member
- Location
- Tasmania, Australia
If you still wanna get the spacers off your other wheel, they're normally not too difficult to remove. Sometimes they'll just pull off by hand, but I've done it by working a knife blade around the join. There could be a bit of oxide or other crap making it stick, but take it slowly and gently and it'll begin to move.
The reason I wanted mine off was to find the source of a slight disk run-out (only a fraction of a mm but enough to feel through the brake lever). I wanted to check every component from the wheel hub to the disk.
The reason I wanted mine off was to find the source of a slight disk run-out (only a fraction of a mm but enough to feel through the brake lever). I wanted to check every component from the wheel hub to the disk.

piranha-bro2
Hero member
- Location
- Melbourne
Very important to remove any oxidation from the mating surfaces - a tiny amount at the bolt circle can translate into noticeable disc runout at the periphery - probably what was causing your lever lumpiness, Cam.The reason I wanted mine off was to find the source of a slight disk run-out (only a fraction of a mm but enough to feel through the brake lever). I wanted to check every component from the wheel hub to the disk.
Dellortoman
Hero member
- Location
- Tasmania, Australia
Yes, it wouldn't take much misalignment at the hub to cause noticeable disk runout. In my case though, the problem ended up being slight warpage in the carrier/disk assembly. It was only a few thou, so was able to get it sorted by re-grinding the disk.Very important to remove any oxidation from the mating surfaces - a tiny amount at the bolt circle can translate into noticeable disc runout at the periphery - probably what was causing your lever lumpiness, Cam.
Mine are well and truly stuck, WD40, heat, blade, no joy. Hoping we have some in club spares!If you still wanna get the spacers off your other wheel, they're normally not too difficult to remove. Sometimes they'll just pull off by hand, but I've done it by working a knife blade around the join. There could be a bit of oxide or other crap making it stick, but take it slowly and gently and it'll begin to move.
The reason I wanted mine off was to find the source of a slight disk run-out (only a fraction of a mm but enough to feel through the brake lever). I wanted to check every component from the wheel hub to the disk.

chrisk
Hero member
- Location
- Brisbane, Australia
Good luck with that.

piranha-bro2
Hero member
- Location
- Melbourne
I've found that a sharpened edge on a mechanical hacksaw blade makes a good pry. I'd combine heat and the pry method around various points on the circumference. Once you get even a tiny gap the WD40 or other penetrant (there are better ones than WD40 types) should help with the rest.
Dellortoman
Hero member
- Location
- Tasmania, Australia
If you have no luck with heat and a thin blade, here's another possibility that's worth a try:
Buy a couple of 8mm Dyna bolts. Insert one into the hole so the the expanding part on the end is only in the spacer (doesn't protrude into the hub). Tighten the nut to expand the end of the dyna bolt so it grips the inside of the hole as tight as you can get it. Do the same with the bolt hole on the opposite side of the spacer. Then turn the wheel over and use a drift from the other side of the wheel to tap the inside ends of the 2 dyna bolts, alternating between them as you go.
If that doesn't work, I have another solution that involves a bit ofbutchery modification to the spacer. Nothing that'll render it unusable though.
Buy a couple of 8mm Dyna bolts. Insert one into the hole so the the expanding part on the end is only in the spacer (doesn't protrude into the hub). Tighten the nut to expand the end of the dyna bolt so it grips the inside of the hole as tight as you can get it. Do the same with the bolt hole on the opposite side of the spacer. Then turn the wheel over and use a drift from the other side of the wheel to tap the inside ends of the 2 dyna bolts, alternating between them as you go.
If that doesn't work, I have another solution that involves a bit of

martymoose
Hero member
- Location
- Sydney, Australia
Haven’t seen one with all those holes drilled into the hub? Stock?
Nope, not stock. I just have a fetish for removing metal that isn't contributing much to the game.Haven’t seen one with all those holes drilled into the hub? Stock?
Dellortoman
Hero member
- Location
- Tasmania, Australia
Dynamite?Fortunately a certain individual managed to get them off in a couple of minutes with the right tools.