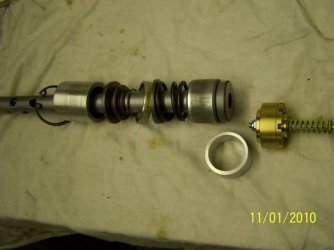
Damper rod holes for Racetech emulators on Ceriani forks

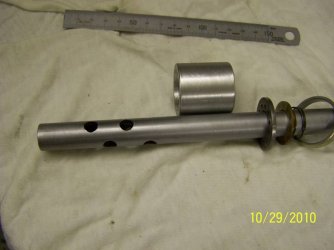
I'm installing Racetech emulators on my '78 Jota (while waiting for primary cover to be welded up ::)) and can't find a definitive answer to these questions. What bits do I remove from the damper valve so the emulator will do its thing, how critical is the sealing between the top of the damper rod, the emulator spacer, and the bottom of the emulator, and how many/what diameter/exactly where do I drill holes in my (totally irreplaceable ???) damper rod?

Ken
 
Hi Ken, maybe this can help: http://www.laverdamania.net/emulatorgb.htm
 
Ken a couple of months back i was at Wakefield Park during some testing with the Oz Laverda bunch,also there by chance was Paul Thede,aka Mr Race Tech out in Oz for his annual suspendion training courses.He poped into the pits and was commenting on some upgrades to the Emulators he was now using.What Race Tech now like to do is make the adaptor fit really snug to the fork leg and seal it with a Teflon insert,they call this a Piston Band,Paul was saying to one and all just get in touch and I will send you a set.Half a dozen unanswered emails later I called Terry Hays the local Race Tech bloke and he made me a set,service my forks,I supplied the seals and Bobs your uncle.$260 oz.Now for the embarrassing bit,they found one of my Emulators fitted upsidedown,2500ks of Snowy run and it felt fine to me.BTW it took 2 goes to get these Piston Bands to fit snug and not bind to the inside of the fork leg,been round the block so far so don't know how they work yet at speed on the bumps.Interesting tool to get the emulators and springs in without splashing oil,they use a claw that works like a syringe with a 500mm arm,$12 at Supercheap autos,claw treads through the spring and grabs the bolt on the emulator.Oil level is 100mm with the Emulator in,spring out and fork bottomed,they like 15wt,I used 7.5 for now.You might have more luck then me contacting someone at Race Tech in the USA.


Vince and JLO

Thanks for the insights, JLO I'd looked at your posting but didn't read it carefully enough to see the bits about Cerianis. Vince I guess I'll call Racetech tomorrow and ask them about piston bands. I bought my emulators in Oz but got the genuine adaptors and springs direct from Racetech USA, and they never said anything about sealing the adapters to the damper or emulator.
I wonder how well a heat-shrink Teflon sleeve connecting all 3 pieces would work, no need for any tricky machining (appropriate to my level of competence in the machine shop).

Ken
 
The Laverdamania link explains it all.
One thing to watch is that the bottom out cone in the bottom of the forkleg can reach almost to the existing comp damping hole in the damper rod. In the Racetech instructions they showed drilling this hole out and adding the others above and below it. On my 38 Cerianis any holes below the existing would have been covered and blocked.
 
I found when doing my Marzocchis that any holes below the existing rebound hole at he bottom of the rod will be covered by the aluminium foot that the rod fits into. I didn't know Cerianis were the same until I read Tippie's comment.

So Doug Home's sketch is wrong on this point for both Cerianis and Marzos.

Cheers,
Cam
 
Further to Cam's post, here is a drilled Marz damper rod in its bottom pocket...
laverda%20jota%20fork%20internals%20valve%20damper%20rod%20%281%29.jpg

Hag.
 
OK, it's getting clearer, I know where to drill the holes BUT I still don't know about what valvey bits need to come off. The Cerianis appear to just rely on different sized holes at the top and bottom of the damper rod for compression and rebound damping, no check valve (like the Marzocchis have) except the obvious circumferential spring loaded valve shown in Tippie's picture. Is that an anti topout valve, or is it the compression valve?
And whatever it is, do I take it off or leave it in the fork?

Ken
 
ken, the spring you mention is the bottom out spring
it and the steel collar it fits up against stay
the parts you remove are in the leg itself,
two plates with orifices, the bronze top hat and the little spring

if you can put your hands on the alloy bit with teflon ring as fitted to the marzos
you have an instant adapter for the ceriani with the sealing ring  :D

cheers,
scott
 
Vince said:
What Race Tech now like to do is make the adaptor fit really snug to the fork leg and seal it with a Teflon insert,they call this a Piston Band,Paul was saying to one and all just get in touch and I will send you a set.

I long ago got tired of waiting for a response from the vintage guy at RaceTech USA and put the front end back together without installing the cartridge emulators, and then out of the blue got an email from the guy. RaceTech is now making piston band spacers, with a split Teflon (or something, it's actually a green plasticy material) seal outside the spacer to seal against the inside of the stanchion. Made specifically for 38mm Cerianis, I guess there's enough Ducatis around to justify their effort.
RaceTech part number is FPEV AD3804 P, $50 US. Now I just have to pull it all apart again and start drilling holes.
He also says not to remove any of the valve pieces at the top of the damper rod, they apparently provide all the valving. I'd finally managed to convince myself that I understood how the tiny holes in the damper rods provided flow restriction to the oil, now I know I just don't have any idea how the Cerianis work.

Ken
 
ken, i don't understand what the fellow is saying
the valving for the std 38mm ceriani is located at the bottom of the tube, not the top of the damping rod
i copied your post and sent it to the guy that runs tech operations at race tech

the emulator replaces the stock valving

reviewing the posts race tech recommends 15W for track use
as the rebound is controlled by the viscosity you can run a higher or lower W
to suit your preferences. much like their recommendations for spring preload

i also chamfer the top of the tubes so not to present a sharp machined edge for the teflon sealing rings used on marzos

i talked to race tech a couple years ago about a sealing ring for the emulator adapter
as the idea is for all the oil to go through the emulator and not around it

they sent me a number of samples but what they first put their hands on wouldn't fit
sounds like they had some made...
it is quite possible a visit to the local auto trans repair shop may find one with the workable dimensions for  pennies
then just machine the adapter to suit

cheers,
scott
 
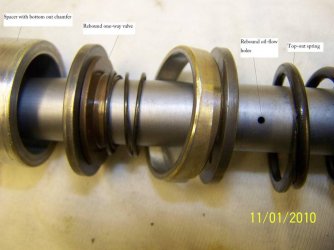
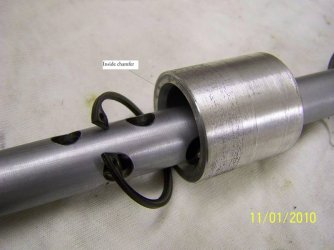
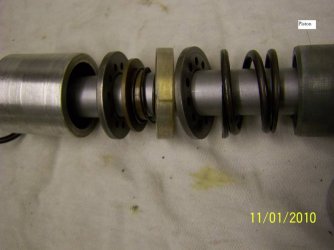
Ken. I?ll attach some photos and explain how the emulators work as it seems you are still a bit confused. I this winter fitted these emulators (and Race-Tech springs) to my Cerianis before I knew about the teflon sealing rings. I?m not concerned as all reports on emulators without them are a vast improvement over standard and as soon as the ice melts here I expect great things. I think for racing they would be better with the teflon but this is just in my roadbike and as I think Piet pointed out emulators are just that, they are a cost-effective solution that "emulates" a cartridge. If I decide to update my racer I think I?ll send the forks to Maxton for cartridges.
You do not remove any damping elements from your forks. The original rebound damping remains to do its work and is adjustable via oil weight (viscosity). It is totally dependent on the one-way valve faces sealing properly so that the oil is forced through the small holes higher up in the damper rod as the fork returns to extension. I have replaced the brass flapper valves twice in these forks as they wore totally out from rubbing on the damper rod. They are an easy job for any machinist.
The original compression damping is simply the restriction in oilflow through the centre of the damper rod created by the larger holes lower down on the damper rod. It is this that the emulator addresses. The original large holes are drilled larger and more added so that they do not create any damping. Instead all the oil flows through the emulator which has the spring-loaded shim stack that restricts oil-flow to create compression damping. This is regulated on the emulator itself via its spring strength and preload.
As Scott pointed out the valving is located in the bottom of the stanchion. The damper rod is connected to the slider and the piston at the top of the damper rod is responsible for the oil flow through the valving as the slider moves up and down.
I hope this is not going over something you already know.
Cheers
Lee
 

Attachments

  • rsz_rebound_damping_with_notes.jpg
    rsz_rebound_damping_with_notes.jpg
    59.6 KB · Views: 58
  • rsz_bottom_out_chamfer.jpg
    rsz_bottom_out_chamfer.jpg
    61.9 KB · Views: 46
  • rsz_rebound_assembly.jpg
    rsz_rebound_assembly.jpg
    55.8 KB · Views: 50
Ken,

With mine I've had to muck around with a number of permutations to get it to work properly. Firstly this is not a fool proof system. Oil is going to leak everywhere and effect how it works. With Marzocchis there is debate over whether you cover the two holes at the top of the dampening rod or not. As an ex superbike racing mechanic mate of mine said;"look at like a mine, you have above ground infrastructure and below ground". Everything below the emulator needs to be neutralised i.e made to not function against the above. So you drill the fuck out of all holes and don't bother filling any up. I like his logic and by the way this guy was one of the first to use these things in Oz after a trip to Daytona back in the eighties. 

The point being - I think we we all seem to forget that the basic premise behind these emulators (as mentioned by Scott and Lee) is that the emulator replaces the stock dampening function - but in only one direction. The other is controlled by the viscosity of the oil. Simple as that.
   
I was talking to Ron Young who races a very quick round case bevel and he said to throw the whole lot in the bin. Absolute crap he reckons. It's ok for him to say this, he owns a machining business. Young's advice to me was to locate a set of cartridges out of a Honda VTR or similar and install them instead. He's doing it to Cerianis at present but said that Marzocchis shouldn't be any different in terms of work. I have Marzocchis.

You have to remember that these emulators are borrowed technology from a Kawasaki trail bike built in the 70's which Racetek developed into a universal product. I'm using them as well and I'm not convinced they're much better than the stock set up. I used them because every one seems to think they're the panacea for handling woes. Having said that I haven't explored some of the other mods to the set up such as adding more low speed holes etc. I kinda couldn't be bothered now.

The real issue with these older forks is the stiction. Again Racetek offer a solution for this as well, selling teflon bushes for the top and bottom of the slider. Machining the top is easy but the bottom is proving to be a bit difficult. If any one is thinking of doing this Ron Young has been down this path as well says bushes from various early eighties Kawasaki's will fit.

Face it if you really want good suspension  Maxton cartridges are the best option or you try to modify something else on the cheap like Ron Young has. When I can afford it I'll look at Maxton because there's daylight between them and any other current choice.

Cheers
Chris
 
Back
Top