Indicators - flashing too fast

  • Thread starter Thread starter richtea
  • Start date Start date
R

richtea

Guest
Hello all good sparkies,

I have the old 'indicators flash too fast' problem. I had a quick search but couldn't see a definitive answer (probably because there isn't one!).

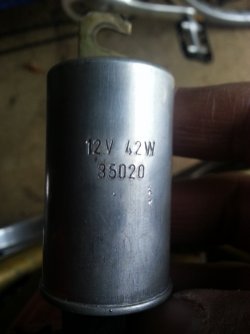
Maybe someone recognises the type of flasher unit, and can suggest the best solution?


Bike:
    SFC1000 (and running v sweetly. Bloody miracle after 2.5 years, but that's another story...)

Flasher unit:
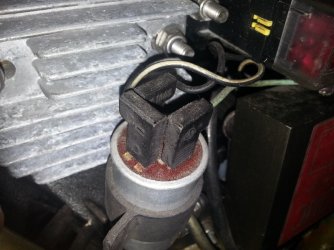
  12V 42W stamped with 35020 (see images)
    3 wires: black, white/black & green (seems to match the wiring diagram if the 'green' wire is really faded blue)

Bulbs:
    All 12V 21W, all working well

Console indicator bulbs:
    Both working

Both pairs flash at the same consistently high speed, at around 120 times a minute - fast enough to potentially annoy a grumpy old MOT tester.
The consistency suggests it not the wiring, and anyway poor wiring = slower indicators, not faster surely? Both those suggest the flasher unit might be the culprit.

Is the tin can one that can be opened and the flash rate adjusted?
Or maybe its just a bin it + replace?

Thanks in advance...
 

Attachments

  • can.jpg
    can.jpg
    98 KB · Views: 7
  • can2.jpg
    can2.jpg
    166.3 KB · Views: 7
Pretty sure those old flashers are the heated strip ones where the current through the bulbs heats a strip up which bends then disconnects till it cools down and reconnects etc. They do go off after time, to temporarily slow them down try lower wattage bulbs and hopefully the MOT tested won't notice that. Other than that just replace it. Note that the modern 3 terminal flashers are different terminals, ie usually +12V, indicator switch and earth. These old ones were +12V, dash indicator, indicator switch. But I could be wrong though.
 
Fit a solid state flasher relay. I stock a one size fits all unit but they are readily available does not seem to be fussy about what bulbs are fitted.


  Keith.
 
It's quite easy to adjust the flash rate of those old bi-metallic strip type flasher relays. I've done it several times, including at least once on the side of the road. You can do it quicker than you can drive to a shop to buy a new one. Especially if it's a weekend and the bloody shop is shut.

Prise the edge of the aluminium can up until you can pop the circuit board out. You'll see that it's little more than a set of contacts.

To change the flash rate, you just need to bend the contact point base. It's quite sensitive so you don't need to bend it much. You'll probably over-do it on your first attempt, so the indicators will come on and stay on, or not come on at all (depending which way you bend it). Keep tweaking until you get an acceptable rate. Crimp it back together and you're done.

Have a go at it. It's no good now, so you've got nothing to lose if you fuck it up. But you're unlikely to break the contact points unless you're a ham-fisted galoot.

Cam

 
Long and Lengthy responses ........

    It's a BAD EARTH ! Out with a bit of sandpaper and start flashing your bits all over the place !

                  Tim the Enchanter

 
Thanks for all your advice. All very helpful!

I went for Keith's suggestion, and bought an electronic flasher unit - from Halfords. Probably not a bargain at a tenner, but it was convenient:
http://www.halfords.com/webapp/wcs/stores/servlet/product_storeId_10001_catalogId_10151_productId_187543_langId_-1_categoryId_165538

Works a treat. It also showed one lamp had slightly grubby connections, so I cleaned that one, and now its perfect.

The only difference to the old can is that you have to earth the Halfords one.
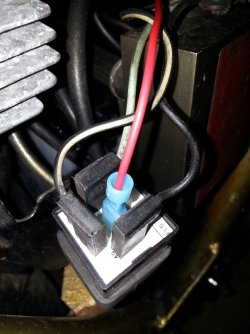
See photos. The red wire is the new connection to earth, i.e. the frame. I had no green wire to hand  (disgust)

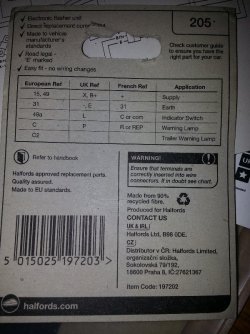
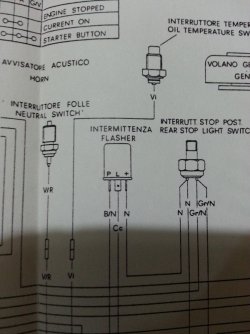
For posterity, if anyone else needs to replace their unit, here's the wiring.
But do double-check before plugging it together...

Wire functionRGS wiring diagram Wire colour Halfords wiring names
Console lamp PBlack/White C
Indicator switch LLight Blue 49a
12v power +Black 49
Earth n/asuggest Green! 31

The new unit in place, the Halfords wiring instructions and the RGS wiring diagram are below...
 

Attachments

  • new-can.jpg
    new-can.jpg
    152 KB · Views: 8
  • new-can2.jpg
    new-can2.jpg
    175.5 KB · Views: 8
  • new-can3.jpg
    new-can3.jpg
    149.4 KB · Views: 13
As it's an electronic one be aware it probably won't change flashing speed if one of the bulbs fail, ie you need to check the bulbs occasionaly. That's certainly the case with the one I put in.

I couldn't find a 4 pin flasher here in OZ so did the diodes to the indicator indicator trick. Would have been nicer to have one like yours though.
 
alternatively, drop an extra cog just prior to the bend, give a proper hand full of gassy stuff and go round the bend in time with the clicks...

remove indicators to save weight???

J
 
Back
Top