Jota 120 crankshaft

rbpjenkins

Junior member
Location
Oxfordshire
Does anyone have or can point me to a Jota 120 crankshaft in, or shippable to the UK? Ideally that I can exchange for mine that needs refurb? Roger Winterburn is working on mine and has found someone to refurb but with a long lead time. I have emailed laverda@lightspeed.ca any other suggestions welcome, thanks
 
Keith can do crank refurbs in UK afaik. If the crank has more than 30.000km on and you plan to put another 30 - 50.000 on, it would be wise to have a second oppinion on the part of "does not need a refurb". The oil slingers typically fill up with what ever debreas goes around in the engine and can block the passage to the big-end bearings of the rods. 20.000 km for sure not critical, but if the bike has 60.000 or more on the clocks, I would recommend getting them deeply inspected...
 
Keith can do crank refurbs in UK afaik. If the crank has more than 30.000km on and you plan to put another 30 - 50.000 on, it would be wise to have a second oppinion on the part of "does not need a refurb". The oil slingers typically fill up with what ever debreas goes around in the engine and can block the passage to the big-end bearings of the rods. 20.000 km for sure not critical, but if the bike has 60.000 or more on the clocks, I would recommend getting them deeply inspected...
Do you seriously mean that Laverda cranks need taking apart every two or 3 years?

Paul
 
You can check how full the slingers are without taking the crank apart. You gotta split the crankcase to get at it though.
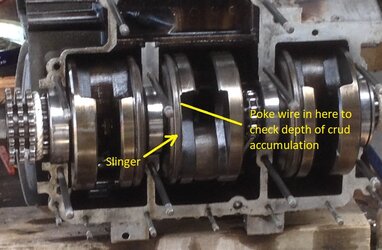
Last time I had my Jota's cases apart to fix a buggered gearbox bearing, I checked the crank slinger cavities by poking a bit of wire in there. They were about half full after around 70,000 original km, so I just stuck the crank back in as it was. It's still on the original factory bearings and con-rods. Bike still goes well.
 
If you clean the slingers without dismantling the crank and removing them , it is a very difficult task, and if you start you must finish and be sure that the cavities are squeaky clean, no easy task!, but of you leave the job even 90% done, the effect will be that the parts/debris that you have left will be inevitably loosened, and when running the motor those bits will lodge in exactly the best places to block the oil circulation. If you dont have a solvent degreaser tank/pump and filter set and an air line with 150PSI, dont even start! think of the shit that will be gotten spread everywhere, into and out of bearings etc.
CLEM
 
Last edited:
Why wouldn’t you clean them out while you could?
Honest question, I’ve never been there myself
Someone else like Red could explain this better because he does it all the time.

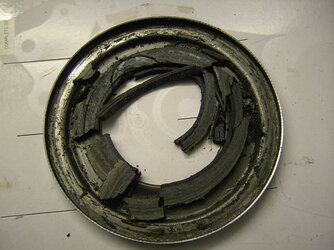
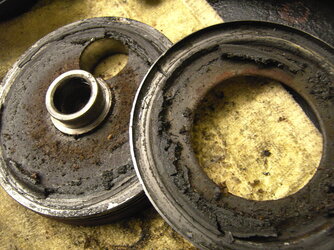
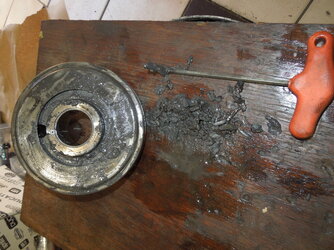
The slinger cavities are formed by a kind of dish stamped or spun from steel sheet that's pressed onto the crank flywheels. The muck accumulates centrifugally as a solidly packed mass in the space between the slinger and the crank flywheel. The only way to get it out is to press the crank apart and prise off the slinger disk to get access to the crud in there.

However, the slinger disk is normally bent out of shape by the process so is unlikely to back on properly, You may be able to panel-beat it back into shape, but Red replaces them with new ones when he rebuilds a crank (he gets them made somewhere).

It's been a while since I did this so I think I've mis-remembered the point where the wire gets poked in. I think the wire poking hole is the gap where the crank passes through the centre of the slinger, down beside the main bearing. That would make more sense than the arrow I've put in the picture. Anyway, there's a hole somewhere where you can get access to check the depth of the hard-packed muck in there.

To de-confuse the disoriented, the photo is taken from underneath the crank, so conrods are pointing upwards away from the camera. Top end of engine wasn't removed on this occasion.

crank slingers.JPG
 
Last edited:
The cavities where the muck accumulates can be accessed when the crank is disassembled. A sturdy hook-shaped tool can be used to scrape it all out, a bit of welding rod bent at right angles will not do... The slinger discs do not need to be removed, I prefer to keep the factory-installed slingers in place if they are not damaged and re-usable. Might be a bit quicker to cut them off and install new ones, but I find the fitting process a bit inconsistant. I must have fitted 100 by now and still have an uneasy feeling if they're tight or not and have had to re-do quite a few. This can get a bit expensive after a while.

Trying to clean the slingers on an assembled crank is playing the lottery, only with better chances, 50:50 chance of working or not. There's hardly a chance of reaching all the way into the slingers and crank pins, even less chance of rinsing everything properly. De-greasing all bearings and putting a dial indicator to them will show how worn they are, this removes uncertainty and more often than not, negates the "she'll be right, mate"! I rarely find a used crank that is within spec, be it in trueness or bearing clearances. But, up to the owner to decide if he pulls the engine again 6 months later to refurbish the crank, or push the bike to the back of the shed for the next 2 decades... ;)

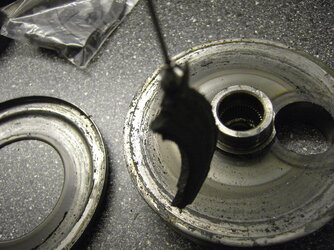
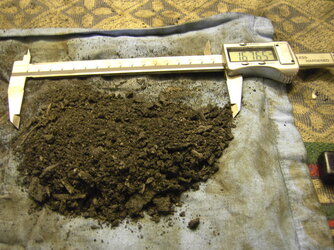
Yes, that's a chunk of crud hanging to a magnet to demonstrate how full of ferrous particles the stuff is. Next to iron/steel, there are often large portions of brass/bronze or aluminium to be found, depending on what has let go inside the engine in the past. Once this stuff is disturbed, much of it will find its way back into the oil circulation and take a few more tours of the entire engine before settling back into the sludge traps. May as well chuck a handfull of glass beads or sand into the oil for a thorough fuck-up!

Just sayin'
pietPICT1318.JPGoil slinger 4.JPGPICT1320.JPGDSCN9870.JPGPICT1475.JPGPICT1480.JPG
 
Last edited:
I went down the road of not doing the crank (against Piet's and also Roger's recommendation 22 years ago). 50.000km later, the inner crank bearing gave up. I am not 100% sure this is a correlation, as the oil first flows through the crank bearing and then into the slingers and if the slingers would have been closed, it would have been the big end bearings that gave up. Nevertheless - we did it now as the engine was appart anyway. (same with the 1000 SFC engine 8 years ago).

I know it costs maybe 1000 - 1200€ for the crank only. However, a damage afterwards caused by a filled up slinger costs much more....
 
Some dramatic photographs from Piet! 20 years ago, went to the local "vinnies", old 70's deep bowl slow cooker, electric base, pressed apart crank, slow boil the attached slinger webs, caustic soda mix, over night. Stiff flat spring steel bent tool, scoop out significant amounts of sludge, not a quick job or clean one can assure you, the few whom have completed the task will attest. Repeat process until heated solution remains clean.

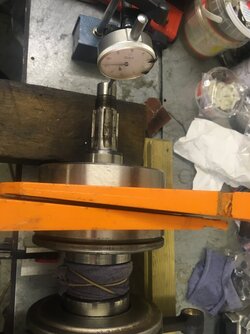
Can see the case for removal or replace slingers, in my case there were limits on what engineering facilities were to hand. Though i have a mechanical geared compound press ( at least 120 years old ) about 7 ton pressing, crank in lathe with dial indicators, measure true error, down onto the compound press, V blocks ( bit of skill there ) with constant mechanical feedback from the main hand wheel ( around 2 foot diameter ) i could "feel" the bend amount to true that part of the crank. At least a whole day of lifting the crank between lathe and floor mounted press frame..... one mans method of crank rebuild with confidence, as it may be of interest... j
 
Truing with what you have got.
SF crank.
I cleaned the slingers with the outside flywheels off, wouldn't even consider it otherwise. Spent hours making sure nothing was left and the inner mains had no shit in them.
 

Attachments

  • 4A4B0E48-5F99-4607-A7C1-2EF4659AC1AF.jpeg
    4A4B0E48-5F99-4607-A7C1-2EF4659AC1AF.jpeg
    111.6 KB · Views: 43
  • A804399B-2EBE-4295-97E7-C472FB0133CE.jpeg
    A804399B-2EBE-4295-97E7-C472FB0133CE.jpeg
    121.4 KB · Views: 45
Back
Top