Let's get this show on the road

Only two studs, I was exagerrating a bit. Just to get enough clearance to swing the head out.

Now you have got me worried. What's the problem with undoing a couple of studs? I normally pull em all out when I take the casings for a blast.
 
Phil said:
What's the problem with undoing a couple of studs? I normally pull em all out when I take the casings for a blast.

Not that bad Phil, I suppose it is more usual to work on the engine when it is out as things are more accessible.
 
Too bloody right it's more accessible. When I get the head off a Triumph I can make a cuppa, whip the head and barrel off (with the tank on) and my tea's still hot when I finish. Now that's what I call an easy engine to work on  :D
 
Phil said:
Rings on two of the pistons were well gummed in so a whole new set of rings will be going in, who's offering the best price per set of std rings?
Base gasket is looking good, can they be reused??
Inlet valve diameter is a tad over 39.5 mm and exhausts are 35 mm so it looks as if the inlets have been opened up.
One little problem was that the camshaft centre support was snapped, the lower half. The break was old so must've happened when it was last worked on .....tut, tut Motodd!! Anyone got a replacement?

before you go and buy new rings, measure the side clearance you have at the moment between your top ring and the ring land, anything more than 0.15mm and your pistons are worn out, when new that measurement should be less than 0.10mm. If the ring land is badly worn the rings flutter and act as small oil pumps, will eventually break as well, have seen Mondials on high mileage engines with over 1.25mm ring clearance

replace the base gasket, don't be a cheap arse, why even take the chance, you reuse it, button engine up, start engine and you get a leak, all that work to save 15 quid

39.5mm inlet valve is standard for an RGS engine, has not been opened up

finding broken middle cam bearing lower blocks on RGS/RGA engines is not that uncommon, have found a number over the years since I started rebuilding engines

when you install the engine studs back in place make certain you install them the correct way, don't install them upside down

I'd never recommend anyone to pull the head and barrels off a triple engine in the frame, way easier to slip the engine out, especially a 120 engine, frame has stacks of room unlike the 180 triples that require a "knack" to remove


Phil said:
When I get the head off a Triumph I can make a cuppa, whip the head and barrel off (with the tank on) and my tea's still hot when I finish. Now that's what I call an easy engine to work on  :D

Proves it right that the bastards at Meriden already knew from the beginning that their crap will go bust every now an then. (bolt)

PS: Take care to put the studs back in the right way around. They have different thread lenght top/bottom side.
 
replace the base gasket, don't be a cheap arse, why even take the chance, you reuse it, button engine up, start engine and you get a leak, all that work to save 15 quid

So making a headgasket from an old Cornflake packet is a definite no-no then?  :D

Yep easy to spot the difference on those studs, longer thread on the bottom and a flat base.

My bad on the inlet valves, thought they were smaller than that,

Oi, the Triumphs I build do NOT break down >:D........but if they did at least I could fix 'em in the dark, with the rain lashing down with nothing more than a Rizla paper, a paperclip and a pair of the wifes tights  :P
 
Hi Phil a Laverda triple engine although well engineered has got some vulnerable points that others have learnt about over time and mistakes made.
One of those is the threads in the crankcases for the head studs, in particular early engines many a mechanic has been in the process of torquing down a cylinder head only to have the stud pull out along with the remnants of the thread coils of Aluminium.!!! In general if you dont have to disturb the studs they are best left in the crankcases.
Although it may seem a shortcut to remove the cylinder head and barrell in the frame it is not.
The other very sensitive component in a Laverda triple engine is the cylinder head, be very wary of recutting seats in the head shim thickness variation is only about 1mm also refacing the cylinder head needs carefull consideration in particular the camcover face this can also have a very detrimental effect on cam to valve clearance.
There have been many cylinder heads that are no longer usable due to these issues.
Choose carefully what really needs to be done.
All the best.
M.
 
Thanks for that advice. Duly noted. I think I'll opt for simply lapping the valves in, better to err on the side of caution.
 
Be careful with the head stud torque when you reassemble.

The Laverda manual says 28 ft.lb for the 8mm outer cam bearing caps and 32 ft.lb for the long 9mm head studs (which also pass through the inner sides of the bearing caps). These figures are wrong. If you use those figures you're likely to pull the studs from their threads.

Safe recommended torque figures are around 25 ft.lb for the M9 studs and 18 ft.lb for the M8 bearing caps. Some people quote 28 and 20 ft.lb, but I'd suggest that's the upper limit. Beyond that you're in thread stripping territory.

My torque wrenches are calibrated in Nm, and I use the easy to remember figures of 35 Nm and 25 Nm, which equate to 25.8 and 18.4 ft.lb respectively.

There has also been some debate over tightening sequence too. http://www.laverdaforum.com/forum/index.php/topic,90271.msg283243.html#msg283243.
Whatever sequence you use, do it in small increments.

Cheers,
Cam

 
Phil said:
replace the base gasket, don't be a cheap arse, why even take the chance, you reuse it, button engine up, start engine and you get a leak, all that work to save 15 quid

So making a headgasket from an old Cornflake packet is a definite no-no then?  :D

Yep easy to spot the difference on those studs, longer thread on the bottom and a flat base.

My bad on the inlet valves, thought they were smaller than that,

Oi, the Triumphs I build do NOT break down >:D........but if they did at least I could fix 'em in the dark, with the rain lashing down with nothing more than a Rizla paper, a paperclip and a pair of the wifes tights  :P

If you do decide to keep the Lav, you'll need to change your habits... and use the time you spent patching the Trumpet for more sensible things, like drinking beer. :D

piet
 
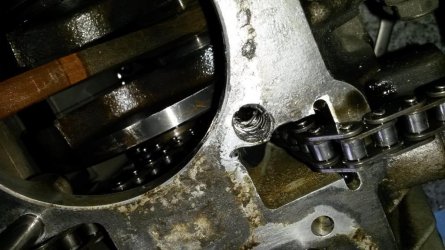
This is what happened to me when I read the manual. BUGGER!!! :'(
The correct torque settings are a must.

All sorted now & loving every second I spend riding the Mongrel
 

Attachments

  • oucha 1.jpg
    oucha 1.jpg
    100.2 KB · Views: 70
Ouch that looks painful. All in all it seems to me that making up some nice steel inserts at this stage may save a lot of grief in the future. Don't worry fellas, I have the technology, I can rebuild her !!
 
Phil said:
Ouch that looks painful. All in all it seems to me that making up some nice steel inserts at this stage may save a lot of grief in the future. Don't worry fellas, I have the technology, I can rebuild her !!

to install thread inserts you need to split the cases, swarf has to go somewhere
just thread the standard studs back in and torque them to 25 lbs/ft, be no issue at all
 
Looking at the manual it appears that crankcase top can be removed without too much bother and leaving the bottom end practically complete. With the head and barrel off it won't be too much work to lump the rest of the engine out now which means I can split the crankcase and get those inserts put in. It'll also make reassembly easier and I can give the crankcases a good clean before the engine goes back in.

Now why didn't one of you bastards advise me to get the engine out in the first place ?!?!? ::)
 
Phil said:
Looking at the manual it appears that crankcase top can be removed without too much bother and leaving the bottom end practically complete. With the head and barrel off it won't be too much work to lump the rest of the engine out now which means I can split the crankcase and get those inserts put in. It'll also make reassembly easier and I can give the crankcases a good clean before the engine goes back in.
Now why didn't one of you bastards advise me to get the engine out in the first place ?!?!? ::)

Did you ask? :D  It's apparent for most of us...

Yes, everything rests in the lower case and can be checked.  Good idea to take everything out for a clean, and to check gearbox bearings.  Especially the needles in the 5th sleeve gear are prone to wear, with either the shaft or gear being knackered in the process.  Cause is mostly an over-tightened drive chain, the whopping #630 chain is not forgiving.  I often find worn selector forks, usually a case of negligent gearbox shimming on Luigis' part.

While you're in there, check the crank for run-out.  DON'T attempt to clean out the oil slingers/sludge traps without disassembling the crank, you'll do more harm than good.  Whatever you dislodge in there and fail to remove, will eventually find its way through the big-ends.  Take care not to break the timing chain guide, many manage to snap it off with the timing chain hanging around the crank.  It is the rectangular cover next to the oil filter plate, best to remove it before the cases are split. 

The cases should come apart quite easily, a couple of tender whallops with a hide hammer usually do the trick.  Don't forget to remove the M6 nut under the starter motor.

If the M9 threads for the cylinder studs are in good condition with no sign of pulling at the gasket surface, just stick the studs back in and use the correct torque upon assembly.  If you do insist on installing inserts, make sure you can source them first, don't think you'll find them in your local High Street ye olde hardware shoppe.

piet
 
One more item; the starter clutch is a bit dodgy on the Mk II engines.  New springs restore proper function, check that all fasteners are REALLY tight.  The clutch is located behind the alternator rotor, this needs to be pulled with a M16x1.5 bolt.  Fixing bolt is RH thread if the bolt head is embossd in any way.

And please note orientation of the timing chain guide, it only fits correctly in one position.  Fit it wrong way around, it will break.  They're getting hard to find.

piet
 
Phil said:
Now why didn't one of you bastards advise me to get the engine out in the first place ?!?!? ::)

Well - actually - we did. Re-read the original thread, there was several times mentioned "Head off is an engine-out-operation"...  :P
 
Phil said:
engine out now which means I can split the crankcase and get those inserts put in.

really, do not bother, to do the top inserts properly the top engine case needs to be set up in a milling machine to make certain the inserts are installed on axis, otherwise the studs resemble a dogs hind leg in alignment
to do that you need to destud the top engine case of all the 8mm studs
are you going to insert them as well ?

just screw the damn 9mm studs back in and torque them correctly which is difficult anyway due to their length

 
Back
Top