my 1200 crank back together

zav

New member
Location
perth, wa.
I heated the web with the hole and froze the pin of the middle cylinder, as instructed. When i hammered it together, it moved all of 2~3mm before seizing. Is that normal? I suppose i shouldn't complain, it's a snug fit!:D
 
I was just reading a post between Ernest Schmitz and Redax Laverda regarding the 1200 180 degree crank rebuild. Without re-reading it word for word;- once no2 conrod webs are aligned, the next 2 inner webs are pressed on and cannot be manipulated. This i don't understand! I'm looking at mine now and they will press, any position you like! What am i not seeing correctly please
 
depends on how you wish to do the crank pressing, am certain other people do their cranks different to the way I do mine
many years ago I spent around 8 days straight machining up my crank fixture and various spacer plates etc, is probably way over designed and is heavy as fuck but still works great

I start with the Inner web of No 1 and the No 2 web, so this is the point where you set the phase to either 180 or 120
My fixture is machined to accept the Big end pins, 36mm and the central hole in the plates is 35mm
Middle plate is bored to centralize the Outer diameter of the webs

To start, set press up, position fixture and middle plate

Position 1
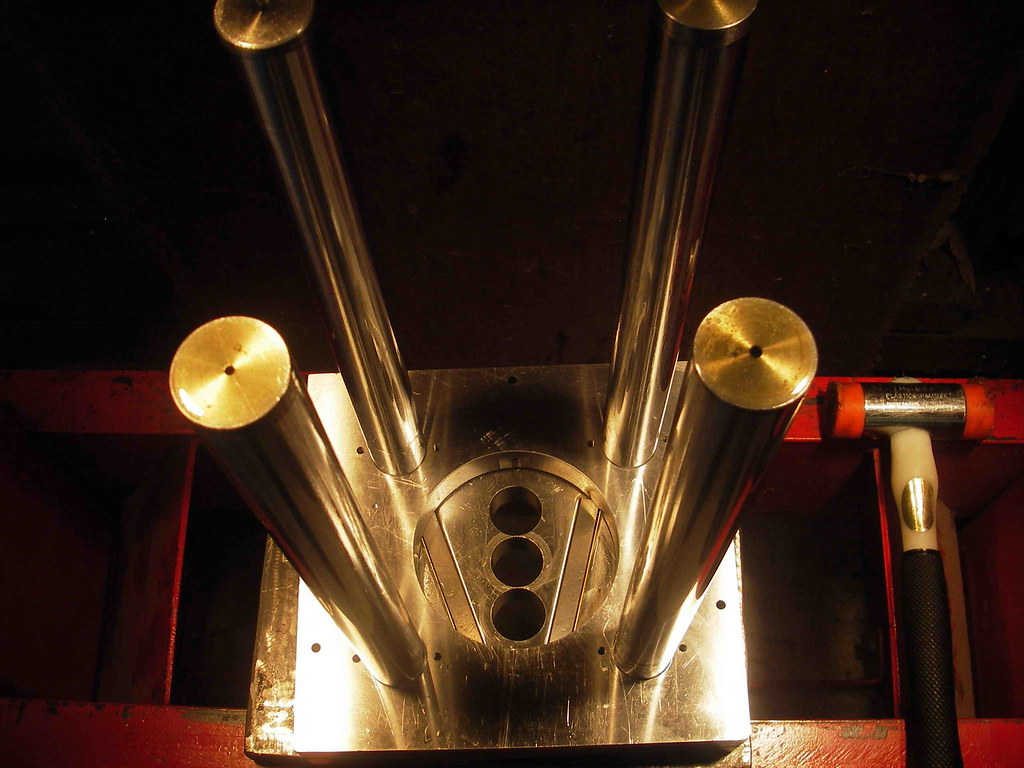
Position 1

Next I load the No 2 Conrod web in the bottom, this is because it is easier to position the Main bearing that way
Outer Conrod web Big end pin positions in the top plate and I use split full size machined spacers not to control the spacing so much but to control deflection when pressing offset to the center line

Position 2
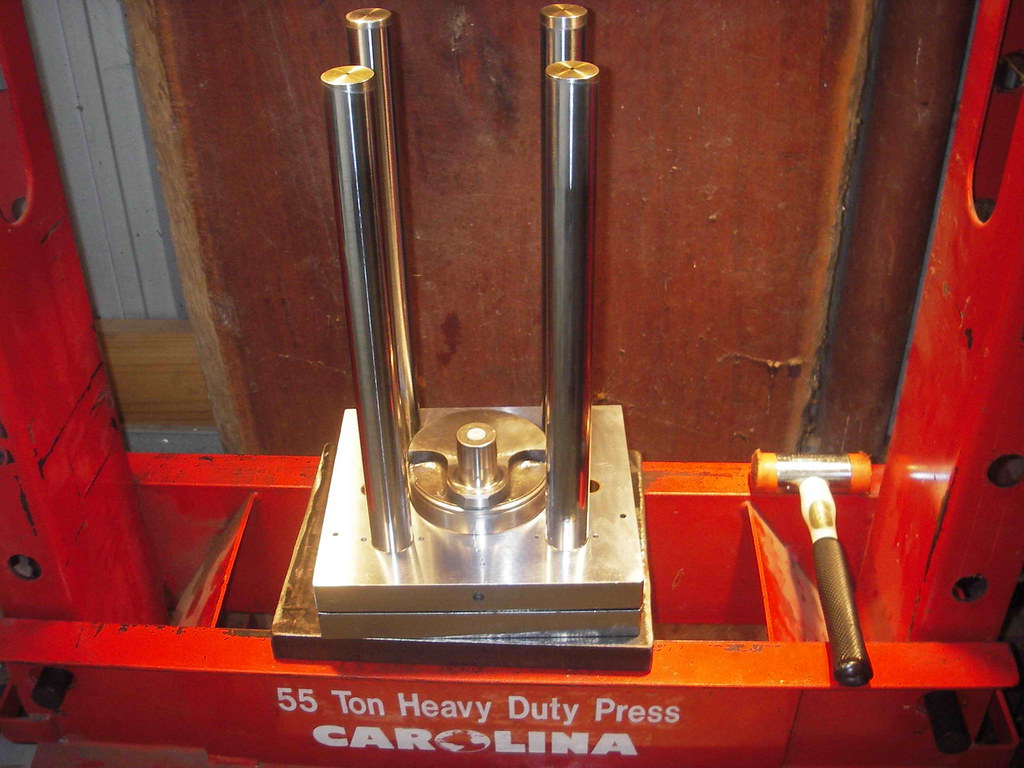
Position 2

Then remove the two pressed up webs on turn them over so now No 1 Conrod Big end pin is in the lower plate, move Middle plate up to position itself on the No 2 Conrod web and then keep building the crank up

Position 3
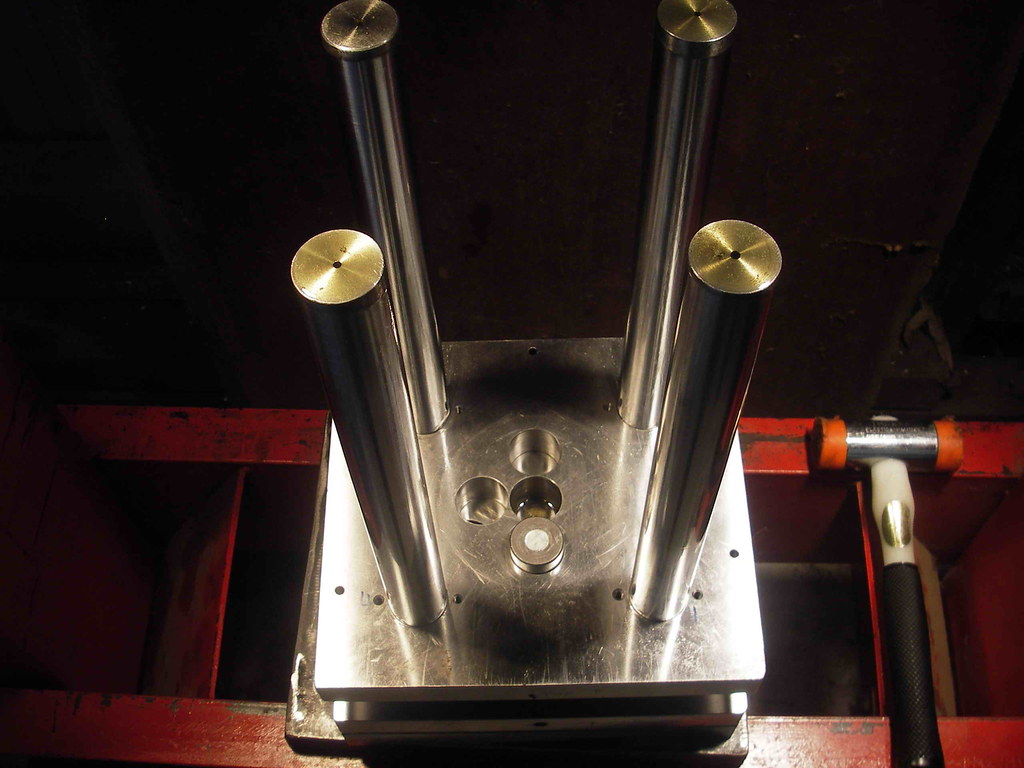
Position 3

Position 4, shows the 180 pressing off No 1 and No 2 Conrods where I turn them over and also shows the spacer plates to spread the pressing load for future webs
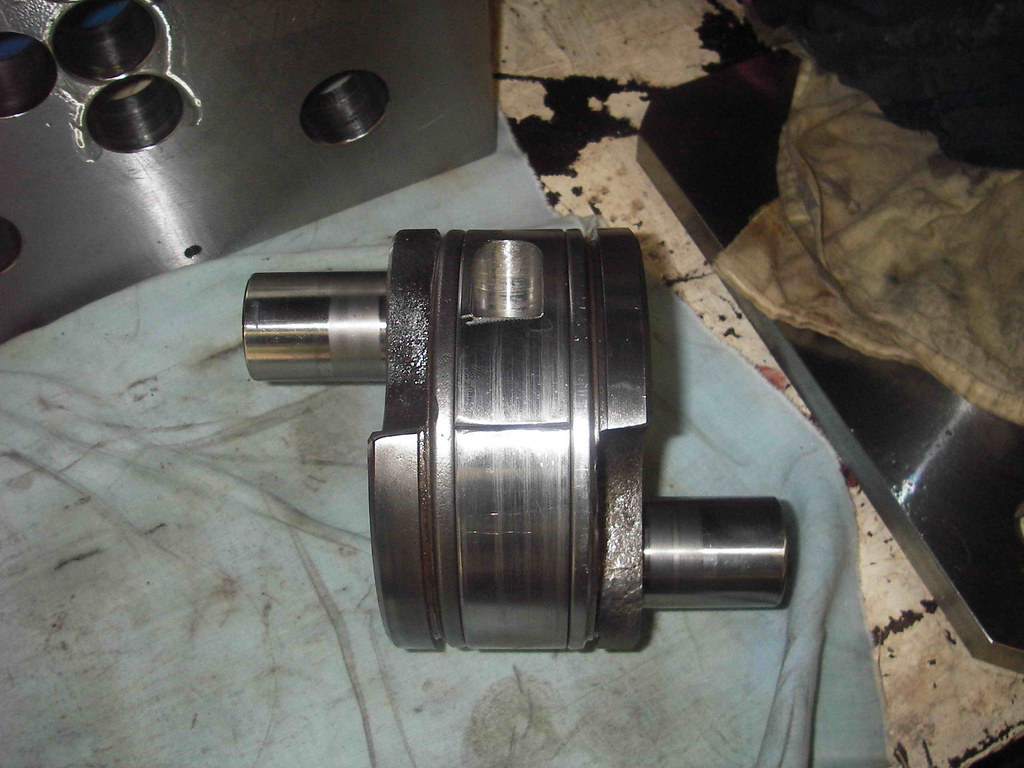
Position 4

Then install Number 2 Conrod, I use ground to size steel blocks to control the side clearance on the Conrod thrust plates, top press plate positions the next web in this case on the center line of the crank, press web on, normally they go on in the 8-10 ton range

It is this web and the inner web for No 3 Conrod that I refer to when saying they are difficult to manipulate due to the fact they are pressed on using the centerline of the crank

Position 5
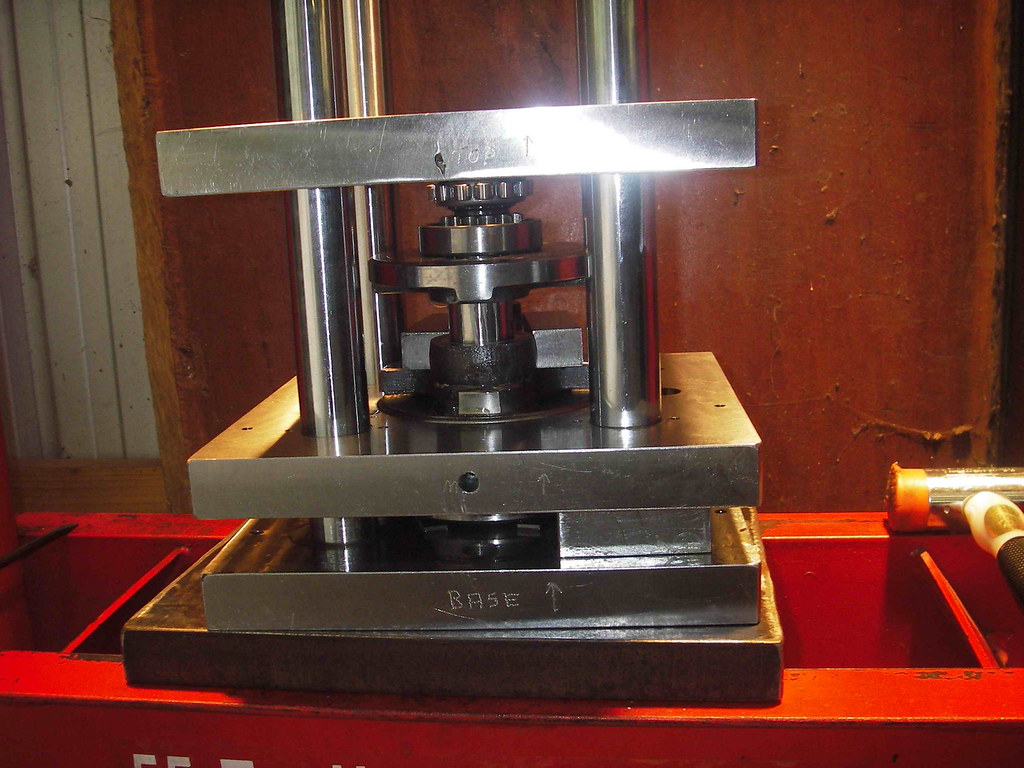
Position 5

Position 6
Shows inner web for No 3 being pressed on
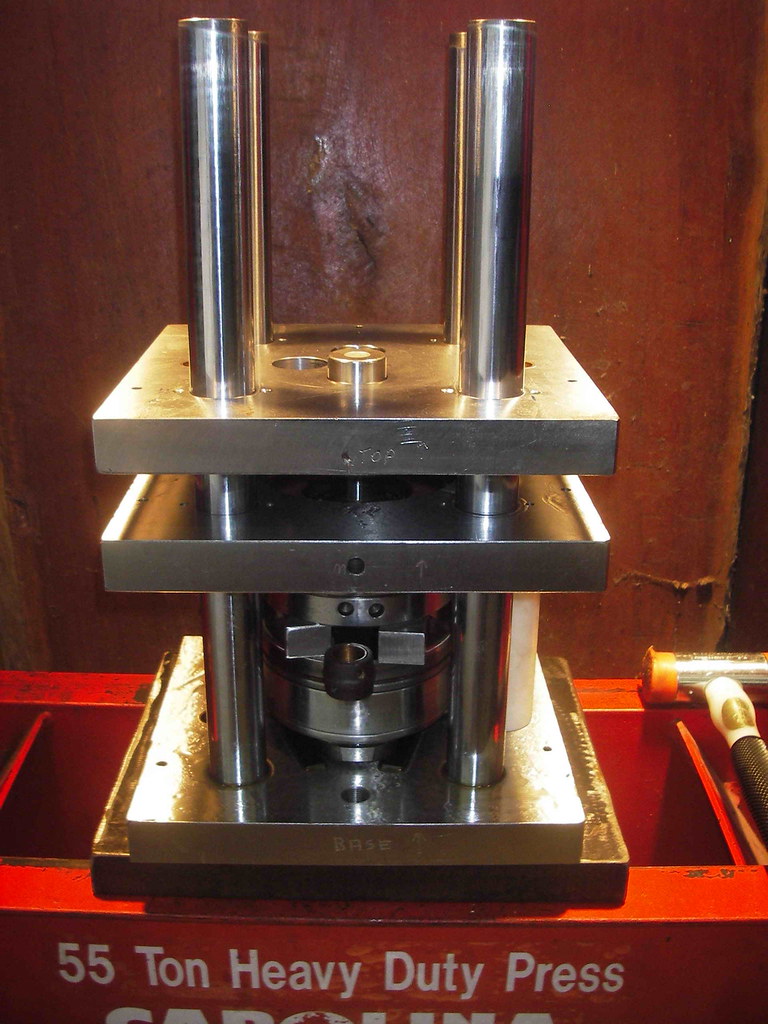
Position 6

Position 8
Shows right hand web being pressed on
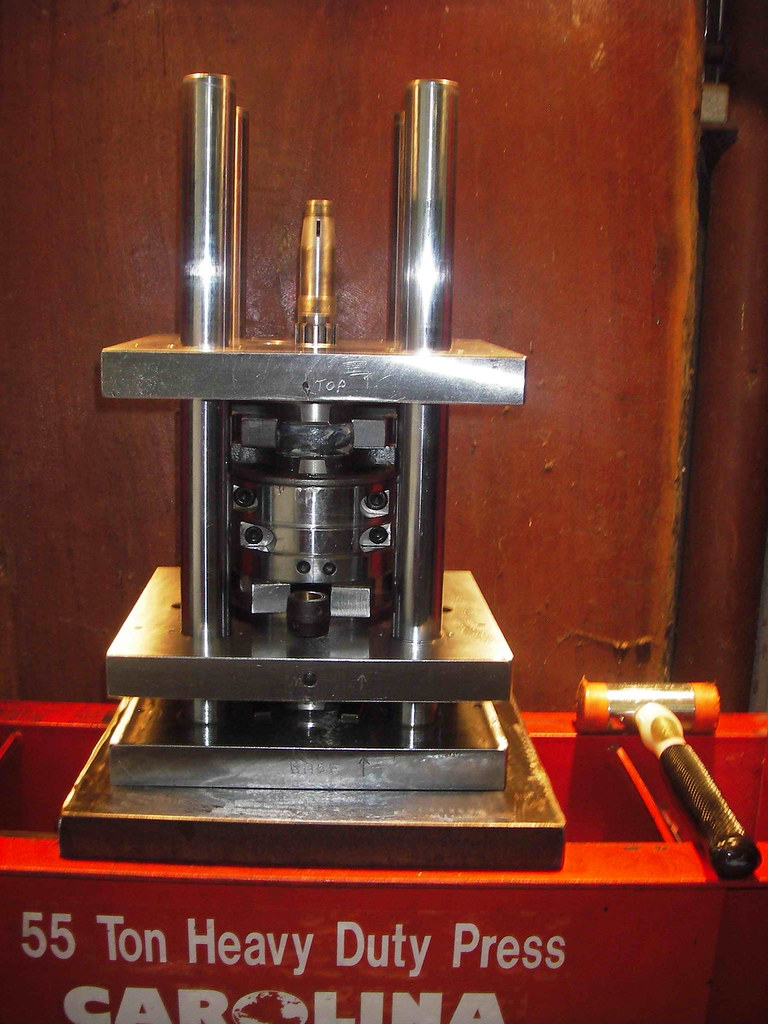
Position 8

Position 10
Crank is together apart from outer web for No 1 Conrod that I do seperately
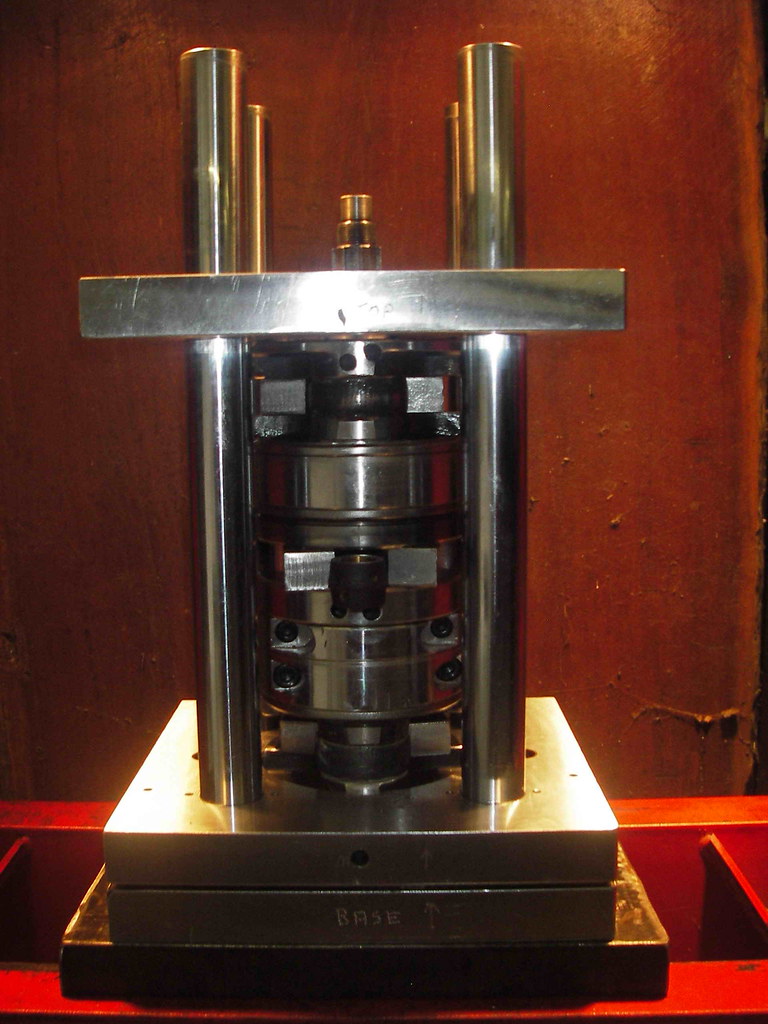
Position 10

Crank out of the fixture, easy as, now just to do final straightening
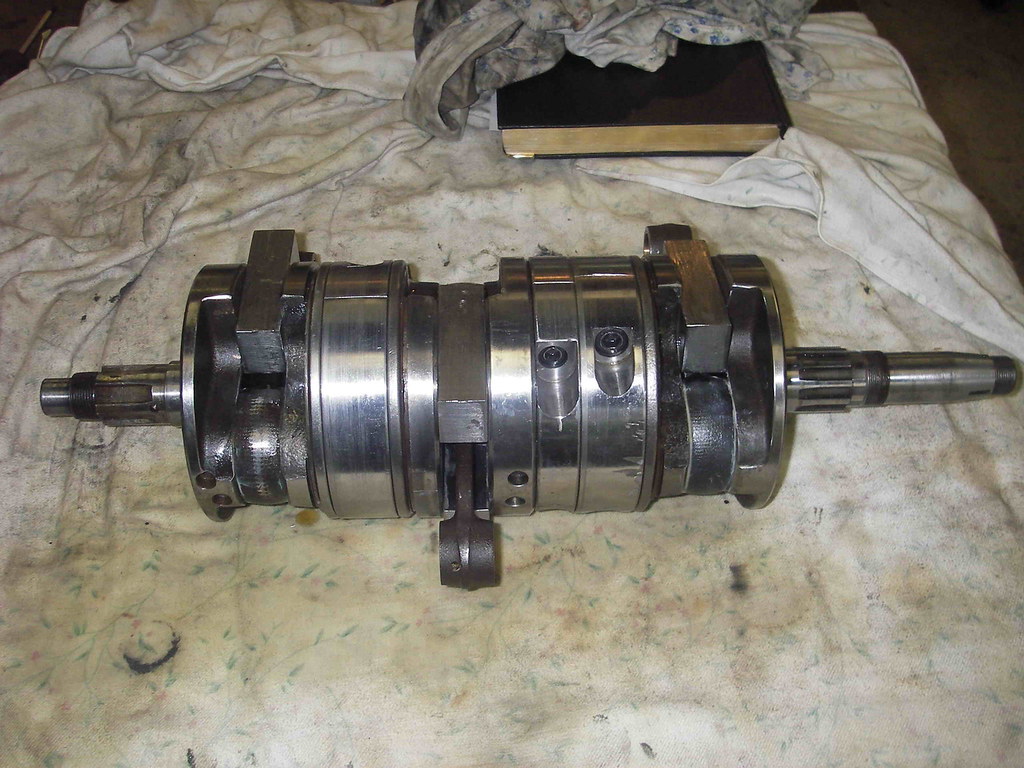
Final from Jig

Or before you even start, machine off the Oil Slingers, get the grinder out if you don't have a Milling machine and drop 4.5 kgs off of the crank weight, press up new Oil slingers, roll them on, press crank together without Conrods, give crank to Crankshaft Engineering to balance, then strip crank, add Conrods, press back together and go racing
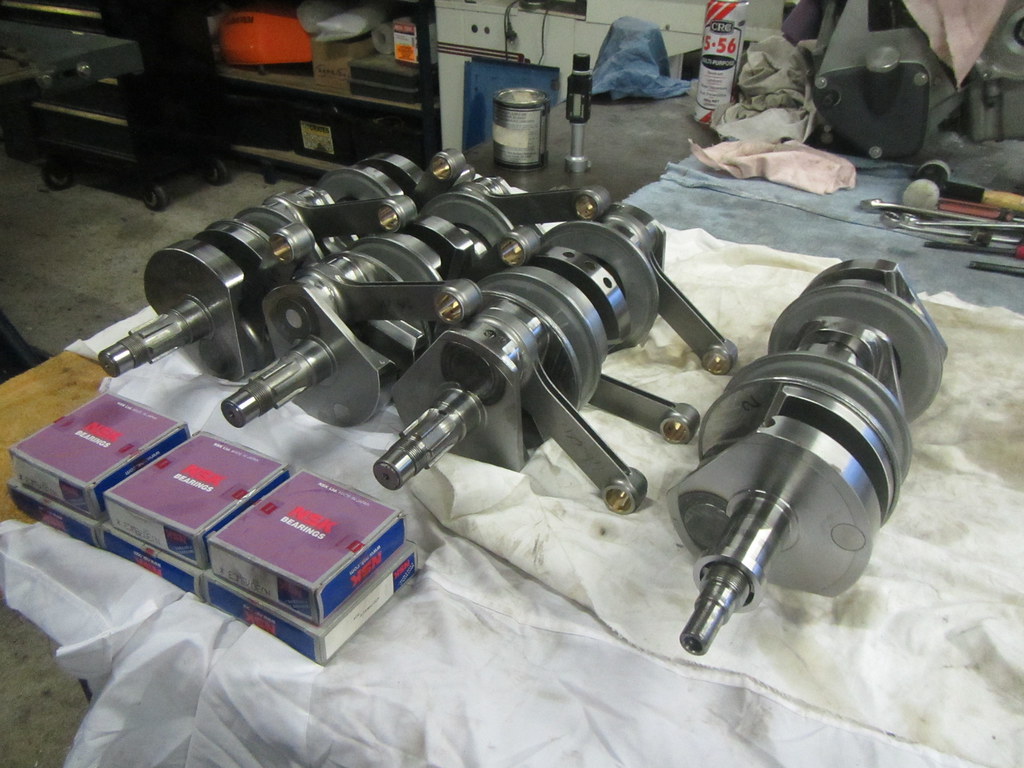
IMG_0885
 
Last edited:
I don't use heat on the Webs with the "holes" and you would need to use liquid nitrogen to shrink the pins, you could leave them in a Freezer for 6 months and they will not reduce in size

I used to use a product called Lubriplate to lubricate the pins and bores but 6 weeks ago my mate that does Harley engines gave me a tube of CMD Extreme Pressure lube to try on my cranks, is good shit, reduced the press force to 5-7 tons as soon as I used it, done three cranks using it now and am sold on it
 
Your 'Crank Alignment Machine' is a work of art! I'm still trying to take it all in! Lateral thinking, beautifully constructed and obviously works well. Thank you for sharing and for the other tips. There is much to be done!
 
I heated the web with the hole and froze the pin of the middle cylinder, as instructed. When i hammered it together, it moved all of 2~3mm before seizing. Is that normal? I suppose i shouldn't complain, it's a snug fit!:D
WTF???

These cranks are not for the inexperienced. Who instructed you to heat the webs and freeze the pin?
Maybe you've watched too many indian, pakistani, vietnamese or thai "crank rebuilders" on You Tube... ?

Yes, we're dealing with interferance fits of 0.05mm+, no great margin for error and quickly destroyed if not careful.

While Reds' apparatus and assembly method is perhaps the best ever devised for the triple cranks, it is not necessarily needed for low-volume work. I do not go to these lengths and have come up with pretty decent results over the course of 30-odd years covering a good 200+ cranks, the vast majority of which were Laverda.

Seems to me you're already at your wits' end, my advice would be to concede defeat and pack it up and send it to Red... ;)


I don't use heat on the Webs with the "holes" and you would need to use liquid nitrogen to shrink the pins, you could leave them in a Freezer for 6 months and they will not reduce in size

I used to use a product called Lubriplate to lubricate the pins and bores but 6 weeks ago my mate that does Harley engines gave me a tube of CMD Extreme Pressure lube to try on my cranks, is good shit, reduced the press force to 5-7 tons as soon as I used it, done three cranks using it now and am sold on it
Red,

Old machinists trick is to smear the press surfaces with stag tallow, using mineral-based lubes can raise issues, especially so with lesser interferance fits. Been using the stuff for years, reduces press tonnage considerably and completely dries out after a day or 2. Quickly dissolved in oil.

piet
 
Hi sfcpiet, thank you for reply. I found the freeze/heat idea on the forum dated 23 february 2025 from Redax Laverda ( sorry for dobbing) plus a couple of videos. I'm a firm believer in pushing the envelope (a little bit).
 
Hi sfcpiet, thank you for reply. I found the freeze/heat idea on the forum dated 23 february 2025 from Redax Laverda ( sorry for dobbing) plus a couple of videos. I'm a firm believer in pushing the envelope (a little bit).
I went back through my posts and could not find any post that I made on the 23rd Feb, 2025

Only time I use cold/heat is for installing Liners in barrels, load new Liners in the freezer for an hour, heat barrels to 180C, drop Liners in, apply weights to the top to stop them from creeping back out
 
Last edited:
If some of our most talented members are a couple of cranky old buggers it doesn't say much about the rest of us.
Well I'm a cranky old bastard whose not as nearly talented as the talented cranky bastards you refer to, but I understand what they are saying/doing and highly respect it as one cranky old bastard to another, especially this thread as I had my ball bearing center mains done by a snowmobile engine rebuilder in your city many a moon ago. Cheers:D
 
I'm dumfounded that you came across that thread, purportedly posted by Red! Of all the people dealing with these cranky cranks, Red would be the very last to suggest - even in jest - that you could whack a triple web onto a crankpin with an effing hammer!!

I've done plenty of twin Laverda cranks using my simple pressing plates - triple alignment and phasing is something entirely different.
 
My deepest apologies Red!😪 I downloaded information from several sites and one of them was a conversation between you and Ernest Schmitz regarding 'conrod 2 to be the start of pressing pins into webs', which i found very useful and gave me confidence. But, the second part of the same conversation, regarding the next inner webs which are pressed to centre pins and cannot be manipulated, i don't understand! The information regarding thermal contraction and expansion came from an AI site. I'll be more careful, i promise!
 
Absolutely in awe of what Red does...please keep going and enjoy what you do..wish I'd been an engineer (as was my dad and as is my son) not a lawyer!
 
Well I'm a cranky old bastard whose not as nearly talented as the talented cranky bastards you refer to, but I understand what they are saying/doing and highly respect it as one cranky old bastard to another, especially this thread as I had my ball bearing center mains done by a snowmobile engine rebuilder in your city many a moon ago. Cheers:D
Unfortunately the snowmobile crank rebuilder in Winnipeg is no more. Harder and harder to get custom machining andcother work whete old school experience is useful done these days. The local expert was very experienced with snowmobile cranks, but if I needed my Laverda crank done I would want one of the Laverda crank experts on this forum to do mine.
 
  • Like
Reactions: psg
Unfortunately the snowmobile crank rebuilder in Winnipeg is no more. Harder and harder to get custom machining andcother work whete old school experience is useful done these days. The local expert was very experienced with snowmobile cranks, but if I needed my Laverda crank done I would want one of the Laverda crank experts on this forum to do mine.
I will say tho that my neighbor at the time, a licensed Millwright and hard core biker (rode a Norton side car rig in Alberta winters}, brought his V blocks and dial indicator over and pronounced the crank almost perfect. Engine runs very smooth for a 180. I'd say that Winnipeg guy was pretty good, That many moons was probably 30 yrs ago, as you say another talented specialist retires from the trade, not to be replaced. Doubt there is any place in NA to get a Laverda crank done, unless Wolfgang has a secret source.
 
I will say tho that my neighbor at the time, a licensed Millwright and hard core biker (rode a Norton side car rig in Alberta winters}, brought his V blocks and dial indicator over and pronounced the crank almost perfect. Engine runs very smooth for a 180. I'd say that Winnipeg guy was pretty good, That many moons was probably 30 yrs ago, as you say another talented specialist retires from the trade, not to be replaced. Doubt there is any place in NA to get a Laverda crank done, unless Wolfgang has a secret source.
Part of the issue in this country seems to be that most of the guys still think a couple hundred dollars will get your crank rebuilt. I have a good friend who is in the business and is more than capable (literally hundreds of sled and bike cranks, with his notes and diagrams to back it). I may throw the idea at him and see what he says....... it may give those of us on the north side of the 49th an option, but I'm not holding my breath that he'll be enthused about the idea.
 
depends on how you wish to do the crank pressing, am certain other people do their cranks different to the way I do mine
many years ago I spent around 8 days straight machining up my crank fixture and various spacer plates etc, is probably way over designed and is heavy as fuck but still works great

I start with the Inner web of No 1 and the No 2 web, so this is the point where you set the phase to either 180 or 120
My fixture is machined to accept the Big end pins, 36mm and the central hole in the plates is 35mm
Middle plate is bored to centralize the Outer diameter of the webs

To start, set press up, position fixture and middle plate

Position 1
Position 1

Next I load the No 2 Conrod web in the bottom, this is because it is easier to position the Main bearing that way
Outer Conrod web Big end pin positions in the top plate and I use split full size machined spacers not to control the spacing so much but to control deflection when pressing offset to the center line

Position 2
Position 2

Then remove the two pressed up webs on turn them over so now No 1 Conrod Big end pin is in the lower plate, move Middle plate up to position itself on the No 2 Conrod web and then keep building the crank up

Position 3

Position 3

Position 4, shows the 180 pressing off No 1 and No 2 Conrods where I turn them over and also shows the spacer plates to spread the pressing load for future webs

Position 4

Then install Number 2 Conrod, I use ground to size steel blocks to control the side clearance on the Conrod thrust plates, top press plate positions the next web in this case on the center line of the crank, press web on, normally they go on in the 8-10 ton range

It is this web and the inner web for No 3 Conrod that I refer to when saying they are difficult to manipulate due to the fact they are pressed on using the centerline of the crank

Position 5

Position 5

Position 6
Shows inner web for No 3 being pressed on

Position 6

Position 8
Shows right hand web being pressed on

Position 8

Position 10
Crank is together apart from outer web for No 1 Conrod that I do seperately

Position 10

Crank out of the fixture, easy as, now just to do final straightening

Final from Jig

Or before you even start, machine off the Oil Slingers, get the grinder out if you don't have a Milling machine and drop 4.5 kgs off of the crank weight, press up new Oil slingers, roll them on, press crank together without Conrods, give crank to Crankshaft Engineering to balance, then strip crank, add Conrods, press back together and go racing

IMG_0885
Red, I never cease to learn from your posts, and admire the way you do things!!
 
Back
Top