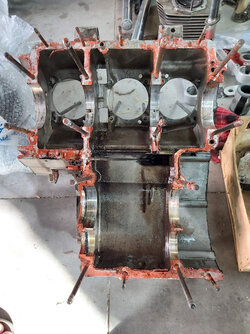
Opening virgin 180 crankcases

tom3c75

Hero member
I'm trying to separate a set of 180 series 1 triple crankcases, but cannot get them apart. The cases have not previously been opened.
All the 6mm and 8mm nuts, including the one under the starter, have been loosened, but left in situ.
I've tried tapping the cases with a rubber mallet and a block of wood at accessible points on the cases, but all to no avail.
Being very cautious and tentative about it, so perhaps it needs to be tapped more firmly. Just afraid I might damage the cases.
What's the best way to go about this?

Tom
 
remove the nut and washers on the stud under the starter motor and get busy with Laco rust buster, drop a good squirt of it down the stud every day for a week and then leave it a bit more, retry to get a "coming apart" if this fails again, use an arc welder, set it on 120Amps or so, and clamp the earth to the metal of (fe) a gearbox lug, and then "touch" the electrode holder with a stub of electrode in it, and create a short, this "cooks" the stud, and then (obviously) try again, the stud will be buggered from the welder, just get a new one, it is a source of very strong corrosion, and is easily prevented by a good slavering of copper slip when assembling the halves of the cases. This may not be the problem of course, but can be.
CLEM
 
Last edited:
Blimey Clem, you're full of surprises. I've never heard of anyone doing that with an arc welder before. Does it really work?
You could probably protect the stud (and then be able to re-use it) by screwing a copper or brass nut on the thread and touching the welder on the nut.

I was going to suggest putting the whole thing in an oven and heating it up to soften any sealing compound in the crankcase joint. I doubt your wife would be too keen on you doing it in the kitchen (dunno whether it would fit anyway). But you can make a temporary oven of sorts outdoors by putting the engine in a box. Make an opening in the bottom of the box, and prop it up off the ground so you can get a portable gas burner or electric heat gun under it. You only need to warm it to something like 100C max, not get it red hot, so something simple like a wooden box lined with aluminium foil would make a suitable oven for a one-off job. Keep a hose or fire extinguisher within reach in case the box catches on fire!

Don't get it too hot or you could damage some of the more heat-sensitive parts like oil seals. 100C is hot enough to burn your hands, so you'll need leather gloves to move the crankcase around while tapping it with your soft mallet.

Just a thought ... It's been a few years since I opened up a set of triple cases, but I seem to remember that there's a small nut on a stud somewhere that's not obvious. I think it's recessed or something. I might be thinking of the one under the starter motor, but is there another sneaky little bugger like that somewhere? Perhaps in a dark recess on the underside of the engine?
 
well it did work for me Cam, and as for heat, you would not dare touch the stud or the stub of rod after a few seconds of that would you? and it goes down the length of the stud as well, burning the rust,the stud was red rusty anyway, so replacement was essential it,may not be the case here, could well be something else, but rainwater does get in that particular spot,.

I really like the system used on RR Merlin engines (similar, well sort of) when removing the heads, a jacking tool is bolted on to them and this also maintains the straight and flat integrity of the heads, as well as very even jacking apart from the block, which in this 12 cylinder V engine, may have three cylinders (x 2) or just the one six cylinder type.

A clamping/jacking device for triples might be a good idea, but I have dropped from doing two or three, or in one case five, engines per year, so the need is not high, I only do my own stuff as and when I feel like it.
CLEM
 
This does not look good :eek:
- Too much unused, solidified sealant = risk for the oil circuit
- Too thick layer on the sealing surfaces = the crankshaft bearings do not have full pressure in the seats.
You can see this at seats 1, 2 and 4 (from left). 3 was ok = seat is clean.

This can happen if a sealant tightens too quickly or it takes too long to close the housings and to tighten the screws.

The ideal sealant that only sticks to the sealing surfaces is Loctite 510. It is a high temperature-resistant anaerobic sealant, that hardens in the absence of air between close-fitting metal surfaces. I use this not only for the housing but also in the front area of the head gasket and on top of the cylinder head cover.

This means that every engine remains permanently dry and oil-free.

Reopening is not a problem.

Loctite 510 datasheet Loctite 510 german datasheet Loctite 510 english

Thomas aus LAU
 
Last edited:
This does not look good :eek:
- Too much unused, solidified sealant = risk for the oil circuit
- Too thick layer on the sealing surfaces = the crankshaft bearings do not have full pressure in the seats.
You can see this at seats 1, 2 and 4 (from left). 3 was ok = seat is clean.

This can happen if a sealant tightens too quickly or it takes too long to close the housings and to tighten the screws.

The ideal sealant that only sticks to the sealing surfaces is Loctite 510. It is a high temperature-resistant anaerobic sealant, that hardens in the absence of air between close-fitting metal surfaces. I use this not only for the housing but also in the front area of the head gasket and on top of the cylinder head cover.

This means that every engine remains permanently dry and oil-free.

Reopening is not a problem.

Loctite 510 datasheet Loctite 510 german datasheet Loctite 510 english

Thomas aus LAU
You're right Thomas.
Everything was knackered on this engine. Really everything. Apart from the gear cogs. The crank would have blown within 2000 km no doubt.
That's when I learnt what a mechanic with experience is. I went to see a friend with the pistons from that engine so that he could confirm my measurements. He took one look at a piston and said "your crank is on the way out". He showed me very fine scratches on the piston which I took for wear and tear and showed me minute shiny particles explaining that they were steel coming off the bottom end.

But please be reassured. Now, everything in that engine is new and I hope to have it running within a couple of weeks.

Paul
 
Lots of bright ideas and lateral thinking fellas.

I decided to start with a conservative approach, so followed Mr Sock's advice, which did indeed work.
Clem, there was some mild corrosion on the front bolts, but I don't believe that contributed to the tight seal.
A more likely cause, I think, was that some of the white sealing compound had seeped into the bolt cavities, and then hardened over time (40 years!).

Anyway, the cases are now apart, so thanks all for your inputs.

Tom
 
Back
Top