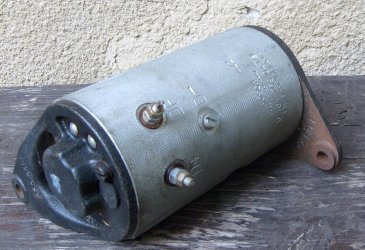
Rebuilding Bosh Dynamo

zizitto

Full member
Location
BELGUIM OSTEND
Hey Guys,

Anybody of you ever rebuild there bosh dynamo yourself?

I was riding my 750 (model SF2 1975) and the dynamo maked some noise.
It wasn't a bad noise so I take her for a spin but a few km's further flat battery and everything is gone...

Now the battery is new and only got 0,0V so I drove the battery dead flat. Battery already recharged and alright but dynamo needs a big rebuild. I didn't start with dismantling the thing.

Probably the brushes are gone, hope so ???

Any body advise? Pictures of rebuildings?
Living in Belguim so You're local engineers don't gonna come to me 8)

Greetings Sam
 
Sam it is very simple to take apart and rebuild, get yourself an exploded diagram of it, there is one here http://www.laverda-paradies.de/shop/catalog.php?lng=en&cat=750&chp=10

just in case you haven't already, remove the dyno from the bike, note, take care when undoing the terminals, use 2 small spanners, one above and one bellow the nut

ease out the rubber grommet from the non pulley end and remove the screw/bolt that this exposes

remove the 2 long screws from the non pulley end.

you should now be able to ease off the non pulley end, infact it may all come appart now, carefull and watch where everything belongs

rebuilding is just the reverse - pics to follow
 
Sam,
I have a dozen of NOS Bosch dynamos sitting in the shed. These are for Guzzi nuovo falcone, but are very similar to SF ones. You can either  
machine off the the holders, or repack the internals. Please PM or e-mail me if interested.
 

Attachments

  • dinamo.jpg
    dinamo.jpg
    147.9 KB · Views: 16
Rebuilt mine a few ago. As John says, easy to disassemble. Took the old brushes to my local auto-electrician. To my surprise, he rummaged in a box of bits and found new brushes!! Either I am very lucky or there were lots of these generators around in the past so plenty of brushes around the world. Probably the latter as the gen was used (I believe) on VW Type 1 (the so called "beetle").

Also took the rotor c/w bearings to the same auto-electrician. Uses standard bearings which he changed in a few minutes and charged me just for the bearings.

It's good to find these small old-school businesses that will do small jobs on-the-spot without a load of fuss / admin / quotation nonsense.

Cheers

Steve in UK
 
Sam, you are going to have to take it apart even if you go the Boba way - I cant find my camera at the moment but a full pic strip down will come soon
 
Indeed John B I have to tak it apart, but I want to do it once and good  :LOL:

Hoping to see you're pics they can be very handy  :P for me...

Greetings Sam
 
this is about the best I can do on my phone I'm afraid hope it helps

remove the rubber cover over this hole and remove this screw/bolt

normal_Dynamo1.jpg


Then you can remove the two long screws here

Dynamo2.jpg


The end cap should then pretty much ease off - the arrow here shows the location of a spring - I'm sure someone will fill us in on the correct name - washer
just make sure it is there and doesn't get dislodged on rebuilding.


Dynamo3.jpg


Just a view down before removing the pulley end

normal_Dynamo4.jpg


The guts should just slide out easily from the pulley end

Dynamo5.jpg


No need to strip further than this unless the bearings need to be changed

Dynamo6.jpg


this shows the peg on the pulley end, both ends have them and they fit into corresponding notches in the body to line up both ends 

Dynamo7.jpg


rebuilding is just a reverse of the strip - the only thing I do to help getting the bushes on is to push them back up against the springs and use the springs to hold them out until I have the end cap just on then reach in and push them down a little and the bush springs will do the rest - you will need to work it a little to get it on - unfortunately this is a terrible picture

Dynamo8.jpg
 
Thank you very much for the picture's they are really helpfull!!!
And aren't so bad at all ;)
Will tackle the rebuild on wednesday it's a holiday here in belguim 8)

Greetings Sam
 
Thanks to Boba, got my replacement in the post today, just got to decide the best way to meld the two together. The Guzzi one doesn't have the indent in the body that the pully end strap fits.

Photo0037.jpg
 
Thanks for this Boba, was waiting when I got back tonight. I would like to drill/machine a hole for the strap to fit then I could refurbish the old one this winter.

Does a motor like this need such a solid body?
 
Back
Top