Repairing leaking petrol tank

smlav

Senior member
Location
Shropshire UK
Hello folks,
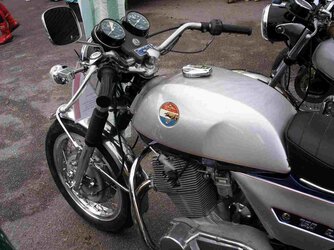
I’m about to start working on project 750GTL resurrection that has stood at the back of garage for 35 years (where did they go). When I was using the bike back then the petrol tank developed a seep from the seam at the lower front edge on right hand side. I put some pet seal in which worked for a while. So what’s the recommended method for fixing this properly? Sealant or some sort of weld?

I‘be been trawling through this place, suspect I’m going to be asking lots of questions over the coming year.

thanks
SM
 
If the rust has already penetrated into the area of the weld seam between the upper and lower shell, a quick re-welding is not really possible.

Rust removal and a good fuel seal is an option if it is just a very local leak.

If the underside of your tank is dilapidated in many places, you have to repair it over a large area. The tank seal doesn't help here anymore.

Thomas aus LAU
 
Cut the rusty area out and have some decent steel welded in. Cut all the bottom of the tank out if need be.

Petrol may well find it's way under the sealant making the situation worse since you'll have to get the sealant out. I have experience of a tank treated like that where the paint was blistering a few years later due to petrol working it's way under the sealant.

Paul
 
I've had issues with the front seams of various GTL tanks from the beginning...

Finally, I was totally fed up and decided to get to the root of the problem. It seems the forming of the tank bottom creates creases that fatigue over time, eventually breaking and leaking. In addition, I had been fighting with ill-fitting front mounts that allowed the tank to slide backwards off the the rubber bungs. As I wanted to have the tank re-sprayed anyway, the cracks were sealed by brazing and new mounts were fitted at the correct angle. Internal sealing finished it off, I now have a tank that doesn't leak AND no longer wanders around under acceleration or braking.

piet
 

Attachments

  • treffen2004laverda750gtl_detail2.jpg
    treffen2004laverda750gtl_detail2.jpg
    187.8 KB · Views: 14
...I had been fighting with ill-fitting front mounts that allowed the tank to slide backwards off the the rubber bungs.
piet
SFCpiet is right - it is important that the tank lies relaxed and evenly on/in its rubber mounts.

- the rubbers must be ok and not worn through
- the retaining rubber at the end of the tank must be strong enough to generate traction forwards and down.
- the two front bolts for the round rubber mounts must be correctly aligned, so that the tank rests on the rubber blocks at the rear left and right.
This is often not the case because eacht tank/frame is minimal different!

Back then (arround 1978), during the final inspection in the factory, I saw an employee inserting an approx. 1 meter long pipe into the stud bolts on the left and right side of the steering head and correcting them by bending them so, that the position of the tank was finaly correct.

Each tank/frame combination is unique = a tank change forces a new check / correction.

Thomas aus LAU
 
Those front mounting cups on SF tanks are bullshit, letting it fall into the front of the seat, should not rely on the rubber strap to stop it. Every chance we re-angle them down so that the tank rests properly on them. The carbon tank Boba is making has very clear instruction about this.
 
The strap is so useless I only used one for the first six months I owned the bike!! As Tippie says, remove the front mounts, angle down at 45 deg and Roberto e il tuo zio.
 
Thanks all. I like the sound of Piet’s solution, brazing the seam and also lining the tank. The information about protecting the tank from vibes by taking care with mounting is useful. This tank started weeping when the bike was about two years old. It was never a drip, just a slight weep. I rode it like that for years, touring all over Europe.
 
Are you sure it's the seam? Have a close look at the creases at the front lower corners, directly adjacent to the seams! Although the front part of the tank has the same shape as the SF tank, these creases are far more pronounced on the GTL tanks. I have 4 GTL tanks to compare with SFs, all show the same tendency, I've had 2 fail dismally.

My first tank developed a leak pretty quickly, metal putty got me over several seasons without too much hassle. But the ill-fitment was still there.

As a matter of course, the front mounting rubbers and rear strap are replaced regularly. The now available rear straps start crumbling after only 1-2 seasons anyway... OE stuff seemed to last a lot longer!

piet
 

Attachments

  • GTL Rettenbach Gletscher.jpg
    GTL Rettenbach Gletscher.jpg
    368.1 KB · Views: 17
With the early tanks from 68/69 there is a spot on the lower side that often gets cracked.
This is definitely a manufacturing defect (too much tension after pressing or/and too thin material).

I've seen this several times.

The easiest way to do this is laser welding.
This saves you from having to repaint the entire tank.

Thomas aus LAU
 

Attachments

  • pissing tank.JPG
    pissing tank.JPG
    141 KB · Views: 45
  • Tank 2.JPG
    Tank 2.JPG
    218.5 KB · Views: 42
  • Tank d.JPG
    Tank d.JPG
    111.7 KB · Views: 46
Thanks Piet. No I am not certain it is the seam, I will check more closely to see if it is the creases. Last time it held fuel the seap was only evident by rubbing a hand along the inner edge of the tank and hand came away smelling of fuel.
 
SFCpiet is right - it is important that the tank lies relaxed and evenly on/in its rubber mounts.

- the rubbers must be ok and not worn through
- the retaining rubber at the end of the tank must be strong enough to generate traction forwards and down.
- the two front bolts for the round rubber mounts must be correctly aligned, so that the tank rests on the rubber blocks at the rear left and right.
This is often not the case because eacht tank/frame is minimal different!

Back then (arround 1978), during the final inspection in the factory, I saw an employee inserting an approx. 1 meter long pipe into the stud bolts on the left and right side of the steering head and correcting them by bending them so, that the position of the tank was finaly correct.

Each tank/frame combination is unique = a tank change forces a new check / correction.

Thomas aus LAU
Some years ago Ricardo Oro was proud to show me his moulds for reproducing the front rubber mounts with offset so that rotating the mount rubbers allowed levelling the tank if frame or tank lugs were not well aligned.
 
How did he then secure the rubber blocks from turning again?

Thomas aus LAU
My thoughts too! Wouldn't it be a whole shedload easier to simply add a little rubber packing to one of the curved blocks that sit on the frame at the back???!!! I had to remove that steel shaft that the front rubbers and tank sit on and it didn't look bendable to me. 12mm thick and welded into the flat frame brace behind the steering head. Bending the 30mm of it protruding each side would be crazy.
 
Back
Top