replacement tachometer cable for 79 1200?

Paul LeClair

Administrator
Staff member
seems to me that the tachometer cable for a 79 1200 and other Laverda's must be the same as for Japanese bikes of the period, maybe a 750 Honda or something? I need a new tacho cable and hate to bother Wolfgang for something so small. Does anyone know of any bike that uses a tacho cable that would be a straight replacement for our Laverda's?

Paul LeClair
 
If you order a new (after market) item, you may wish to compare it to the knackered one, particularly with regard to the length of the inner cable relative to the outer sheath.  I found that the one I bought was not properly sized.  When the collar that attaches to the instrument was snugged up, the instrument would not register.  After some head scratching, I decided the inner cable was too long and was binding.  When the threaded collar was backed off all worked as it should.
 
lawrence said:
If you order a new (after market) item, you may wish to compare it to the knackered one, particularly with regard to the length of the inner cable relative to the outer sheath.  I found that the one I bought was not properly sized.  When the collar that attaches to the instrument was snugged up, the instrument would not register.  After some head scratching, I decided the inner cable was too long and was binding.  When the threaded collar was backed off all worked as it should.
Funny I had the exact same opposite the inner cable was too short so wouldnt sit in the drive adaptor at the cam cover so I made a second slot on the drive adaptor
Maybe you got my inner and I got yours.
 
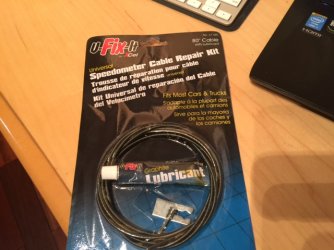
I think I have found a very inexpensive solution to my broken tach cable. It is the inner cable that broke into two pieces, the outer cable sheath and fittigns all seem fine, so I went looking for an inner cable.

Found an 80 inch universal "speedo" cable repair kit at my local Princess Auto for $4.45 CDN, comes with a tube of graphite lube, a small "staking" tool, one end squared off, the other end to be fitted with a drive end once cut to length, all included.

project for tomorrow, Saturday, supposed to be cold and rainy anyway......

Paul LeClair
 

Attachments

  • IMG_3440.JPG
    IMG_3440.JPG
    109.5 KB · Views: 25
Hi Paul.

I assume the staking tool is to crimp the drive end onto the cable, but it looks a bit crude. You'll more than likely have a better gadget for that job in your tool inventory.

80" may give you enough for two speedo cables or at least a speedo and tacho. But I presume they only give you one drive end. Not an insurmountable problem if you want to use the leftover piece for another cable. You could make another drive end and file it square (well, you could if you had a lathe  ;)) or make a die to squish the bare cable end into a square shape. The die is simple. Just file two matching 90 deg V-notches, each into a small piece of flat steel so that when placed face to face they form a square hole (of the right size). Sandwich the end of the cable between the two notches and press them together in a vice. I've done that on several occasions when recycling rotary cable inners and it works perfectly.

Cam

 
Dellortoman said:
Hi Paul.

I assume the staking tool is to crimp the drive end onto the cable, but it looks a bit crude. You'll more than likely have a better gadget for that job in your tool inventory.

80" may give you enough for two speedo cables or at least a speedo and tacho. But I presume they only give you one drive end. Not an insurmountable problem if you want to use the leftover piece for another cable. You could make another drive end and file it square (well, you could if you had a lathe  ;)) or make a die to squish the bare cable end into a square shape. The die is simple. Just file two matching 90 deg V-notches, each into a small piece of flat steel so that when placed face to face they form a square hole (of the right size). Sandwich the end of the cable between the two notches and press them together in a vice. I've done that on several occasions when recycling rotary cable inners and it works perfectly.

Cam

Hi Cam

I would up working on the 79 CBX turbo project over the weekend, as well as stripping yet another (my third now) Triumph Spitfire car transmission for rebuild for my 72 Spit Mark IV. The Triumph is a text book example where you increase engine power significantly with a "high performance" engine build then everything else starts to break, half axles, drive shaft couplers, two transmissions so far....bloody hell. :D :D :D ;) ;)

On the 79 CBX Turbo build, it is running, well. However, the first time it hit ten pounds of boost the freshly rebuilt engine turned into an oil sprinkler, hot oil geysering out the tacho drive, plus pulsing out the head gasket. I just had the head back off this weekend to deal with better oil containment, just getting the CBX engine back together before I get back to the tach drive cable for the Laverda.......

as for having leftover  cable length, at $4.45 for the inner cable, cable end, and cable lube, I bought three of the kits, no worries!!

Paul LeClair
 
Hey Paul,
Next time you run the CBX, it would be fun to see a video...hope you can keep the oil in, am wondering what it sounds like? How long does it take to do the valve clearances?? Are they shims or simple screws?
Regards Nick
 
nick7 said:
Hey Paul,
Next time you run the CBX, it would be fun to see a video...hope you can keep the oil in, am wondering what it sounds like? How long does it take to do the valve clearances?? Are they shims or simple screws?
Regards Nick

Hi Nick

on the CBX, the valve clearances are set by swapping great big shims, 24 of them, thankfully the setup is shim OVER the valve buckets. I say thankfully as the cams are very long, and are driven by not one but two cam chains. Getting all 24 bang on the money the first time took me several hours, measure a valve clearance, then depress the bucket and take the shim out to measure, then do the math, then find the most correct sized replacement shim from the $200 valve shim kit I purchased, and was also able to re use some of the existing shims by swapping locations. The first time I did all the clearances with the engine out of the frame which made things fairly straightforward. Now that the engine is back in the frame any future valve shim adjustments will require a bit of time to even get the valve cover off, requires removing the three dual coils, the spark plug wires,  a total of twelve large bolts from the upper engine mounts, spark plugs for cylinders 1 and 6 to be able to get at two of the engine mounting bolts, and so on, just to get the valve cover off......

with my single Mikuni HSR 42 carb I am still dialing in the base jetting, I started out of the ultra rich side of things as I do not want to blow up a very fresh motor, the bike is still smoky rich, and I wound up taking off the fuel pump and regulator and going to a straight gravity feed as the fuel pump was overwhelming the float needle valve even with the regulator set as low as it would go and even using a float needle valve from Mikuni intended for use with a fuel pump. I just submitted another parts order to Sudco International for leaner jetting ranging from three sizes of progressively leaner pilot jets, and so on, waiting on jetting bits as no one local to me stocks any of these bits, not even the two Harley dealers local to me who routinely fit a Mikuni HSR 42 carb to Harley's, but those carbs come completely pre jetted for the specific Harley application, unlike what I am working with.....

as for exhaust sound, the 6 header pipes are set up three into one and those two resulting pipes are then are collected into a single pipe (with a adjustable mechanical waste gate in it) that spins the compressor side of the Rajay turbo, then exits the turbo into a large diameter dump pipe, with absolutely no sound deadening except whatever the turbo suppresses. It is rather loud, but in a silky screaming kind of way, I have only done a total of 50 miles so far, definitely need a good set of earplugs, and there is an annoying exhaust resonance at around 4,000 rpm, which is easily solved by spinning the engine just a bit higher.

once I get the basics sorted, I will shoot a bit of video and post it. This build took me way out of my normal comfort zone, I learned lots of new skills, and I am quite proud of the end result even though it still needs some tweaking, especially some time to sort the carb jetting before I really start cranking up the boost...... I welded in an Oxygen sensor bung just after the waste gate, but I have managed to screw up my Innovate LM2 by trying (very unsuccessfully) to update its firmware, and have just sent it back to the manufacturer in the United States for repair, which I am told is going to take a few weeks, bloody hell

Paul LeClair
 
Paul,
I don't like the word, but awesome springs to mind! Please fit a rev limiter...the thought of that thing spinning up so fast that it self destructs doesn't bare thinking about!
Nick
 
The CBX is just getting interesting...Are the tops of the liners grooved for wire inserts ? All the blown motors i've ever done, that was the first thing we did...Quite a common thing on drag motors, cut a groove in the top surface of the liners about 2 -3mm away from the bore and deep enough to take 20G (.9mm) wire and have about .004in standing proud.
Last one I did used a .020in shim alloy gasket, the wire as described, ran 15lb boost on alky with 9:1 static com...No probs whatsoever.
From memory the CB fours and the six have a problem with wimpy head fastenings too....
 
Back
Top