side case needle bearings

michipons

Hero member
Hello to everyone!

long time since I wrote here! I was busy with other projects, but finally re-started my Laverda 1200 project, and expect to finish it soon!
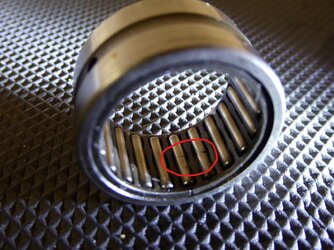
Is it worthy to change this needle bearings? I have the new ones, but I never had good experiences with those needle bearings... when they don't want to be extracted, they can become a real pain :LOL: :LOL:
Any advice before I start my fight with them?

Best regards,
Miguel

IMG_7654.JPG
 
Ttis needle bearings are very reliable and if they look ok and the shaft also is fine I would not pull them out if it is a difficult work. Main load is on the crankshaft bearing, the needle bearing will just give an other support, but how much the crank can be bended with a worn needle bearing? 0.02 mm? or less?
 
Heat the case up evenly and allow the expansion to release the bearing.

An old remedy for removing bushes etc is to pack the bearing with grease and using a drift made to suit the ID of the bearing locate it in the bearing and belt the free end with a good hammer. The grease if you're lucky will push the bearing out.
 
I would go with what Andre says. Unless they look bad leave them alone. But if you have to: The inner can be a real pain to get the off the crank, sometimes must dremel it. For the outer in the cover I cut a bit of flat steel, drill a hole in it and tack a nut to that, then just tack weld it into the needle bearing and pull it out with some thread and spacer/washer system, the case is heated from the weld and they come easily, going in the bin anyway. Having seen triples with the inner spun out through the side cover, it is important that it cannot move.
I know of SF race motors that left the needle rollers off without problem too.
 
Hi Miguel,

Just make sure you inspect them thoroughly,mine were in one piece but bearings were cracked in places and came apart when removed,also the oven and freezer are your friends and are to be put to good use when needed. :giggle: (y)
 

Attachments

  • Needle bearing.jpg
    Needle bearing.jpg
    151.1 KB · Views: 29
  • Whats cooking.JPG
    Whats cooking.JPG
    130.9 KB · Views: 28
no body is mentioning the these bearings are retained by three centre dot punchings in the case, this is factory correct and it deforms the hole so as to prevent the bearing moving out, on removal, using the factory tool as shown by Marnix, the old bearing will reform the hole, even if you heat the case a bit, on re-insertion you will have to stamp three more dots in a fresh place, there is only so many times you can do this before it wont hold fast, best avoided as noted above, VERY close inspection with a lamp, a magnifier and a wooden coqutail stick, to rotate every needle is a must, if its good, leave it in, a great shame realy as those bearings are cheap as chips from bearing/seal wholesalers. bearing codes as follows.....
NK1 20/16 for the crank (the "1" after NK denotes the sleeve on the crank end
NK 22/16 for the clutch shaft (no sleeve)
INA is a good make and easilly obtainable.
CLEM

ps I dont have one of thos factpry needle roller tools, and wuld like to buy one, if anyone is selling or knows of???
Marnix, check your security, I have my cordless grinder, oxy/acet and crowbars ready! my driver will be Roy James and the car a Mk11 but with a V12 dropped in.
clemtog:
It’s not rocket science to take a needle bearing out of a engine cover 🧐🧐👍👍
 
I may have posted these photos before. Memory is a bit fuzzy. Apologies if I'm repeating myself. I made a simple tool by turning down a nut. You'll need access to a lathe to make something similar.

All you need is a large bolt and a couple of nuts. One of the nuts will be turned down and cut into 3 segments as shown below. The bolt needs to be a bit smaller than the ID of the bearing, so that when the nut is turned down and cut into 3 segments, it'll form 3 shells that you can insert into the bearing with the lip under the inner edge of the bearing. You have to put the 3 segments in the right order so the internal thread lines up across each segment. Once the 3 shells are in place, put a tubular spacer over the bearing. The spacer bears against the case and must have a large enough ID for the bearing to fit inside it as it's extracted. I think I used a bit of exhaust tube. Put the other nut on the bolt and wind it up the thread so there's plenty of bolt thread sticking out. With a large washer over the spacer, insert the bolt and screw it down into the 3 segments, then wind the nut down against the washer and it will pull the bearing out. There's no need to use a Dremel or die grinder to grind away the 3 peened indents (as described by Clem a couple of posts back). The extractor will generate enough force to push them back out of the way as the bearing comes out.

This home-made tool works perfectly. It has enough wiggle room to fit both the crank and clutch needle roller bearings (they're slightly different sizes). I think I lent it to another forum member a few years ago, and he found it simple enough to use.

bearing puller 2.jpg

bearing puller 1.jpg

bearing puller 3.jpg
 
Clever Cam! I think my special tool is an elliptical piece of steel with bevelled edges on one side and a threaded central hole. It's just the right shape to be manoeverable under the lip of the bearing, then it's the same principle as Cam's using a sleeve and washer. No need for the extra nut, just turn the head of the bolt and the threaded 'washer' pulls the bearing out.
 
If you aren't as lucky as Cam with a lathe and just have basic shit to work with.
 

Attachments

  • uuid=696F4D3F-D4FA-408D-90EC-E3B1A3FD19C5&library=1&type=1&mode=1&loc=true&cap=true.jpeg
    uuid=696F4D3F-D4FA-408D-90EC-E3B1A3FD19C5&library=1&type=1&mode=1&loc=true&cap=true.jpeg
    122 KB · Views: 34
  • uuid=3B2517A8-8B76-42DF-968E-F31FCF3417B4&library=1&type=1&mode=1&loc=true&cap=true.jpeg
    uuid=3B2517A8-8B76-42DF-968E-F31FCF3417B4&library=1&type=1&mode=1&loc=true&cap=true.jpeg
    120.1 KB · Views: 34
Back
Top