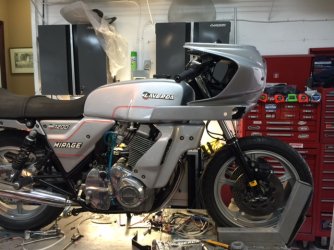
stalled project getting moving again

Bit of a long shot Paul, is it possible that you obscured the light sensors on the mask by accident when you struck up? Same symptom as flat battery - a face full of white light.

Some of the 'Solar' masks also have a non-rechargeable button type battery as a backup.
 
SimonR501 said:
Bit of a long shot Paul, is it possible that you obscured the light sensors on the mask by accident when you struck up? Same symptom as flat battery - a face full of white light.

Some of the 'Solar' masks also have a non-rechargeable button type battery as a backup.

Hi Simon

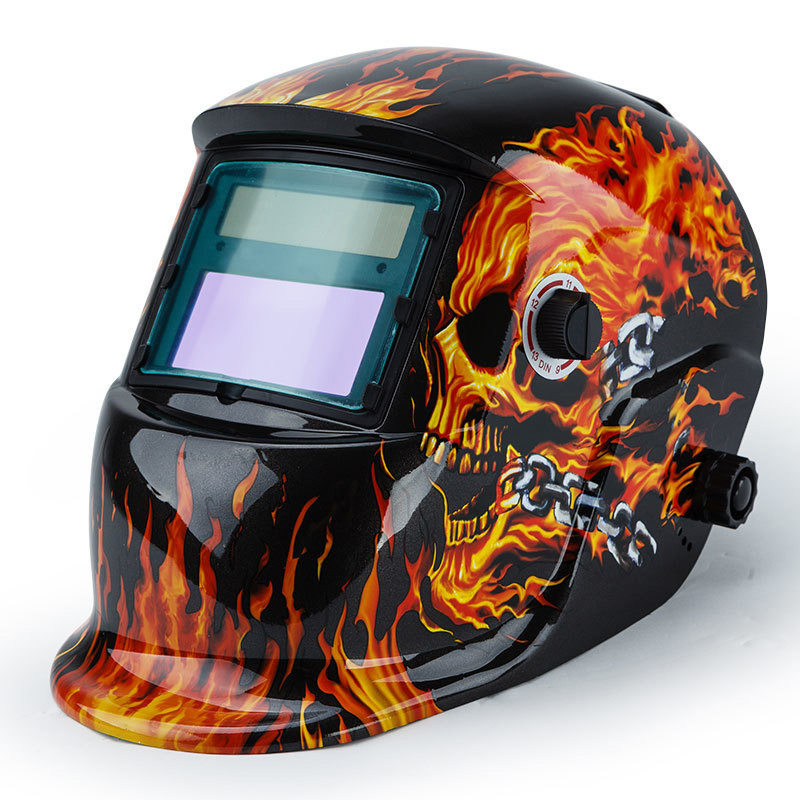
I did the old lie on my back with a tea bag over each eye for about half an hour last night, I really got an eyeful. At the moment I am hoping all the water (still raining and the cheap Chinese welding helmet is still out in the rain) will require me to go buy a better welding helmet - maybe with flame graphics or something cool this time....... :o :o

Paul LeClair
 
Hope the eyes are ok.

I have an ESAB mask, which is good.
We use Speedglas at work. Surprise surprise they are quite expensive, but excellent stuff.

I Like this:
WH4000-FIRE.jpg

 
I am going welding helmet shopping later in the week, this time to a wholesale welding equipment supplier, no more cheap cheap welding helmets for me....

right now I just watched three different YouTube videos on how to properly work with pin striping tape, I have done pretty much everything wrong in my first/second/third attempts, now I have some basic instructions I am going to pull all the tape back off and give it another go........ who knew there was art and technique to applying pins tripe tape, especially curving double stripes..... :o 8)

Paul LeClair
 
Paul LeClair said:
At the moment I am hoping all the water (still raining and the cheap Chinese welding helmet is still out in the rain) will require me to go buy a better welding helmet - maybe with flame graphics or something cool this time....... :o :o

Paul LeClair

Paul at least the rain will help keep the dust down for your painting  :D :D

Reckon I am about a week away from having to work out an under tank bracket solution for the Cico fairing...
just about finished the rear tail peice/seat front mount solution and under guard then onto mounting the fairing but have no bracket only holes in that area on the fairing.
Need to also insorportate some indicators there.

Say do you know anybody that is riding up the West Coast for the rally ?? am thinking of flying to Sacramento and riding my bike up there... it looks like about an 18 hour trip.... from Sacramento which looks well do able especially on a touring Laverda !!
 
Paul

Hope the Eyes are ok. I recently took myself back to school for a welding refresher and for some expert instruction in Mig TIG as I had not covered it 35 years ago. Got some great tips. Your the second person I have know personally to be caught with the solar only helmet, The other kept his helmet in cupboard in workshop, and did not think to much about it being slow each time he started till his eyes would not stop watering. Went to eye specialist and has be told never to weld again. Burnt a layer of his eyes. So when I bought my new helmet I got a battery back up with warning light inside if battery is low.

Getting the brackets just so took a lot of tries. They are the lighter model only 1mm not the old style 3mm so I had a lot more ability to bend them I don't know if it would have been possible with the heavy brackets. Piet's mount looks the gun fixing.

Jugs 
 
Brett said:
Paul at least the rain will help keep the dust down for your painting  :D :D

Reckon I am about a week away from having to work out an under tank bracket solution for the Cico fairing...
just about finished the rear tail peice/seat front mount solution and under guard then onto mounting the fairing but have no bracket only holes in that area on the fairing.
Need to also insorportate some indicators there.

Say do you know anybody that is riding up the West Coast for the rally ?? am thinking of flying to Sacramento and riding my bike up there... it looks like about an 18 hour trip.... from Sacramento which looks well do able especially on a touring Laverda !!

I assume Lawrence is riding from Idaho, Moto V (Bill M) is coming from Oregon and sometimes rides, sometimes drives, I am pretty sure Alan Chalk is coming from Los Angeles but likely flying or driving. I would just post the question here in a new thread and see what you can scare up.

Paul LeClair
 
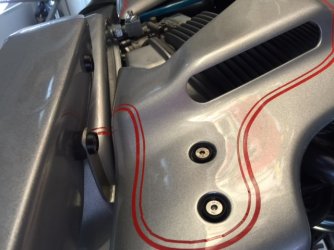
my first proof of concept for fairing brackets following Grant's idea of using the top engine fairing bracket as a base for the rear Jota fairing mount. Thanks, Grant!

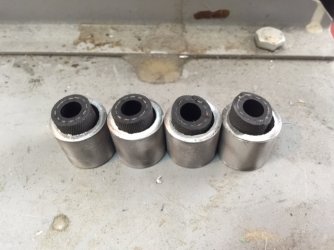
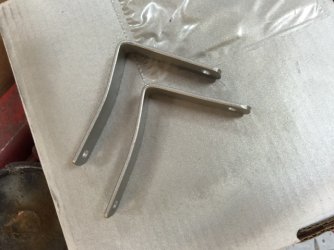
I did not do that the first time as the top bracket for the engine fairings was kind of floppy, so this time around I duplicated the stock engine fairing bracket in heavier gauge steel, pretty simple, six holes, two bends. Once I had a solid base, then I made simple relatively light gauge L brackets (easy to bend and modify as needed), and made 4 aluminum and rubber spacer/isolators, lined everything up, drilled two new holes in the freshly painted fairing (very carefully) and bolted it all up. For longer term use I think I will re make the two L brackets out of heavier gauge strap steel, maybe even stainless steel, as they only need one 90 degree bend each.

a couple of photos, so much better than my first elaborate attempt that mounted off the 7 mm threaded stud on the engine and stuck out like a sore thumb.

I just checked my Itemized "Assembly List", I have 14 items left to deal with, ranging from installation of the front fender and installing the speedo cable to installing the new horns (when they get here this weekend with Wolfgang), installing the new mirrors, etc., etc. The end is in sight, so the next phase, the fettling and adjusting after test riding can soon begin. This has been a lot of work.

Paul LeClair
 

Attachments

  • Jota mount 1.jpg
    Jota mount 1.jpg
    97.7 KB · Views: 9
  • Jota mount 2.jpg
    Jota mount 2.jpg
    114.8 KB · Views: 5
  • Jota mount 3.jpg
    Jota mount 3.jpg
    106.6 KB · Views: 21
  • Jota mount 4.jpg
    Jota mount 4.jpg
    130.6 KB · Views: 27
[quote
Reckon I am about a week away from having to work out an under tank bracket solution for the Cico fairing...
just about finished the rear tail peice/seat front mount solution and under guard then onto mounting the fairing but have no bracket only holes in that area on the fairing

[/quote]

Not so much fun this Brett,had a mongrel of a time GUESSING where the holes were in the mounts and drilling holes in the TT Montegi fairing so these linned up. Having strong ESP might help. What I learned was never to fit a full fairing again.Very easy to end up with a few extra holes. Still sweating on seeing a genuine Cico though.


now to mount the windscreen. I am concerned about cracking/breaking the "new" windscreen (which is several years old and unfortunately a bit scuffed up, but has never been mounted) when making the necessary mounting holes. I am thinking about trying a soldering iron to melt the holes. Anyone ever tried that? Or, is there a tried and true method for drilling the holes?

Paul LeClair
 
Paul,

What you need is a "blunt" drill bit.  The cutting angle is determined by the helix angle and the relief angle and is usually arond 40-50?.  This angle needs to be increased, ie, the included angle of the cutting edge needs to be larger.  This way it cannot bite readily into the soft plastic but rather scrapes its way through.  You need a negative cutting angle, ie, the cutting edge will have to be around 90?.  It's a bit fiddly, but you only need to hold it to your grinder for a split second to modify the cutting edges.

Have drilled dozens of screens without having one crack on me... doesn't prevent you from drilling in the wrong spot though! :D

piet
 
Solid advice there, Paul.  In years past customers of Gustaffasson either got a special bit for plastic with their windscreen or were given the opportunity to purchase one.  The correct drill bit does wonders for increasing the chances of a successful outcome here.
A bit of tape over the location of the intended hole is helpful as well.
 
Paul LeClair said:
I am thinking about trying a soldering iron to melt the holes. Anyone ever tried that? Or, is there a tried and true method for drilling the holes?

Paul LeClair

That's exactly how I do it. I melt a hole with the soldering iron (4mm tip for a 6mm hole) and then drill it out to the right size. Have never cracked a screen that way. The heat from the iron creates a crunchy bead around the hole that is rather brittle and the drill bit ploughs through the '?runchy' plastic without grabbing.  Go for it.
 
thanks for the advice, all. Used a 25 watt soldering iron to first melt the holes, then a blunted drill bit to open the holes up to size.

fitted it up, and realized either the screen is really warped, or my repaired fairing shell is. I now have the lower wind screen edge marked for the trimming that appears to be required to even the fairing screen fit out, am thinking about using a belt sander? I started with a sharp flat file, but that will take days at the slow rate the file is progressing and how much is going to need to be removed from the front lower screen edge to get a correct even fitment and screen shape.....

my hat is off to you fellows who do this all the time or for a living, nothing fits, nothing is straightforward, pretty much everything on the bike has needed fitment, shimming, new brackets made, whatever, nothing much has been straightforward, hardly anything on the bike has been a straight bolt on. I can just picture an angry customer bitching about a bill for two or three hours of labour "just" to fit a new wind screen.......... I am going to go walk the dog before attacking the wind screen with a belt sander....... ::) ::) ::)

Paul LeClair

ps Gustafson Plastics is still around, I just emailed them to order a medium smoke grey screen for the 82 Jota Series 2 fairing, hopefully it will fit better than the clear stock one I am struggling with  http://bikescreen.com/
 
I reshaped my most recent screens using the roller end of a linisher, makes a mess but is quick and gives a nice result without risk of cracking the screen.  A belt sander is much the same process I guess, as long as you can securely hold both items in a manner that does not end in decapitation by your newly reshaped screen. :)
I texta-marked the approximate shape I wanted with it mounted on the bike then removed screen and did it on a fixed linisher.  You have to go easy and keep the heat down so as not to melt too much. It gave me a surprisingly good result.  Cutting a paper/card template and flipping to the other side helps to get both sides much the same shape.
 
breganzane said:
I reshaped my most recent screens using the roller end of a linisher, makes a mess but is quick and gives a nice result without risk of cracking the screen.  A belt sander is much the same process I guess, as long as you can securely hold both items in a manner that does not end in decapitation by your newly reshaped screen. :)
I texta-marked the approximate shape I wanted with it mounted on the bike then removed screen and did it on a fixed linisher.  You have to go easy and keep the heat down so as not to melt too much. It gave me a surprisingly good result.  Cutting a paper/card template and flipping to the other side helps to get both sides much the same shape.

Hi Chris, Hi Steve

Good advice from both of you, thanks!

I am going to put a fine grit belt on my belt sander, clamp the belt sander upside down in the vise, and hold the screen over the belt. I have marked the areas to be removed on the screen, once the markings are sanded off I will know I am done. The belt sander is the closest I have in my garage to any form of linisher, unfortunately.

but, why the heck is any of this necessary? It would be nice of something fit the first time, although the last thick RGS screen I got from Gustafson I had to basically reshape the bottom of it as well, seems a common issue. The Gustafson screen was so thick I cut it with a fine toothed saw, not really practical with this thin Jota screen.

on another note, last year I had the fellow in the UK (Johno?) make me a custom rack for the 1200 TS Mirage project, it is fairly large and apparently would not fit the vat at his chromer's. Anyway, it came to me well packed and in bare metal. I just unwrapped it for the first time to day. On first appearances it looks decent. For the purpose of test fitting and proof of concept I took a file to some of the welds, bead blasted it, and gave it a first coat of "chrome" paint this cool rainy Friday evening. I may modify it further, I have not even tried a first test fitting yet. I don't want to send it to the real chromer's until I know it will fit properly and maybe make a few practical modifications. The grab rail that came on the bike when I got the bike was in the worst condition of all the bits, quite heavily rusted. The first coat of "chrome" paint on the rack looks surprisingly good. 5 bucks for the spray can, bargain......... 8) 8) When it is time for the chromers, I will send the original grab rail as well as the new rack, and I have a few other bits that need doing to be perfect, but I need to be sure of fitment and operation first.

Paul LeClair
 
Paul LeClair said:
but, why the heck is any of this necessary? It would be nice of something fit the first time, although the last thick RGS screen I got from Gustafson I had to basically reshape the bottom of it as well, seems a common issue. The Gustafson screen was so thick I cut it with a fine toothed saw, not really practical with this thin Jota screen.

A big problem with all sorts of repro and aftermarket bits, Paul.

Usually depends on how well the person that commisions the manufacture of such parts has done his homework!  Very often modified or home-grown parts are assumed to be stock equipement, these are supplied as patterns for reproduction, the begin of a long and tiresome chain of balls-ups...

OCTs' policy for instance, is to retain the very last of every stocked OE item for future reference, expressly for the purpose of remanufacturing.  Every time we come across a good example of a rare "unobtainable" item, this is locked away as well!  From there, it is only a matter of finding somebody willing to make the part to an acceptable price, if we cannot do it ourselves. :D  Unfortunately, a former staff member couldn't give a fuck, so many important bits are lost. ::)

A lot of thought and development flows into many remanufactured bits.  Known flaws are ironed out, as well as sometimes using better materials to avoid premature failures, triple cam bearings or sprag clutch components for example.  Then there's the things we conjure up ourselves, such as the RGS windscreen based on the 1000SFC screen shape.  There have been fitting issues with these, but mine fitted perfectly straight out of the packaging, proof that there were minor variations in the stock parts to begin with.

piet
 
Back
Top