Starter Operation Noise SF1

Franc

New member
Location
UK - Midlands
View attachment trim.6CFABC3A-9552-410A-BA3C-056D2695507B.MOV
Afternoon all - next job on the SF having sorted wiring is to have a look at the starter.

The engine generally starts instantly but I have this issue where one in three pushes of the starter button it makes an unpleasant shrill noise the starter turns, but the engine doesn’t. I managed to get it on video with sound and you can see what it does.

The bike runs and rides nicely but worried that this will get worse and one time it won’t start…

thanks as always for any guidance as to where to start.

Franc
 
LH/reverse thread, 24mm AF. Expect to find tired springs at the very least. Possibly chewed rollers and damaged/cracked insert of the freewheel body. Inspect the engaging surface of the drive sprocket, shouldn't show rough spots.

Re-assemble the little bits with a liberal coating of oil, while keeping the crank taper dry. Service/lube the clutch after every season, best to always have a spare set of springs to hand.

piet
 
If you're unlucky the pins can seize in their holes - might come out with gentle tapping (think 'inertia') and if they're really stuck it's possible to very carefully drill from outside to enable a pin punch to tap out the seized pins. It's not a simple drill job - requires a mill to obtain a flat surface for the drill to centre on and a very accurate angle of attack - I made a basic alignment jig and held the freewheel in a cross-slide vice.

Good luck ... if it's only just started to misbehave you might find all the pins come out without drama and the surfaces won't be too bad.
 
Thanks for the info so far - unit came off with a small puller. As pictured I have 6 rollers with wear marks and and chips 5 pins with some ragged springs one I can see is stuck - it is not immediately obvious how to get the top cover off?? (operation and maintenance manual doesn’t say too much) I have purchased a workshop manual off eBay as well but waiting for it.
What I can see of the surfaces don’t look too bad and no cracks visible…. Assume I should order new rollers springs and pins in anticipation of getting the other one out?

thanks
98C8352C-BD82-4B97-B4D7-B7701A0B7DA7.jpegFrank
 

Attachments

  • F76F6303-FA04-4FCC-A07E-3EB145B52D80.jpeg
    F76F6303-FA04-4FCC-A07E-3EB145B52D80.jpeg
    125.7 KB · Views: 22
If you're unlucky the pins can seize in their holes - might come out with gentle tapping (think 'inertia') and if they're really stuck it's possible to very carefully drill from outside to enable a pin punch to tap out the seized pins. It's not a simple drill job - requires a mill to obtain a flat surface for the drill to centre on and a very accurate angle of attack - I made a basic alignment jig and held the freewheel in a cross-slide vice.

Good luck ... if it's only just started to misbehave you might find all the pins come out without drama and the surfaces won't be too bad.
I've found it far easier to dis-assemble the unit completely. The rivets are first drilled out partially with a 4mm drill, the remainder can then be punched out. The little pins/pistons are easily removed once the internals are out. Re-riveting ain't rocket science either, a painless 5-minute job.

Having it completely apart also allows you to re-dress the body, removing the hammer and vice marks that countless bodgers have left behind. Also allows smoothing of the inside of the body so that the rollers cannot be snagged in their path of operation.

Franc,
The springs are definitely knackered, as are the rollers. Also looks like different type springs have been fitted previously. :rolleyes: You may be able to extract the final piston with a bit of patience... maybe not.

The manual goes no further than stating which parts are included and to lubricate regularly, another point in which a manual proves its' worthlessness.;)

piet
 
Last edited:
thanks piet appreciate the help
I’ll drill the rivets out and get a closer look if I can’t get the last out i will take to the engineering shop nearby.

you are so right about previous bodgers, all the work I’m doing since I bought the bike is undoing the bad work of every previous owner …. I find new surprises every week! But it’s getting there and i always wanted a Laverda so worth it in the end!

franc
 
good evening all,

drilled the rivet centres with a 4mm drill and pressed them out all good, inner surfaces not too bad will be able to tidy and polish. Last question on this topic - what am I looking for to replace the rivets, have done some googling but not sure I would rather complete the job myself having got this far with piet and everyone elses help, but if you recommend could take to the engineering shop, never had to deal with solid rivents before

Thanks to you all as usual ... Franc
 
If you have the right rivets that fit your holes, that's no problem at all. You only need a stable surface (e.g. vice) and a heavy hammer.
There are also rivets here: Wegertseder

The rollers are available for a few cents from the nearest better bearing dealer.

I would buy the springs from one of the established dealers. Order twice for spare part.

If your rollers were so worn out, there is a risk that your inner driver with the toothed head is no longer round.
Either you have someone who does it quickly on the lathe or you improvise. This works quite well with a belt sander (120 + 240 grit) if you clamp the driver in a pillar drill or turn the sproket on the crankshaft shaft with the starter.
Important: reduce the diameter only minimal, the directions of rotation must be opposite and try to stay parallel! Sounds adventurous, but it works. :)

If you can't get the sleeve with the broken spring out, a small, soft hose and a vacuum pump will help. Cut the hose straight off and place it neatly on the sleeve with a little grease, create a vacuum, pull out. Has always worked so far.

Thomas aus LAU wishes you a lot of success.
 
Last edited:
DO NOT USE A HAMMER ON THE RIVETS!!!!!

Biggest mistake you can make in this case. What you need is a hydraulic press, around 15 tons should do nicely. Suitable rivets, as well as all other bits, are available from OCT, shipping to UK is a no-go at the moment though. IIrc, they are steel 5mm x 20mm countersunk rivets, but not entirely sure on the dimensions. I should have some in my workshop, I can check tomorrow.

Tap all rivets through the sheet cover into their bores, place on the press table with rivets protruding upwards. Press centrally on the body to ensure all rivets have bottomed properly, don't exceed 2 tons pressure. Using a SHORT steel mandrel of about 10mm diametre with flat parallel ends, press squarely on the protruding rivet ends, one after the other, ensureing the mandrel doesn't tilt, until they are flush with the clutch body. The correct length rivets will require no further dressing, the assembly will be as it left the factory.

Be very, very careful when re-dressing the drive gear surface. Remove too much material and the clutch will slip even more, the rollers won't be able to engage properly.

piet
 
Last edited:
DO NOT USE A HAMMER ON THE RIVETS!!!!!

piet
Correct - at the normal clutch i wouldn´t use a hammer as we have there sensible Aluminium.

At the starter-clutch from steel several times at different bikes it was never a problem. Lasts since > 50.000 km.
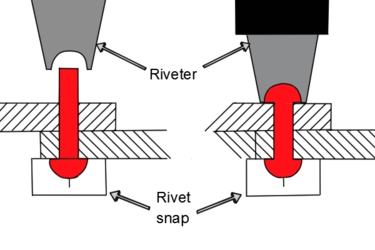
If you want to get a bonus-point, you can use at the open end a revieter, the other side is flat = no rivet snap necesarry.

You can also have a few sips of beer beforehand so that you can aim the hammer better. With a press you don´t need the beer.

1630527868508.png

Thomas aus LAU who made it successful ;)
 
Last edited:
Thomas,

as you well know, we are dealing with countersunk rivets here, no protruding heads possible. The entire assembly needs to be as flat as possible in order to clear the generator vee belt and not to foul the starter drive sprocket. The clutch internal is through hardened, very brittle and quite delicate when exposed to hammer blows.

I have repaired/overhauled dozens of starter clutches over the past 30-odd years using this procedure, quite fed up dealing with inept amateurs wilfully destroying parts in their vain repair attempts, never had an issue with it.

piet
 
Thomas,
as you well know, we are dealing with countersunk rivets here, no protruding heads possible. The entire assembly needs to be as flat as possible in order to clear the generator vee belt and not to foul the starter drive sprocket. The clutch internal is through hardened, very brittle and quite delicate when exposed to hammer blows.
I have repaired/overhauled dozens of starter clutches over the past 30-odd years using this procedure, quite fed up dealing with inept amateurs wilfully destroying parts in their vain repair attempts, never had an issue with it.

piet

There are many ways to get to Rome.

Yes, I have a 30 to press in my workshop. But not everyone has one ore an affordable and fast workshop around the next corner.
There are about 1,5 mm space between belt and body. Of course by too much high you have to grind as the Laverda-factory does it - no problem.

Thomas aus LAU
 
Last edited:
Thanks for the advice I got a new set of springs rollers and plungers ordered - so looking for the rivets tomorrow I have a press I can use but will still take a few sips of beer for good luck

franc
 
Ensure the Back Plate Rivets on the starter clutch are secured if not replace them by tapping the flywheel and using small bolts or MiG weld the starter clutch back plate to the flywheel.

Really stupid why the Breganzie Factory elected to use rivets on the back plate for the Flywheel Starter clutch in the 1st place !

No Kicker on a Breganzie as we depend on a Battery or a PUSH to get started. The Breganzie Starter Clutch issue extents into the Jota Triple series !

I don't think this issue was ever solved except Bregananzie Enthuists learned to live with it.

The Breganzie 750 SF is not 1/2 bad in acceleration, granted you have to learn to keep her going FAST.
 
Last edited:
Back
Top