steering head gussets for 180 -- templates?

Heavy and repeated braking over decades.
The headstock is too short and not supported well enough.
 
beauchemin said:
Is there any pattern to where on their circumference that the downtubes begin to crack?  The front, back, or sides?

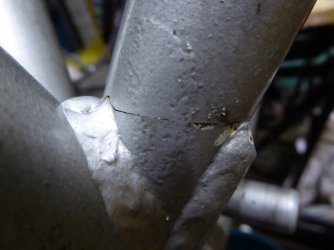
You can see where the crack was on Grant's frame down-tube just below the steering head gusset. The weld repair is still visible. 

Nice reinforcing job Grant. The braking load on the steering head is transferred directly to the horizontal frame tubes. Sorry about the title of the photo. I only realised after I posted it  :D
 

Attachments

  • Grant's crack.jpg
    Grant's crack.jpg
    100.2 KB · Views: 46
have to agree with Grant, Red and Rob, the 180 frames do indeed crack, as do the 120's, just more so due to longer fork legs,and hence more leverage.

I have been a welder for more than 40 years, and have held the coveted ASMEE 9GR which has to be renewed every three years, that is for stick (electric arc) welding which is what Laverda frames are welded with.I have repaired quite a few 180's but surprisisingly only one 120.What I have seen on every single one is defective welding, sometimes VERY deffective, and but usually just a tad deffective, sometimes run in too fast and too hot,mabe the welders at Verlichi were on piecework, who knows.TOG has never been braced at all, but she has been raced many times,(for two years with no breakdowns) I even crashed at Lyden (same place as Bob) because I "endoed" with the rear wheel two feet in the air, hit the barrier full on after I released the brakes, and still no frame damage,and dont forget she has done 200,000 mainly two up with tons of camping gear, and two fat (sorry dear) arses on board.The quality of the welding on TOG's steering head is OK.The problem arises from the HAZ (heat affected zone) that is the parent metal very close to a weld.My solution is similar to Robs above.kind of extending the small bracket that holds the tank fixing lugs (but not removing it) no reason why Reds under neath gussets cant be added as well.A competent welder will understand where the "pull" will be as he progresses and a lot can be done to equalise this to the left and right, if you just slapped on one plate and then rooted and filled it (two runs) without doing the other side it would of course go scewy, the main thing is that you want the whole front end of the frame fairly hot before you even start tacking, TIG can be used to great effect with very little worry of distortion.
I do have a pair of plates left over,they are yours (Chris) for free if you want them
CLEM
 
dont forget cracking carbs and cracking handlebars and cracking collecters and even (recently cracking silencers
didnt tell me you were going to Eastbourne yesterday did yer !
worried the Pan might leave you for dead? or out range and out MPG you
or was it your turn to buy lunch
CLEM
 
Hi Clem! Looking forward to you having a go on the Beemer. I followed Tim on it last w/e, me riding his Pan.interesting comparison ;)
 
The general idea is to match the wall thickness of what you're attaching it to, in this case 3mm is plenty and is similarly over-dimensioned as the rest of the frame.  Laverda frames are always very thick walled, the twins even more so than the triples.
 
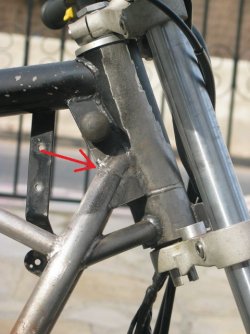
OK, my Redax-style gusset is in place.  Mine is a little taller than the one I saw a photo of, so I added a scallop to ease the path of the wiring harness.

Redax-style_gusset.jpg

 
I spent lunchtime at work  today reading up on the whys and wherefores of the steering head bearings on my 120, whether to have both taper rollers or not....and the need to check whether there was ovality in the bottom  bearing housing.
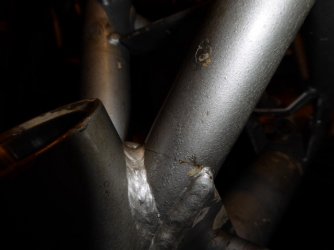
So when I got home I thought I'd have a good measure up to see. And this is what I found!
Now I've read this and all the associated spin off threads.
The failure looks identical to "Grants crack"!
I'm inclined to go for a fairly minimal amount of bracing (probably something like Beauchemin), I only want to repair it, not to race it or ride it particularly hard.
I want to do this myself- am I mad? Bearing in mind Clem's advice. I have MIG welded a Caterham type chassis from scratch, so have some experience.
Alternatively does anyone know of a good welder within striking distance of Reading, UK.


Attachments

  • image.jpg
    image.jpg
    67.3 KB · Views: 36
  • image.jpg
    image.jpg
    61.8 KB · Views: 42
MIG welding will be perfectly OK for your repair, but I doubt that a DIY MIG welder running from a 13 amp electric socket would have enough power, some preheating of the general area is desirable as well and not possible with a MIG, a warm and draught free workshop is also a boon, outside would not do at all, especially in winter. and if you do what I do, you will add some temporary struts  going from lower down the frame, to half way along the top tube first (to hold everything straight) then Cut a 1mm disc right into the crack so that you now have a 1mm gap, this will give you the opportunity to get full penetration of the weld, which is vital, I have seen several that have only had a run of weld on the surface of the tubes and no penetration at all, which may well look fine, but is only marginally stronger than not bothering to repair it at all, if you are skilful enough a "root" run, polished back to bright, and than a "capping" run is the way to go. This is not easy, because of the small diameter of the tube, the approach angles of the operator, flame and rod, whatever method you choose, are varying rapidly as you run the weld around, much harder than a straight run on a piece of plate which is flat.

CLEM
 
CLEMTOG said:
MIG welding will be perfectly OK for your repair, but I doubt that a DIY MIG welder running from a 13 amp electric socket would have enough power, some preheating of the general area is desirable as well and not possible with a MIG, a warm and draught free workshop is also a boon, outside would not do at all, especially in winter. and if you do what I do, you will add some temporary struts  going from lower down the frame, to half way along the top tube first (to hold everything straight) then Cut a 1mm disc right into the crack so that you now have a 1mm gap, this will give you the opportunity to get full penetration of the weld, which is vital, I have seen several that have only had a run of weld on the surface of the tubes and no penetration at all, which may well look fine, but is only marginally stronger than not bothering to repair it at all, if you are skilful enough a "root" run, polished back to bright, and than a "capping" run is the way to go. This is not easy, because of the small diameter of the tube, the approach angles of the operator, flame and rod, whatever method you choose, are varying rapidly as you run the weld around, much harder than a straight run on a piece of plate which is flat.

CLEM

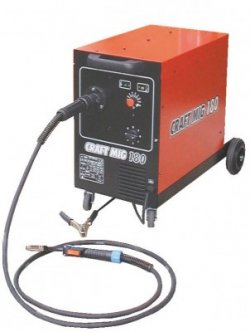
Well that had the desired effect :o I better let an expert do it, mostly due to the "draft free workshop", although I think the welder has enough umpph for the job it  can weld 3mm plate at about 1/2 full power
 

Attachments

  • Mig.jpg
    Mig.jpg
    24.1 KB · Views: 8
Back
Top