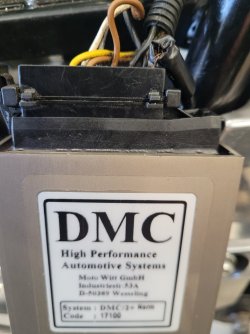
Witt DMC multipin connector problem

henrywillms

Hero member
Location
Canada
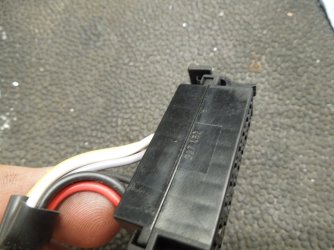
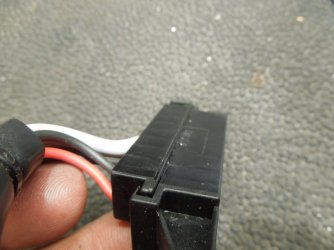
I have one wire frayed right where it goes into the crimp-on pin inside the connector block (the large connector that plugs into the ignition box.

Is it possible to pop the crimp-on pin out of the block? I tried using a small screwdriver to push it out by going into the small square shaped space between the connector and the block thinking there must be a tab or something pressing against the block I could flatten down. Didn't seem to work, didn't want to break it. Hope to reuse the pin or find a new one, once I can see what it looks like.20250315_164509.jpg20250315_162444.jpg
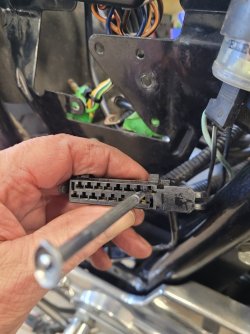
 
yes it is possible, but you need the right tool. I also could o it with a small screw driver but maybe there are better tools hich can do it better.
Andre
 
The pins on these connectors often have a tab that keeps it from coming out. The extraction tool (for AMP) is a small hollow tube. I can't recall the shape of the pins on this connector but the AMP tool is generally for round pins. HTH
 
I have one wire frayed right where it goes into the crimp-on pin inside the connector block (the large connector that plugs into the ignition box.

Is it possible to pop the crimp-on pin out of the block? I tried using a small screwdriver to push it out by going into the small square shaped space between the connector and the block thinking there must be a tab or something pressing against the block I could flatten down. Didn't seem to work, didn't want to break it. Hope to reuse the pin or find a new one, once I can see what it looks like.View attachment 95462View attachment 95461
Flat pin removal tool, not round. Buy something like this:
 
I have one wire frayed right where it goes into the crimp-on pin inside the connector block (the large connector that plugs into the ignition box.

Is it possible to pop the crimp-on pin out of the block? I tried using a small screwdriver to push it out by going into the small square shaped space between the connector and the block thinking there must be a tab or something pressing against the block I could flatten down. Didn't seem to work, didn't want to break it. Hope to reuse the pin or find a new one, once I can see what it looks like.View attachment 95462View attachment 95461
Why not email the lads at Witt, and they can tell you the exact tool to buy or sell you the correct tool.
 
No amount of pushing annd shoving with removal tools alone will be sucessfull.

The connector body is made up of 2-pieces, these slide along each other lengthwise to securely locate the pins. It's a snap fit, a bit of force is required to move the bits. Only when the body frees the pins can they be removed without damage. IIrc, there will be an arrow somewhere on the body denoting direction of movement.

If new pins are needed, these are the same as used in older DIN car radio connectors which were used pretty much globally.

If at all, a thin, flat tool will be required, a small watch-makers screwdriver is quite adequate.

There's no "lads" at Moto Witt, Uwe is a one-man-show these days.

piet
 
  • Like
Reactions: IAG
You can buy these sets of connector pin/socket removal tools pretty cheaply on eBay. They're not exactly quality tools that a professional auto-electrician would use, but they're OK for the occasional job. You can usually find a suitable shaped tool for whatever connector you're working on.

 
Sorry fellas,

Made a big mistake in my first post...

The connector body needs to be slid across its' lengthwise axis. Please see pics.

Once the connector body has been "opened", the pins can be removed with your flat, thin removal tool of choice.

piet

closed-secured.JPGopen.JPGopen 1.JPGarrow.JPG
 
Thanks Piet. Your last post was the trick, and taking seriously you need to exert a lot of force to snap it apart. You actually take snap the connector apart opposite of the arrows, at least in my case. When you look closely at the plastic block you can see it only goes one way. And it only moves a few mm apart, but enough the pin comes right out.

Now off to find a pin, got a feeling that are not too common in Canada.

Don't know why there has to be a million different types of connector blocks.....
 
Thanks Piet. Your last post was the trick, and taking seriously you need to exert a lot of force to snap it apart. You actually take snap the connector apart opposite of the arrows, at least in my case. When you look closely at the plastic block you can see it only goes one way. And it only moves a few mm apart, but enough the pin comes right out.

Now off to find a pin, got a feeling that are not too common in Canada.

Don't know why there has to be a million different types of connector blocks.....
Any workshop capable of fitting a car audio system should have them in a drawer, they have been in almost universal use for at least 30 years! Just ask for DIN connector hardware.

Millions of different plugs just to keep us on our toes frustrated.

piet
 
Henry,
That black wire looks wrongly crimped also, the insulator is not crimped so the wire has no strain relief, so it will fail too. Find the correct pins and also make sure to have the correct type of crimping pliers. Absolutely essential for a reliable joint. They don't have to be expensive, but need to generate the right crimp profile to suit the connector and wire size.
If going to an audio shop for pins as suggested by Piet, maybe take the whole harness with you and get them to re-terminate every wire as they will have all the right gear if they are even half decent. Or if proceeding DIY, plenty of good info on the web these days on wire harness making, check Youtube for HP Academy among others.
eg:
 
Good spot on the crimping. I didnt do the original crimping and I guess I was so over damn over joyed on getting the bloody pin out I didnt notice the rest of them were not correct. I do have the right tool and Wolfgang has the pins and connector block if needed so I will redo the whole thing. As well I will inspect the other related connections.
 
I had some discussions with Uwe Witt recently abut the optical sensor and wiring on my ignition, he made a point about not wanting to send stuff to the UK due to 'paperwork etc'. but he did eventually send me the part numbers I needed and a picture of the wiring, i got the sensor from Digikey in the US... 3 days from order to delivery in the UK... over a weekend!
 
My connector block had been bastardised with female connectors that were the correct size to go onto the male pin, but the wrong type for the block (tang shape and size) so watch out for previous bodgery folks. This made the dissasamly a right pain in the arse and no amount of applied logic seemed to work, until I reallised the female connector had been swapped for something close-but-not-right.

All fixed a while ago now thanks to Piet's excellent Audio DIN tip. Superstar.
 
HAGGIS SAID........". until I reallised the female connector had been swapped for something close-but-not-right."
I think many if us have experienced this, though not neccesarily on Laverdas.
 
Back
Top