- Location
- Calgary, Alberta, Canada
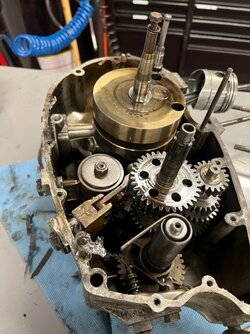
going to charge ahead and split the cases. Have removed the cylinder, the clutch, and the outer housing of the generator. Have also cleaned up the chain drive area enough to find the remaining "hidden" case half bolts
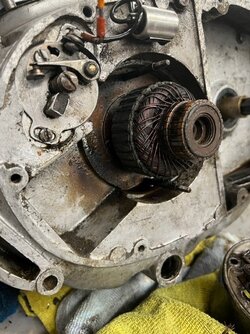
Have removed the crank end bolt and now looking curiously at the generator itself. Looks like it has a backing plate, which has the two threaded rods that the outer generator face plate was attached to and did not rotate. The geneator windings themselves I am guessing are likely an interference fit on the cranckase end, likely with a woodruff key or similar. Has anyone here any experience with removing a generator like this? I am thinking of using a three or four arm puller and just haul it off? Suggestions or advice?
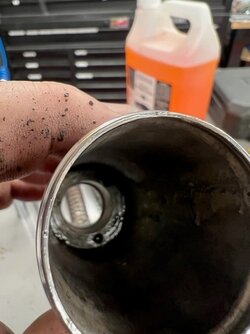
Also have the fork legs upside down in a bucket, they were full of greasy sludge and a fair bit of water. If they are like the Garelli forks from my previous project I am guessing the chrome bits unscrew from the lower fork legs. I am also guessing they probaly have not been apart in many decades, hopefully all the greasy sludge has at least minimized internal rust, we'll see. Going to try to split the fork legs later today
Have removed the crank end bolt and now looking curiously at the generator itself. Looks like it has a backing plate, which has the two threaded rods that the outer generator face plate was attached to and did not rotate. The geneator windings themselves I am guessing are likely an interference fit on the cranckase end, likely with a woodruff key or similar. Has anyone here any experience with removing a generator like this? I am thinking of using a three or four arm puller and just haul it off? Suggestions or advice?
Also have the fork legs upside down in a bucket, they were full of greasy sludge and a fair bit of water. If they are like the Garelli forks from my previous project I am guessing the chrome bits unscrew from the lower fork legs. I am also guessing they probaly have not been apart in many decades, hopefully all the greasy sludge has at least minimized internal rust, we'll see. Going to try to split the fork legs later today


")


 Great fun following the progress...


")