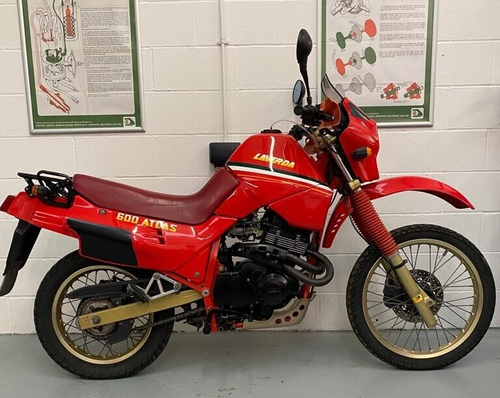
Atlas Questions

Not long after getting my Atlas I parked up on sloping ground, it was slightly windy. An hour or so later a neighbour knocked on my door: "Is it your bike lying on it's side?"
Pooh.
Await arrival of replacement brake lever. Fit, use bike. Starts fairly easily, as before, but abject to rev much past 5-6k.
Grrrh.

I pondered and pondered. What has changed from before?
Well bike was near vertical, fell sideways and came to an abrupt halt on hitting hard surface.

Ergo: Shit dislodged in the carb.

Contrary to your fears Vince, removing the carb was fairly straight forward. Exploratory dismantlement again quite straight forward. I found shed loads of crap inside the carb. Cleaned using solvent, mechanical and compressed air. Everything replaced as found. 2 maybe 3 hours work, at leisurely pace and basic tools.

Result: Runs noticeably better than before toppling over, except...

Upon finding so much crap in the carb I thought that this could also explain why the bike is glitchy between about 2,700 - 3,000 rpm. However, I also noted the Bosch electronic ignition units being the same as the BTZ 180 triples... Cure not in the carb.

Sensibly priced replacement electronic ignition systems anyone?
 
How did you go doing the balance between throats, there is a description in the carb section on the Atlas owners site. It looks a bit complicated to my dumb arse. That's why after I hope Piet confirmed Grants and the CNC inlet builders jetting I hope I can get the local Carb expert to have a fiddle. He also does a lot of Ingitec Ignitions but hopefully, it won't come to that. BTW Mr Thin from memory you have Grant's old bike, with his jetting changes, are you enjoying owning it? I hope to get mine going as well as possible. Maybe these Emulsion tubes might be the key to that carb glitch.BTW this description also includes a diagram that helps as well plus heaps of other info, great site.

CARBURETOR SYNCHRONIZATION AND IDLE ADJUSTMENT

Proper carburettor synchronization and idle adjustment requires an exhaust gas CO meter, a rev-counter and a four-column mercury manometer.

Proceed as follows:

  • Disconnect the throttle control rod and lever (1).
  • Unscrew the idle speed screw (2) out of contact with lever extension (3).
  • Unscrew the screw (4) of the balance lever (5) until the throttles of both front and rear carburetors are fully closed. Check they are with light upward pressure on lever (1) While maintaining pressure on lever (1), tighten screw (4) until it contacts the tongue of lever (1), thus fully closing the throttles of both front and rear carburetors.
  • Tighten the screw (2) one more turn after it first contacts the extension (3) of lever (1).
  • Remove the anti-tamper seals from the mixture screw housing (6) and unscrew each screw five turns from the fully-closed position.
  • Check that the idle air bypass screws, to which anti-tamper paint has been applied, are completely closed- Remove the depression blanking plugs (8) and connect each barrel to the four-column mercury monometer using the screw-in adaptors.
  • Reconnect the Throttle operating rod to lever (1).
  • Start the engine and leave it running to attain normal operating temperature.
  • First ensure that any airlocks are removed from the mercury columns which will otherwise result in inaccurate readings.
  • Align the lower mercury column of the front carburettor with the lower one of the rear carburettor using balance screw (4).
  • Then, if necessary, adjust the levels of the other two cylinders to match those of the lowest pair using the bypass screws on these barrels With the No 1 cylinder blow-by pipe temporarily clamped shut, all readings should be brought to the same level. Unclamped for normal running, No 1 cylinder’s mercury level will always be lower than the other three cylinder levels.
  • Insert the CO tester probe and connect the rev counter.
  • Preferably only by using the special Dellorto screwdriver, adjust the running of each cylinder by turning the mixture screw (6) to get the most even running with the engine idle speed at the correct level and holding the exhaust CO level well below 4,5%. Remember that by unscrewing these screws you increase the CO level and vice versa. The mixture screw of barrel (1) will need to be opened more than the others due to the effect of the blow by hole on that cylinder- Remove the vacuum adaptor plugs and refit the blanking plugs in their place.
  • Fit new anti-tamper seals on the mixture screw housings (6).
 
I will sometime in the future fit a long ago bought set of Oxford Heated grips but I had lost the handlebar mounting plate that they supply making these a bit of a boat anchor. I found the Distributers' site last night, Whites Power Sports and they have an email contact that I used to try and get another mounting plate thinking well I will never hear back from them. This morning, the day after I get a phone call from Matt who really nicely agrees to send me a plate out of a warranty return. Long term motorcyclist and a fantastic bloke to boot. My faith in Humanity is restored for a change,
 
How did you go doing the balance between throats, there is a description in the carb section on the Atlas owners site. It looks a bit complicated to my dumb arse. That's why after I hope Piet confirmed Grants and the CNC inlet builders jetting I hope I can get the local Carb expert to have a fiddle. He also does a lot of Ingitec Ignitions but hopefully, it won't come to that. BTW Mr Thin from memory you have Grant's old bike, with his jetting changes, are you enjoying owning it? I hope to get mine going as well as possible. Maybe these Emulsion tubes might be the key to that carb glitch.BTW this description also includes a diagram that helps as well plus heaps of other info, great site.

CARBURETOR SYNCHRONIZATION AND IDLE ADJUSTMENT

Proper carburettor synchronization and idle adjustment requires an exhaust gas CO meter, a rev-counter and a four-column mercury manometer.

Proceed as follows:

  • Disconnect the throttle control rod and lever (1).
  • Unscrew the idle speed screw (2) out of contact with lever extension (3).
  • Unscrew the screw (4) of the balance lever (5) until the throttles of both front and rear carburetors are fully closed. Check they are with light upward pressure on lever (1) While maintaining pressure on lever (1), tighten screw (4) until it contacts the tongue of lever (1), thus fully closing the throttles of both front and rear carburetors.
  • Tighten the screw (2) one more turn after it first contacts the extension (3) of lever (1).
  • Remove the anti-tamper seals from the mixture screw housing (6) and unscrew each screw five turns from the fully-closed position.
  • Check that the idle air bypass screws, to which anti-tamper paint has been applied, are completely closed- Remove the depression blanking plugs (8) and connect each barrel to the four-column mercury monometer using the screw-in adaptors.
  • Reconnect the Throttle operating rod to lever (1).
  • Start the engine and leave it running to attain normal operating temperature.
  • First ensure that any airlocks are removed from the mercury columns which will otherwise result in inaccurate readings.
  • Align the lower mercury column of the front carburettor with the lower one of the rear carburettor using balance screw (4).
  • Then, if necessary, adjust the levels of the other two cylinders to match those of the lowest pair using the bypass screws on these barrels With the No 1 cylinder blow-by pipe temporarily clamped shut, all readings should be brought to the same level. Unclamped for normal running, No 1 cylinder’s mercury level will always be lower than the other three cylinder levels.
  • Insert the CO tester probe and connect the rev counter.
  • Preferably only by using the special Dellorto screwdriver, adjust the running of each cylinder by turning the mixture screw (6) to get the most even running with the engine idle speed at the correct level and holding the exhaust CO level well below 4,5%. Remember that by unscrewing these screws you increase the CO level and vice versa. The mixture screw of barrel (1) will need to be opened more than the others due to the effect of the blow by hole on that cylinder- Remove the vacuum adaptor plugs and refit the blanking plugs in their place.
  • Fit new anti-tamper seals on the mixture screw housings (6).
 
Indeed my Atlas is ex Grant, but with 3 intervening owners, albeit with very few miles ridden.

Grant certainly spent a lot of time with the carb. The exhaust in non standard on mine. I would be surprised if the jets fitted to mine are much different from standard.

Atlas is a hoot to ride aggressively on the throttle and ok at pootling a very low revs. The ignition glitch is irritating.
 
I just spent the last hour scribing the original Italian text of carb specs in the Parts book to English. As to the 7772 type Emulsion Tubes, I couldn't find mention of anyone changing the Standard Emulsion Tube in the bike from the 17 the factory fitted they come from 1 to 17 and are not evenly graduated for rich or lean performance but the car forums recon as a general principle the smaller the cylinder capacity the bigger the number on the emulsion tube. A bunch in the middle number range are classed as Emission types, not performance types. It's good to learn something new. So it looks like the std idle jet is a 52, and the std main jet is a 162.
 
is the story or 50 X red ones verifiable?
or where these the ones that went to Walter Schneider in Swiss and had the frame numbers obliterated and restamped (AT THE FACTORY) due to Swiss homologation problems?
CLEM
 
I just did compared to the first ride an extended test round-the-block ride, it is weak as hell, virtually nothing till 3k and then it takes off like a scalded cat just like Grant said his did. I have a tricky Croc slide with exposed tree roots and a tight turn in thick grass to get into my shed. There is no way I could do that with its weak off-idle power and its crazy hit at 3k without tipping it over. I can feel its potential, ergonomics are great. it's just the power and the way it's delivered is horrible, especially for something that needs smooth applications of power in tricky situations. It did need extended time with slight choke just to keep running. When it got hot there was some popping at higher revs as well. Lots to think about after that. I see a new ignition happening soon.
 
I see a new ignition happening soon.
Ignitech is always a good option because of its programming versatility, and it makes nice big sparks. I dunno if Red does a plug-and play system for your engine. But if not, and the existing pickups are OK, you could just run with those pickups and a default twin cylinder program from Ignitech.
 
Have you seen this.
    • Carburetor type​

      the carb used in the Atlas is a DellOrto DHLA 40. This carbutor origines from the automobile sector and is used in Fiats and Alfa Romeos.
      Therefore you can find after market spares (jets, sealing kits) for quite low money.
    • Carebutor manifolds​

      A big problem comes from the manifolds between the carebutor and the engine: nearly all of them aged and started to crack.
      • Until a certain stade of damage, the manifolds could very successfully repaired with headresistent silicone (covering the entire outer surface)
      • Stefan Huber did an amazing job when turning massive manifolds on his CNC lathe and offering to us:
        manifold, kit: right manifold: left manifold:
        Price is 320,- € plus shippment for the complete kit.
 
Have you seen this.
    • Carburetor type​

      the carb used in the Atlas is a DellOrto DHLA 40. This carbutor origines from the automobile sector and is used in Fiats and Alfa Romeos.
      Therefore you can find after market spares (jets, sealing kits) for quite low money.
    • Carebutor manifolds​

      A big problem comes from the manifolds between the carebutor and the engine: nearly all of them aged and started to crack.
      • Until a certain stade of damage, the manifolds could very successfully repaired with headresistent silicone (covering the entire outer surface)
      • Stefan Huber did an amazing job when turning massive manifolds on his CNC lathe and offering to us:
        manifold, kit: right manifold: left manifold:
        Price is 320,- € plus shippment for the complete kit.
Yes this is years old. Appears to be a dead end now.
 
I don't know where the previous owner got my CNC manifold, that's Andy Jessop. I am ecstatic I have it and Malcome's exhaust as well. Only missing the supply of Cam Chains at some future point.
 
Thinking back 5 years to when I rode Yogi's bike around Bruises farm at a National Rally it went really well below 3k. I was trundling around in 1st and 2nd gear easily on some steep grassy hills and even had to bunny hop it over a hidden spoon drain that was hidden in deep grass. There is no way in hell my bike would do that at the moment.BTW accelerator pumps help heaps in off-road riding, tried to do without it on a 350 Husky once. It lost its ability to react to hard full throttle to get over obstacles. Mmm.
 
Back
Top