15 Months and thousands of dollars later...

I did the crank .
I do need a new clutch cable actually, but am still playing with the routing.
Any sharp turn, and the clutch feels a lot heavier..:confused:
RESPECT!

Can you tell me a little bit more about the process?? how to open, how to close... How big the press needs to be, and what special tools you had to do, difficulties you found in the process... How to time it to 360
I am super curious about that work and I don't want to disturb the big Laverdist with my stupid questions :ROFLMAO:

Miguel
 
If you have never done a twin crank before , it would be better to start with a single....Just to get the " feel and experience.
My press is 45 ton, but for the 750's you theoretically only would need a 10T , since they come appart with about 6-7 Ton.
It is best to have a press with two handles, because the last mm's are crucial. It is also better to have a bigger press, simply because they are heavier
build, and have less " spring action"
For me personally the crankshaft on the 750's is about the worst thing in the whole engine , but hey , lets not go there. I don't want to upset anybody...
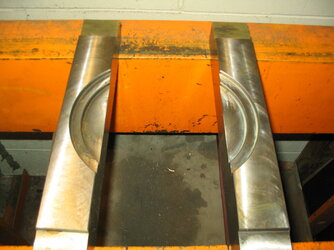
Anyway , I made some special press tools with a recess cut out, for pushing the crank together. To pull the webs off , you use the usual press tools that have a slot cut in them, that goes around the big end.
Before starting it is a good idea to mark the webs, and scratch a line over the webs to align them roughly when you start assembling.
Once the outer webs are off, you can take the rods off, (and spend the next half hour chasing rollers 😄 )
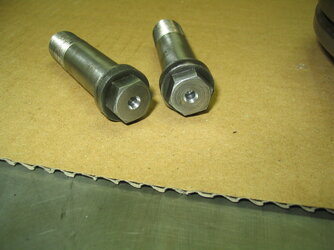
Then there is a bolt that holds the inner web on the center piece ; You need to have a 13 mm impact socket for that, but I don't use the impact hammer, just a bloody long bar. You then push the center piece out of the inner webs ( remember to mark !!).
That center piece is the weirdest thing : they made it with sharp splines on both ends, and then pressed it in the inner webs, letting it cut the female splines in the inner webs : the swarf is still in the center piece !! Never seen anything like it....
This means that the webs can only go back in the same place.....did I say mark everything ?
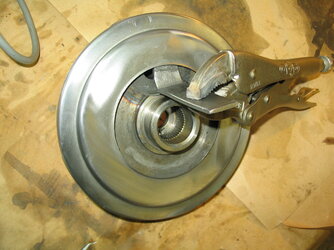
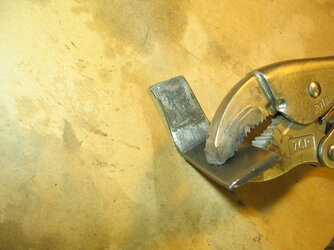
You then have two inner webs, with a big end pin. You don't have to take the slingers of to get the pin out : Use a wedge shaped piec of steel , a bit like a blund cold chisel.
Congratiolations, you are now in a world of hurt.......
Now you can soak the inner webs in parts cleaner, and then scratch the gunk out of the slingers. I do have a professional endoscoop that I can check the inside of the slingers with.

Assembly is in reverse order of disasembly.....
 
Last edited:
Nah , just kidding......

The first thing I did after cleaning and getting parts is to make two dummy big end pins , that slid nicely in the inner webs.
Then fitted the new inner bearings on the inner webs
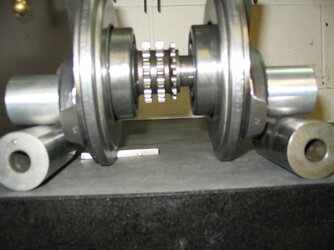
I then loosely fitted the center bit in the inner webs. If you now put that assembly on a surface plate, the gap between surface plate and pin
must be the same for left and right. If you use the old , or new big end, : these should both touch the dummy pins. There is a picture that explains it. Don't worry, if one web is on the "wrong " spline it immediately shows now.
So once you are happy, press the webs "home" . I also add a picture of the assembly press tool : it has two half moon recesst that the webs fit in nicely. Now due to the crappy tolerences of Luigi , the inner piece just about falls together, and you can put the special bolts back in.
Now, this is were I diverted from conventional wisdom. Normally people push the new big end pin in before they assemble the center webs on the center bit. But that carries the risk that when you press the outer webs on , that at the last moment the pin slides trough the inner web, in stead of trought the outer web as it should. And then you are fucked....
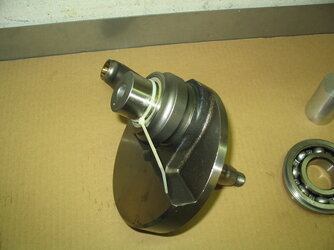
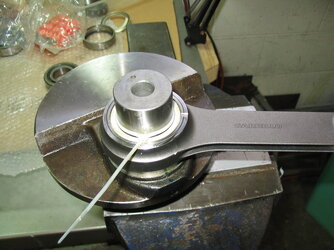
So I pressed the pin in the out web first, then the rod with bearings with lots of grease, and a cable tie to hold it in place.
Then I pressed that combination on the inner part, Worked a treat.
I mentioned my concern to Red, and he confirmed that that does happen. So cunning sod that he is, he made special spacers that go beteen the
inner bearing and the web, that prevent the pin from " sliding through " Realy clever ( for an Australian ...😉 )
Red is great : no problem sharing info and tips. So is Wolfgang in Canada : great guy !
Anyway, when you press the outer web on, you are best to roughly line up the outer and inner web with a set square.
Press it on a bit, and then take it out to check runout. Correct with the copper mallet , and press it on further ,until it is back in place
don't forget to check side clearance; I always put a feeler gauge between rod and web, and press untill I can just pull it out.
.. As mentioned the interferences on these crankshafts are pretty crap , so straightening them does not cost much effort ( like a KTM crank !)
Red ( that guy again ) Told me that 1000 cranks are much better ...and a lot more expensive
Now do the other side.
For clocking out I normally have a very nice jig, but I cobbled together a thing that could hold the Laverda crank at the middle bearings with a clamp. It is so rough and ugly, that I won't show a picture, because everybody here will give me shit , and ridicule me till my dying days...
I was going to make a proper one, but this might be the last Laverda crank I will ever see in my lifetime, so maybe not..
Straightening now is the same as with a single crankshaft. As mentioned before : cut your teeth first on a single cylinder crank, to get experience.
I got this crank to withon 0.05 mm run out , which is the best I ever managed, 40 years ago , I had cranks , that I couldn't get within 0.12 mm...
Red reckons he can get them within 0.03 mm
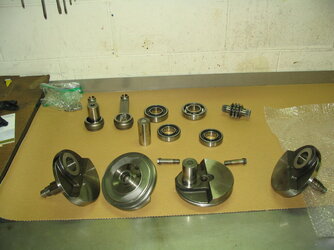
I will enclose some more pictures ( but not of the clock- out jig ) , so that might make all this a bit clearer.
If you are still keen on doing it : You probably need your head examined....but good luck , I hope this will help
 

Attachments

  • IMG_4776.JPG
    IMG_4776.JPG
    126 KB · Views: 55
  • IMG_4777.JPG
    IMG_4777.JPG
    98.5 KB · Views: 55
  • IMG_4778.JPG
    IMG_4778.JPG
    116.4 KB · Views: 54
  • IMG_4779.JPG
    IMG_4779.JPG
    148 KB · Views: 54
  • IMG_4670.JPG
    IMG_4670.JPG
    145.7 KB · Views: 51
  • IMG_4671.JPG
    IMG_4671.JPG
    157.5 KB · Views: 51
  • IMG_4774.JPG
    IMG_4774.JPG
    128.3 KB · Views: 49
  • IMG_4775.JPG
    IMG_4775.JPG
    127.7 KB · Views: 56
Last edited:
I watched Red do the copper hammer thing on my crank wearing his leather apron, looked like a Blacksmith from 100 years ago, great spectator sport for Laverda owners.
 
A trick for on a press with any flex is to give the bed of the press a whack with a heavy copper hammer to help it to start moving once you have lots of load on it and the bed is flexing. Do the same thing when pressing it home as it can jump in steps which can take it past your desired side clearances, using a hammer makes these steps much smaller.
 
Nah , just kidding......

The first thing I did after cleaning and getting parts is to make two dummy big end pins , that slid nicely in the inner webs.
Then fitted the new inner bearings on the inner webs
I then loosely fitted the center bit in the inner webs. If you now put that assembly on a surface plate, the gap between surface plate and pin
must be the same for left and right. If you use the old , or new big end, : these should both touch the dummy pins. There is a picture that explains it. Don't worry, if one web is on the "wrong " spline it immediately shows now.
So once you are happy, press the webs "home" . I also add a picture of the assembly press tool : it has two half moon recesst that the wbs fit in nicely. Now due to the crappy tolerences of Luigi , the inner piece just about falls together, and you can put the special bolts back in.
Now, this is were I diverted from conventional wisdom. Normally people push the new big end pin in before they assemble the center webs on the center bit. But that carries the risk that when you press the outer webs on , that at the last moment the pin slides trough the inner web, in stead of trought the outer web as it should. And then you are fucked....
So I pressed the pin in the out web first, then the rod with bearings with lots of grease, and a cable tie to hold it in place.
Then I pressed that combination on the inner part, Worked a treat.
I mentioned my concern to Red, and he confirmed that that does happen. So cunning sod that he is, he made special spacers that go beteen the
inner bearing and the web, that prevent the pin from " sliding through " Realy clever ( for an Australian ...😉 )
Red is great : no problem sharing info and tips. So is Wolfgang in Canada : great guy !
Anyway, when you press the outer web on, you are best to roughly line up the outer and inner web with a set square.
Press it on a bit, and then take it out to check runout. Correct with the copper mallet , and press it on further ,until it is back in place
don't forget to check side clearance; I always put a feeler gauge between rod and web, and press untill I can just pull it out.
.. As mentioned the interferences on these crankshafts are pretty crap , so straightening them does not cost much effort ( like a KTM crank !)
Red ( that guy again ) Told me that 1000 cranks are much better ...and a lot more expensive
Now do the other side.
For clocking out I normally have a very nice jig, but I cobbled together a thing that could hold the Laverda crank at the middle bearings with a clamp. It is so rough and ugly, that I won't show a picture, because everybody here will give me shit , and ridicule me till my dying days...
I was going to make a proper one, but this might be the last Laverda crank I will ever see in my lifetime, so maybe not..
Straightening now is the same as with a single crankshaft. As mentioned before : cut your teeth first on a single cylinder crank, to get experience.
I got this crank to withon 0.05 mm run out , which is the best I ever managed, 40 years ago , I had cranks , that I couldn't get within 0.12 mm...
Red reckons he can get them within 0.03 mm
I will enclose some more pictures ( but not of the clock- out jig ) , so that might make all this a bit clearer.
If you are still keen on doing it : You probably need your head examined....but good luck , I hope this will help
Woow! Thank you very much with this great knowledge sharing! I will keep it in my forum tutorial book😁
Where are you from?
I am considering when all this corona shit goes away to make a visit to a few of you and see in person how you do that sort of things, that must be the best way to learn...
Last months I was looking for a press, which is one of the tools i miss more in my personal workshop, i saw one from mega 30 tones... that should work, however I would preffer a bench one for space reasons.

thank you again!!

miguel
 
Wow, my deeply felt respect that you dare to do such work yourself! If you do something like this once, all the steps are significantly more time-consuming, not to mention all the necessary devices and tools.

Now all you have to do is move to North America, where someone is wanted who can recondition laverda crankshafts ...
:D :cool:

Cheers
Jo
 
At this end of the world, we tend to just do things. The alternative of waiting at the end of a long supply chain isn't appealing.

That is certainly very nice work. I'm suitably impressed. I'm assuming Boetje is in the North Island as twins are rocking horse poo down here in the South. I suspect there are more triples down here though.

Boetje, are you involved in anything like the Classic Register, VCC or similar ?
 
Ah, it's nice to read of someone's fun learning curve with SF cranks! I did my first in about 1978 and still use the same pressing plates, with a few additions and mods along the way. I still yearn for my own press 920T would probably do it) but can't justify the space or expense when i use them rarely. SF cranks are a 'soft' fit - and as you noted the middle splined section can be virtually pushed back home with a wide vice!! I'm far more impressed with the 750 SFC and triple system where the crankpin is one with the inner webs ... why they never produced SFs with those SFC cranks is beyond me - they are a beautiful road crank, not too light and add a 'vitality' to the engine you can't really get any other way. And the big end pins are super hard and rarely wear.

Phil Todd beat me to actually using ('wasting', Red says :cool:) triple webs to create a lighter SF crank. Converting the splined centre to a press fit is a very workable compromise, but it becomes expensive if all you want to do is reco an SF crank.
 
Back
Top