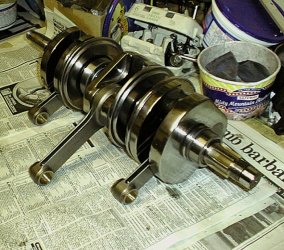
4 row primary Drive & Power outputs, Crank balancing, Con Rods, Alloy casting.

sfcpiet said:
Robjota said:
Thats impressive work JLO, I wish I could just "mould" a new cover in my back yard ....

Why not give it a try, Rob?

Bert Munroe cast and finished his pistons in a shed!  8)

piet :D

Piet I'd love to but Im not that clever.  I have just bought a tig welder which kind of melts aluminium, well that's as much as I've managed to do with it.

You have a go, and Ill see how you get on  ;)

Rob
 
jlo said:
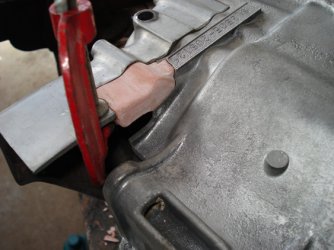
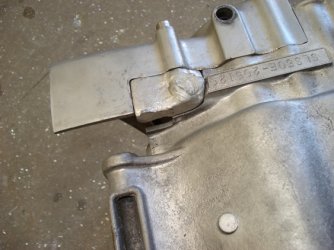
I'm sure I have the picture of the new moulded case somewhere but here is already the original case, you can see the crack.

Was the original case a casting from the factory for this bike ? I presume so looking at it ... You have an endless supply of photos I think JLO  :)
 
I tried some aluminium casting a while back. The little Honda I was restoring had a chunk bitten out of the upper crankcase where a drive chain had broken at some time during a lifetime of abuse.

I filled the hole with body filler. After it had set I trimmed it into what looked like a sensible contour with a dremel. Then I removed it from the hole and used it as a plug for a mould. I made the mould out of plaster (in two halves) and baked it in the oven to ensure it was perfectly dry. Then I drilled the filling and vent holes in the upper half of the mould (all these things have names in casting parlance but I've forgotten them).

Next step was to find some aluminium alloy. The bike had a broken clutch basket that had to be replaced anyway, so I used that. I made a crucible by welding an end and a handle on a piece of steel pipe. Put some chopped up lumps of clutch basket in it and melted it over an oxy flame. Pre heated the mould (paranoid about moisture flashing to steam and blowing up in my face), poured the alloy in and let it cool. When I broke the mould open, there was a perfect aluminium replica of the plastic plug! Easy!

I took the crankcase and patch to an aluminium welder who stuck them together. A final clean up with the dremel, drill and tap a hole for the sprocket cover, and it's (almost) as good as new.

The only minor problem was that the missing piece took the last couple of digits of the engine number with it. I had no idea what they were, which caused some headakes for the pen pushers when I went to register it. Small minds are worried by small things. Fuck 'em.

Cheers,
Cam
 
Robjota said:
Piet I'd love to but Im not that clever.  I have just bought a tig welder which kind of melts aluminium, well that's as much as I've managed to do with it.

Yes, Rob, I know what you mean.... just be sure to wear sturdy shoes, those drops of metal can tickle like hell when they crawl down between your toes, exiting through the sole!!

Dory's the one in our family that's always in danger of setting fire to the house, with her melting all that gold and silver!

piet
 
I am doing some maintance work and there is a foundry on site,OHS makes me wear long pants just in case the 5 ton kible spills any molten cast iron on me,just great in 40c temperatures,BTW I dont go ANYWHERE near any molten metal,its mainly office repairs
 
Dellortoman said:
I tried some aluminium casting a while back. The little Honda I was restoring had a chunk bitten out of the upper crankcase where a drive chain had broken at some time during a lifetime of abuse.

I filled the hole with body filler. After it had set I trimmed it into what looked like a sensible contour with a dremel. Then I removed it from the hole and used it as a plug for a mould. I made the mould out of plaster (in two halves) and baked it in the oven to ensure it was perfectly dry. Then I drilled the filling and vent holes in the upper half of the mould (all these things have names in casting parlance but I've forgotten them).

Next step was to find some aluminium alloy. The bike had a broken clutch basket that had to be replaced anyway, so I used that. I made a crucible by welding an end and a handle on a piece of steel pipe. Put some chopped up lumps of clutch basket in it and melted it over an oxy flame. Pre heated the mould (paranoid about moisture flashing to steam and blowing up in my face), poured the alloy in and let it cool. When I broke the mould open, there was a perfect aluminium replica of the plastic plug! Easy!

I took the crankcase and patch to an aluminium welder who stuck them together. A final clean up with the dremel, drill and tap a hole for the sprocket cover, and it's (almost) as good as new.

The only minor problem was that the missing piece took the last couple of digits of the engine number with it. I had no idea what they were, which caused some headakes for the pen pushers when I went to register it. Small minds are worried by small things. Fuck 'em.

Cheers,
Cam
Cam
That pretty impressive work, it seems out of reach to achieve something like that until you hear a story like yours. You're the man for heads and crankcases now !!

Piet , I'll be sure to keep my boots on when welding, say Hi to Dory !.  

PS off off topic, I got the end of my crank running true, alternator end, it was a total of 20 thou out at the taper, just time and patience and brute force, got it to 1 thou "

Rob
 
It wouldn't be that hard to make a pattern out of jellutong timber, MDF and body filler. Using Cams method you'd then just make a series of plaster molds that fit together and work out a way of clamping it all.
Sounds easy but as with most things doing it for the first time, it's a learning curve. I have the skills/ materials to make the pattern though.
Have done that sort of complex patterns in the past but not of an engine case nature!. First things first I need to finish my carbon fuel tank before I take on any more challenges. It would be a satisfying project though to have a go.
 
Robjota said:
Cam
That pretty impressive work, it seems out of reach to achieve something like that until you hear a story like yours. You're the man for heads and crankcases now !!

I didn't know whether the outcome would be successful, but it was in a non-critical area so I thought it was worth a try. I was surprised how easy it was. The only skilful bit was the welding, which I didn't do myself.

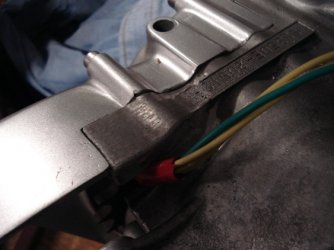
Some photos attached.

Cheers,
Cam
 

Attachments

  • DSC00586s.JPG
    DSC00586s.JPG
    127.4 KB · Views: 28
  • DSC00592s.JPG
    DSC00592s.JPG
    130.3 KB · Views: 25
  • DSC01106s.JPG
    DSC01106s.JPG
    96.5 KB · Views: 29
Robjota said:
Piet , I'll be sure to keep my boots on when welding, say Hi to Dory !.  

PS off off topic, I got the end of my crank running true, alternator end,   it was a total of 20 thou out at the taper, just time and patience and brute force, got it to 1 thou "


Off-topic.....

Rob, no wonder the bearing was knackered!  How did you manage to get it that far out?  Was the bike dropped?

Dory says "Hi!" :D

piet
 
sfcpiet said:
Robjota said:
Piet , I'll be sure to keep my boots on when welding, say Hi to Dory !.  

PS off off topic, I got the end of my crank running true, alternator end,   it was a total of 20 thou out at the taper, just time and patience and brute force, got it to 1 thou "


Off-topic.....

Rob, no wonder the bearing was knackered!  How did you manage to get it that far out?  Was the bike dropped?

Dory says "Hi!" :D

piet

I didn't, it was welded, balanced and rebuilt by the experts because I removed too much metal, I acted upon their advice !!

When it was returned it didn't go into the bike for quite a while and finally when it did I noticed the run out. I didn't expect to be able to true it, but neither did I want to trust it to the experts again,  thinking it was probably beyond redemption, ( at least the R/H web).
Clearly it wasn't.  This is the much abreviated version of the whole affair..... I'll now be able to run with an alternator bearing back in, Interesting to note, its run very well without one since Spa .


I dont like sending the crank out, even with a courier...Ive lost several parcels this year including a brand new tyre and it's not a nice feeling, knowing how much the crank has cost overall and with Carillos, its a big gamble.

Rob
 
Robjota said:
I'll now be able to run with an alternator bearing back in, Interesting to note, its run very well without one since Spa .

Hi Rob, I already told once on this forum that I had a 750 crank very badly repaired in the UK some years ago, the LHS end was totally running out, to the point that I was not able to use the LHS needle bearing in the primary case! I had no money at that time to repair it again so I decided to remove the needle bearing and see what happens. Believe me or not, although I admit that the "new" crank vibrated a lot, no additional damage occured even when my old SF was my daily commuter at that time! The engine continued to run during 2 years until I finally decided to repair it before selling the bike.
 
MarnixSFC said:
What I wrote is not entirely true, the loose 1975 factory engine came from the factory together with a loose space frame in 1978, where it was turned into a rather unconventional racer at the Bol d'Or at Paul Ricard with riders Oudin/Barbera who did not finish the race due to a blown head gasket. The engine remained in France, as said, and the frame returned to Breganze.

Marnix

That frame then disappeared from the factory shelves.
Where did it go?
Ciao
Paul
 
jlo said:
Robjota said:
Wondered if any of you had seen this before (probably) and what was the history behind it. Along with the 4 row chain, it appears to have inner guides, a different cush drive system and front sprocket.
Was it a factory mod ?

Is this the factory, I recall seeing an engine outside a similar building on the old site (or is that just Italy)?

Rob


155082_120475678015015_100001577510142_133253_7482790_n.jpg

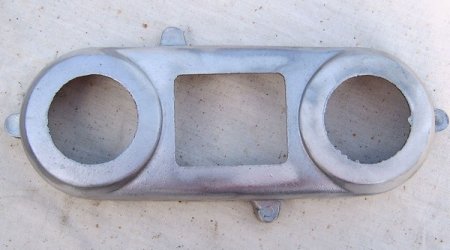
I know the guy who owns this motor. The primary case broke and he was not able to find a new one so he simply decided to... re-mould one in alloy! Great work and great result.

Here is a view of the special spacer for the 4 row chain, picture taken on another engine.

Hi Jean-Louis,

Belt drive alternator as well.
ciao
Paul
 
Paul Marx said:
Hi Jean-Louis,

Belt drive alternator as well.
ciao
Paul

Hello Paul,

Right about this one but I was sure that he tried to mould the primary too, maybe my memory fails.


Attachments

  • moul.jpg
    moul.jpg
    51.6 KB · Views: 12
Robjota said:
I didn't, it was welded, balanced and rebuilt by the experts because I removed too much metal, I acted upon their advice !!

Seems that is quite easy, Rob!

At OCT we're working on balancing and lightening twin and triple cranks.  Calculations have revealed some quite curious things regarding balance factor.... and the fact there isn't much superfluous metal on the triple cranks in the first place!

piet
 
sfcpiet said:
Robjota said:
I didn't, it was welded, balanced and rebuilt by the experts because I removed too much metal, I acted upon their advice !! edit, their advice that welding it back up again was ok.

Seems that is quite easy, Rob!

At OCT we're working on balancing and lightening twin and triple cranks.  Calculations have revealed some quite curious things regarding balance factor.... and the fact there isn't much superfluous metal on the triple cranks in the first place!

piet

Not unless you can lighten the crank pins, rods and pistons 1st, Ive read stories where people have allegedly removed 6kg from a triple crank. I'd like to see the evidence  :-\

Rob

I should also correct that earlier comment about acting upon the advice of the crank specialists, I acted on their advice, as to them welding up the crank rather than start again. I was offered either route but both would be satisfactory,. In hindsight I should have written it off and started with another old crank. However its stayed together this year and now it should be ok.
 
Hi Rob - I've heard the 6Kg lighter story as well - not very beleivable  as there would be massive vibration problems with trying to get balance factor right - I did a "big pin " conversion on my 750 using two triple webs and had to add "Mallory metal" to get the weight back to balance crank properly. Here's a shot of my crank that I did for my racing 1200 - Regards - Phil
 

Attachments

  • crank (assembled)2.jpg
    crank (assembled)2.jpg
    125.3 KB · Views: 61
Very nice Phil. It's a shame to hide it in an engine.

Excuse the ignorance but what rods are those?

Scrumpy
 
Back
Top