They are great to move a bike sideways out of a rut, my late model Husky had them and you could pull the bike against your hip and lift it easily, eg the difference between a good lift and a bad lift and injuring yourself. I almost tried to weigh the Atlas at the local council rubbish transfer station on their weighbridge but didn't today on the way home from Eastern Creek. I have read 150kg 180kg and 200kg. I know there is zero chance of me lifting any 150kg Dirtbike, that Husky was 110kg, but I can dream. Extreme Endro bike riders add looped straps under the headlight and if they don't have these metal lifting handles they add strap loops on the rear guard so the spectators can heave the bike over crazy terrain. More dreaming from me. They're handy for tying luggage on the rack as well. There just way too tall. BTW there are not just simple loops, typical Italian style there a crazy splayed shape looking a bit Art Deco, sexy as hell for a simple lifting hoop.

You are using an out of date browser. It may not display this or other websites correctly.
You should upgrade or use an alternative browser.
You should upgrade or use an alternative browser.
Atlas Questions
- Thread starter Vince
- Start date
After my Anzac thing today I started investigating why the Speedo stopped working on Sunday. It was fine heading out the 60ks of Expressway to watch the Redax blokes but not so much heading home. I pulled the front wheel today and noticed that the flat metal tang that looks like it engages with the wheel hub was bent and twisted quite a lot and now not touching the hub. It looks like it should come out of the Speedo drive and engage with one of a bunch of spurs on the outside of the wheel hub. The question is how much bend is correct. That drive bar has a couple of tears, and cracks, from the bending pressure so it's not long for this world. Anyone got a picture of one fitted, the parts book doesn't show much.
I forgot to add, the Speedo cable has the typical hex nut on the bottom but there doesn't seem to be an attachment that fixes to the Speedo drive. It just allows a push fit, that cannot be right. There is what looks like a spring-loaded ball bearing on the side of the Speed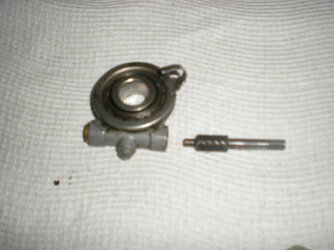 o drive, anyone got a clue what it does?
I worked out where I stuffed up, I hadn't noticed a square-shaped hole in the hub that tang on the speedo drive should have gone into, it's pretty hard to see on a black-painted hub. I think it's ok now but as usual, in their brilliance, as there is no ability to do a lap of the block without using up another Historic Rego log book day for a 5-minute ride I cannot check to see if the speedo is working. So stupid. They had that clause in the original Historic Rego scheme but just gave it up. The last time a risked that non-logbook 5 minutes round the block ride there just happened to be an RBT Hyway Patrol car 300m down my road, never seen that before in the 50 years, I have lived here, and yep he pull me in and incredibly he let me go without the $900 fine for no rego. EG no Log Book entry. Still pissed off that not being able to do such a simple thing that was allowed originally.
Last edited:

mauricejota7604
Hero member
- Location
- Victoria Australia
looks the same as a 900SS speedo drive.

Andy
Hero member
- Location
- Auckland, roughly
Can you Jack up the front wheel and give it a few spins? You should see the needle flutter and the odo tick over a bit.

Dellortoman
Hero member
- Location
- Tasmania, Australia
If you're really keen to try it without venturing on the road, there are better ways than spinning the wheel by hand.
Give the wheel an initial spin by hand, then press a belt sander against the tyre to speed it up. It won't damage your tyre. Once the tyre gets up to belt speed, it'll give you about 20kph on the speedo. That should be plenty to check whether the speedo works.
If you want to go really crazy, use a 9" angle grinder. That can theoretically clock over 300kph on the speedo! Use the flat of the grinder disk, not the edge (you don't want to slice the tyre open). Start with the tyre close to the centre of the grinder disk and move towards the outer edge as the wheel speeds up. Press the disk gently against the tyre so you don't create clouds of tyre smoke. Make sure the bike is well strapped down and the wheel is perfectly balanced before spinning it up to idiotic speeds, lest you end up with a Darwin award.
Incidentally, I use a belt sander with a course belt on it to remove the slippery surface of a new tyre and put a light scuff on it. If you hold it at a 45° angle to the wheel, it'll sand the tyre as well as spin it around so you get even coverage. Move the sander around from one edge of the tread to the other as the tyre spins to cover the whole tread area. Then turn the sander to 45° in the other direction and go over the tread again to create a crosshatch pattern on the tyre surface. Makes it a little safer when you chuck the bike into that first corner after fitting a new tyre. I dunno what that slippery stuff is on a new tyre, but I know a couple of blokes who have thrown their bikes down the road while breaking in a new tyre.
Give the wheel an initial spin by hand, then press a belt sander against the tyre to speed it up. It won't damage your tyre. Once the tyre gets up to belt speed, it'll give you about 20kph on the speedo. That should be plenty to check whether the speedo works.
If you want to go really crazy, use a 9" angle grinder. That can theoretically clock over 300kph on the speedo! Use the flat of the grinder disk, not the edge (you don't want to slice the tyre open). Start with the tyre close to the centre of the grinder disk and move towards the outer edge as the wheel speeds up. Press the disk gently against the tyre so you don't create clouds of tyre smoke. Make sure the bike is well strapped down and the wheel is perfectly balanced before spinning it up to idiotic speeds, lest you end up with a Darwin award.
Incidentally, I use a belt sander with a course belt on it to remove the slippery surface of a new tyre and put a light scuff on it. If you hold it at a 45° angle to the wheel, it'll sand the tyre as well as spin it around so you get even coverage. Move the sander around from one edge of the tread to the other as the tyre spins to cover the whole tread area. Then turn the sander to 45° in the other direction and go over the tread again to create a crosshatch pattern on the tyre surface. Makes it a little safer when you chuck the bike into that first corner after fitting a new tyre. I dunno what that slippery stuff is on a new tyre, but I know a couple of blokes who have thrown their bikes down the road while breaking in a new tyre.
My arms are not long enough, especially using a 9-inch, or they were before using a 9-inch. I love how I keep hearing how there banned for safety reasons, Demo Saws are way more dangerous. I also liked being asked if a bloke should use a cracked tool on an Over Head 3-phase Timber Router that rotated at 20,000rpm. My favourite was using a massive double-handed Hammer Drill using a 50mm tungsten bit with no Clutch. It was so funny watching my buddy the Insane Architect, he was such a Dickhead being constantly spun off his feet and almost in tears from it jamming.

Alan
Senior member
- Location
- Northern Ireland
Surely if remove the cable end at wheel you would see the speedo drive rotating.

Andy J
Hero member
- Location
- Isle of Man
You can obviously test if the Speedo is working using a drill attached to the cable but that doesn’t prove the mechanism attached to the hub is working. A set of rollers would work but probably needs two people to make it easier.
As for the shiny stuff on your new tyre Cam it is release agent to allow the tyre to pop out of the mould easily.
As for the shiny stuff on your new tyre Cam it is release agent to allow the tyre to pop out of the mould easily.
Dellortoman
Hero member
- Location
- Tasmania, Australia
Yeah, that was my first guess, but I've also heard the theory that it's a preservative coating to extend shelf life. A waxy coating probably does both.As for the shiny stuff on your new tyre Cam it is release agent to allow the tyre to pop out of the mould easily.
I have a mate (I won't mention his name) who fitted a pair of new tyres to his Guzzi. Then on the first outing with the bike, he only got about 500m down the road before it slid out from underneath him because of that stuff.
Andy J
Hero member
- Location
- Isle of Man
Slightly off topic now, but I know of someone who didn’t get even that far, high sided his Honda turning right out of the tyre shop on the quayside in Douglas… 

Looks the same as a Veglia unit used on late T140 Triumph see attached links to Ebay sights with relevant photos.
You appear to be missing the pressed in brass thread.
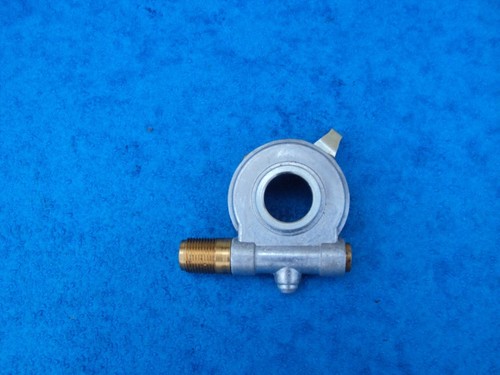
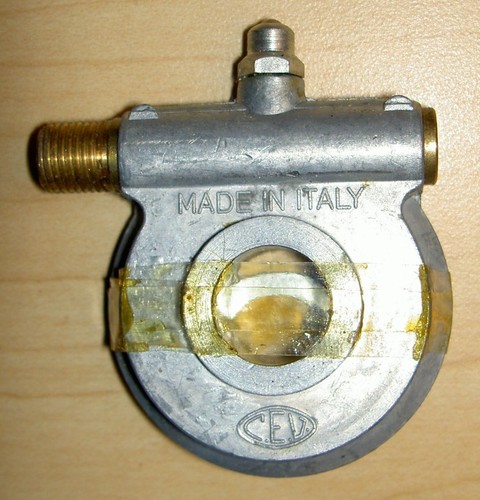
You appear to be missing the pressed in brass thread.
TRIUMPH SPEEDOMETER GEARBOX VEGLIA TYPE 60-7091 TR7 T140 BONNEVILLE 1979-83 | eBay
Find many great new & used options and get the best deals for TRIUMPH SPEEDOMETER GEARBOX VEGLIA TYPE 60-7091 TR7 T140 BONNEVILLE 1979-83 at the best online prices at eBay! Free delivery for many products.
www.ebay.co.uk
Veglia speedometer drive #238 1950's 1960's Ducati Guzzi Morini 8/15 ratio | eBay
Find many great new & used options and get the best deals for Veglia speedometer drive #238 1950's 1960's Ducati Guzzi Morini 8/15 ratio at the best online prices at eBay! Free delivery for many products.
www.ebay.co.uk
Will cause issues.The brass bit is attached to the cable end not in the pic, it's just a hand-push fit though. Doesn't take much to pull it apart on mine.
My brother's T140 speedo cable would fall out at inopportune moments.
Loctite or a good thump with a hammer to ensure press fit.
Safer.
Save you losing the worm gear which eventually happened with the T140.

Cosi
Hero member
- Location
- Kingscliff
Fuck I’ve done it twice, anyone else???Slightly off topic now, but I know of someone who didn’t get even that far, high sided his Honda turning right out of the tyre shop on the quayside in Douglas…
No, not even a slip but I always used to get the comment when getting new tyres fitted, or I did till some new bloke started doing it. I have heard of brand new bikes getting written off heading home on their first ride from being just bought over the years. What I usually do is pull the wheel and drop it off, pick it up with a new tyre and fit it and it doesn't get ridden usually for a week or two, and then hopefully I remember it's got zero ks on it.
Fitted a set of SW Motec 25mm bar risers branded to fit a BMW today. You take off the bar mount top cap and replace it with a new mount that keys into the remaining lower section of the original mount. Really easy and neat fit. That's going to allow me to see through and under the Mini Navigation Tower to the std speedo and tacho. That Nav Tower finally turned up today after a 4-month wait. No issues with the length of std cables and wiring with the handlebars now 25mm higher. Next week I will try and get a new windscreen made that will be supported by and bolted to the top of the tower, probably 100mm higher and quieten down the wind roar I hope. I should have the pannier racks and crash bar finished as well soonish.
I finally fitted the Mini Navigation Tower today. I am happy with it. They're supposed to be bolted directly to the handlebars but I needed more elevation so I used a hole saw on the ends of the foam cross-brace pad, made some 30mm packers out of Stainless 16mm tube, super glued some stainless washers on the ends of the tubes and Bobs your Uncle.