Atlas Questions

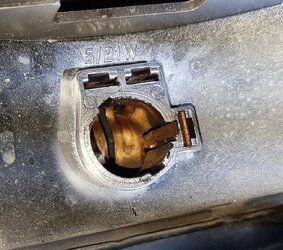
This is mine, I took the 3oclock bit as one groove and the one slightly below it is really tiny on mine and the upper one at 11oclock is bearly seeable. Yours are much more obvious. Poor casting on mine. Thanks for the pic, it explains my issue 100%. I expected to see another big groove on the horizontal and with nothing there it made no sense. They might even be full of dust so I will give it a scratch and see. Sanity prevails at last.
DSCN0522.JPG
 
3 o'clock is the spring earth. Bulb pin grooves at 5 and 11 o'clock. Looks like the socket on yours may have been butchered. Appears oval.
 

Attachments

  • tl2.jpg
    tl2.jpg
    329.7 KB · Views: 12
It's a poor pic of mine, I took it at 11pm in a shed with no lights holding a torch with a camera flash. The grooves on mine are bearly 1mm deep, a fingernail would almost miss them. I thought that spring was THE ONLY GROOVE. Be nice to never think about this again. I will refit the LED tomorrow and hopefully never open it again, BTW the other screw stripped yesterday that hold the red lens on. Both now have plugs made out of rolled Coke Cans super glued in. That's been a great repair.
 
It's a poor pic of mine, I took it at 11pm in a shed with no lights holding a torch with a camera flash. The grooves on mine are bearly 1mm deep, a fingernail would almost miss them. I thought that spring was THE ONLY GROOVE. Be nice to never think about this again. I will refit the LED tomorrow and hopefully never open it again, BTW the other screw stripped yesterday that hold the red lens on. Both now have plugs made out of rolled Coke Cans super glued in. That's been a great repair.
I mistakenly bought spare globes that have the pin configuration your after Vince, I'll check them out tomorrow.
Think I bought them from Supercheap.
 
Thanks for the offer Chris but I have an LED that has the right pin configuration, it now just needs orientation into those very tiny grooves. It should be ok now I know where to jamb it into its socket and fingers crossed it's nice and firm now.
 
I will look at that, might need doing. I have a triangular file used for Wood Saw Sharpening that would work.
 
Now that I can see a clear picture of AJ's globe holder, I agree with him that yours must have been butchered by some cowboy. Maybe to jam in a globe with the wrong pin configuration. Now I'm wondering if it's possible to bore it out and re-sleeve it.
 
Now that I know how the LED is supposed to fit, in those 2 tiny slots instead of the one big slot the light is much more stable. BUT it still needs a couple of cable tie, cut-off ends 15mm long to pack down the side of the LED to keep it nice and straight and tight. I am really happy with these LEDs for very bright tail and brake lights now fitted to all my bikes.
 
Latest pain in the Arse is trying to fit Grip Puppies over the now working Oxford Heated grips, I have the Sports Bike heated grip model with particularly aggressive Knurling that makes this bloody hard. The left Grip Puppy went on fine but even going to extreme measures they just keep tearing even lubed to the max on the throttle side. I have now ordered a set called Grip Puppies Big Pawers from Andy Strap. They're slightly bigger so should go on easier and not tear, or slip I hope.
 
A while back I was asking about the remote battery charger plug the bike has. Andy was saying it was the old-style Oxford battery tender connection, it didn't have any protection for reversing the way it clicked in and I didn't have any way to use it plus I didn't want a Trickel charger as my shed has no permanent power to use one so I was looking for a remote connection that I could use with your typical Aligator clips and found these. I was hoping that I could connect the second set to the plug and then connect the alligator clips to the second one's ring connectors and buggar me it's working just like I hoped. The only issue so far is because you are reversing the second plug connection, the red ring now is Negative and the black ring is positive. Some coloured shrink wrap will fix that potential nightmare.
https://www.mxstore.com.au/p/TecMate-Optimate-12V-Weatherproof-Battery-Lead/4-O-01
 
I'm guessing the grip puppies are for your 3C, because you fitted Oxford heated grips to the Atlas. Or have I got it arse-about?

The cold weather probably isn't helping. Those grips are pretty inflexible when cold. Have you tried putting them in hot water? That makes them much softer and more pliable, but you need to work quickly before they cool down again.

It's always the throttle grip that's the hardest to get on. The last time I fitted a similar grip (I think it was a Beston - a long time ago) I took the throttle twistgrip plastic tube off the bike and did it in the kitchen sink full of hot water. The heat softened the grip, and the water provided a bit of lubrication.
 
Being an individual and very special in the non-classical way, I put Grip Puppies over the Oxford Heated grips. I started doing that a few years back on my 3c. The original Oxford grips were horrible, very hard with zero cushioning. They're much better now but I just like the double thing. The heating is reduced a bit but doesn't destroy the grip puppies at all and they're nice and soft to boot. But as I said the Sports Bike version of Oxford Grips are EXTREMELY serrated and that makes slipping the puppies a major pain. My hands today are ROOTED from massive pushing. After tearing one I came up with a brilliant plan, I bought 2.4m of 3mm stainless rod and cut it into 8/ 300mm pieces and cable-tied them around the Oxford Grip, lubed it all with HEATED soapy water and went at it. I was hoping the reduced friction would negate the extra width, and it did for 85% of the job. And then it tore, so I gave up as a bad joke and ordered the bigger size for Harly one-inch bars. They arrive Tuesday. BTW I have done this on my 3c and Pantah with no dramas but this Atlas seems to be as SPECIAL as me. At least the Battery Charging mod was a win.
 
Being an individual and very special in the non-classical way, I put Grip Puppies over the Oxford Heated grips. I started doing that a few years back on my 3c. The original Oxford grips were horrible, very hard with zero cushioning. They're much better now but I just like the double thing. The heating is reduced a bit but doesn't destroy the grip puppies at all and they're nice and soft to boot. But as I said the Sports Bike version of Oxford Grips are EXTREMELY serrated and that makes slipping the puppies a major pain. My hands today are ROOTED from massive pushing. After tearing one I came up with a brilliant plan, I bought 2.4m of 3mm stainless rod and cut it into 8/ 300mm pieces and cable-tied them around the Oxford Grip, lubed it all with HEATED soapy water and went at it. I was hoping the reduced friction would negate the extra width, and it did for 85% of the job. And then it tore, so I gave up as a bad joke and ordered the bigger size for Harly one-inch bars. They arrive Tuesday. BTW I have done this on my 3c and Pantah with no dramas but this Atlas seems to be as SPECIAL as me. At least the Battery Charging mod was a win.

I’m so over these heated grips, they’re giving me the shits.
They'd be over the neighbours fence if I was doing it.
 
Being an individual and very special in the non-classical way, I put Grip Puppies over the Oxford Heated grips. I started doing that a few years back on my 3c. The original Oxford grips were horrible, very hard with zero cushioning. They're much better now but I just like the double thing. The heating is reduced a bit but doesn't destroy the grip puppies at all and they're nice and soft to boot. But as I said the Sports Bike version of Oxford Grips are EXTREMELY serrated and that makes slipping the puppies a major pain. My hands today are ROOTED from massive pushing. After tearing one I came up with a brilliant plan, I bought 2.4m of 3mm stainless rod and cut it into 8/ 300mm pieces and cable-tied them around the Oxford Grip, lubed it all with HEATED soapy water and went at it. I was hoping the reduced friction would negate the extra width, and it did for 85% of the job. And then it tore, so I gave up as a bad joke and ordered the bigger size for Harly one-inch bars. They arrive Tuesday. BTW I have done this on my 3c and Pantah with no dramas but this Atlas seems to be as SPECIAL as me. At least the Battery Charging mod was a win.
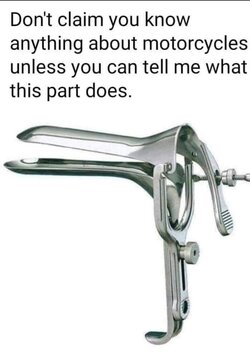
I think this special tool is used to stretch the foam grips and make it easier to slip them on. Can't imagine what else it would be used for.
 

Attachments

  • FB_IMG_1625816150156.jpg
    FB_IMG_1625816150156.jpg
    63.1 KB · Views: 6
Looks handy for a Proctolagist. The Big Paw-sized Grip Puppies turned up today and thankfully went on well, by that I mean with some soapy water as a lube and snuggly. I didn't need to bust a gut. I was worried they would be loose and slip but there A-ok. I am running out of stuff to do, only a couple of things left. I had to use bolts instead of the pillion pegs to hold the pannier mounts on as the pegs thread was too short so they need extending. And I use one of Andy Straps' long green 50mm wide elastic and velcro straps around my old soft panniers to support and secure them but it's too short by 500mm to go around my new SW Motec Urban Panniers.

I was a bit shocked to read their max load is a paltry 5kg, kind of underwhelming. The 2 sides of these panniers are held together with a zip and they bounce quite a bit on rough ground so this strap is I think important. Found a place in Newcastle NSW that sells it by the mitre for $10 and free postage so I will get it added to the middle of my old strap by the leather repair lady in Bathurst St Sydney next week. I have a test ride idea for next week, it involves approx 50ks of very badly corrugated dirt and another 100ish ks of very rough back roads and I want to try that with the bike loaded up a bit. I also have a plan to do the same type of test not including the dirt bits on my 3c also with those panniers loaded. The load I will use is 3/2litre soft drink bottles filled with water in each pannier. That's 6kg each so that should be a good test. The plan with the 3c is to start loaded up with excessive rear shock preload, and dial that down to get max shock travel, once that's found empty the bottles and go again to see how much less preload on the springs is needed with just my weight.
 
The brilliant ideas just keep coming sadly. You need to pull the Plastic Bash Plate, 3 bolts but there a bit of a pain to refit, to do a quick oil change and now that the Crash Bars mount through the front of the Bash Plate that's a bit more complicated than I like even with Reds Billet oil stainer Plate with its separate Magnetic drain plug. So the plan is to plot the position of at drain bolt using the bash plate fixings and drill a hole with a hole saw directly adjacent to that oil drain bolt through the plastic bash plate and just big enough to get a socket on it. One issue I foresee is because there is no centre stand which means the oil will drain on a bit of an angle and make a mess inside the bash plate, the fix for that I hope is a short piece of plastic plumbing conduit glued to the baseplate hole and up to touch the bottom of the engine case.
 
Back
Top