Building a race bike

Been focused on other things for a while but got a few hours in last night,
Made my exhaust roller rocker prototype last night, 1.43:1 for the inlet and 1.15:1 for the Exhaust.
now to design the cam so I can get the correct cam timing / lift pattern.
I am luckily enough to have some good contacts at Kent Cams who can design the cam shape for me from my timing info and rocker design / rocker pivot point info. Skiing next week but will digitize it all when I get back and set the ball rolling, Interested to see what shape they come up with.
Valve lift is rather a lot compared to normal but timing is not massive considering a 6000 to 12000 rpm power band. (coming on power at about 4k and peaking at 10k with only a small drop off in power all the way to 12k) In theory anyway 😁😁

Also going to see if I can wrap up the crankcase mods while the sub contract work is going on so I can at last design the final crank form and bearings etc. And of course finishing the oil system, Looking forward to that part.

Pics as soon as I can
J
 
I need to do this carefully, as I don't want to offend anyone involved, how do you spec the hardness re cam and followers. I was part of a big disaster when an aftermarket cam didn't play well with standard Laverda cam follower hardness spec resulting in some cases both eating each other in very few ks. This blindsided everyone involved and was sorted by replacement of followers with a hardness spec that worked with the custom cam, the problem turned out to be a much harder than the standard Laverda cam and it being incompatible with standard followers. All now fully fixed but one horror story for all involved. I forget who made those cams but the retainer stepped up bigtime at his great expense and in the end fixed this, really great bloke but I good thing to know about.
 
H Vince,
We regularly design cam profiles for different engines etc and the simplest way I find is as follows.
We design the follower and use Stellite pads, this avoids any issues for "Sliding" type followers. We then tell the cam manufacturer of the cam opening / velocity and let them spec the cam hardness. To date never had an issue with this combo other than once had a stellite pad come loose. 1 in about 300 so not an issue.
For my Rollers I use Jessel rollers from the states, these are designed for 1000 lb/in springs and crazy acceleration rates with no problems, Basically I over spec everything. Simplest option. And at the end of the day, expensive is usually cheapest.

Regards,
Jules
 
Julian,

Not Laverda related but you haven mentioned something I am working on for a different bike and I have not been able to find the answer.

I am making camshafts and cam followers for a 1929 AJS 350cc side valve bike. I was going to put stellite pads on the cam followers with silver solder. But................................... I don't understand how I can solder on the pad without losing the heat treating on the cam follower? Silver solder melts at 1000 degrees F (537 degrees C). The cam follower except for the pad is made out of carburized 8620 which I can't allow to get that hot?

I know lots of British bike such as Triumph have a stellite pad soldered on the cam follower. How did they do it?

Regards,
Bruce
 
That's what I love about this forum, you learn from the way conversations go along with new stuff that helps all involved. I have heard about stelliting valve tips but dint get that reference as well.
 
Just silver solder the pad on. The pad's the wearing surface, not the follower body so how hard the body finishes up is largely irrelevant.

Vince - it might not have been hardness related. I've seen a hardened steel cam run against hardened steel buckets - and destroy everything. Substitute a cast iron cam with a eutectic buildup and it'll last for ever. Or in this case, nitride the cam and it lasted reasonably. Material choice has a lot to do with it. Given other options, I wouldn't now run steel on steel in a rubbing design.
 
In one case I saw a 1/8 of an inch deep cam width grove warn in a bucket top in approx a 1000ks. Mine had striations in the cam face so not as bad thankfully. It was pretty shocking to see. I now see a lot of car shows on TV talking about braking in Flat tappet cams, who know how important this is too long engine life.
 
Most aftermarket car cams - for road cars anyway - are cast iron, chill cast. If there's no build-up on the lobe then usually only a short bed-in period with the right oil is needed, With a eutectic build-up the bedding in period is a bit longer,
Springs are a major factor too. Too many aftermarket car setups use excessive pressure IMO.
These days I believe it's only the oddball vintage/classic race stuff that uses billet steel cams - hence Julian's experience with steel on steel.
 
Metallurgy is an amazing science - too close in hardness and it matters not how hard each part is. Out of interest is stellite super-hard?
Sooper-dooper fucking hard... ;)

Laverda 750 rockers can be salvaged with a soldered stellite pad, works great!

piet
 
Julian,

Not Laverda related but you haven mentioned something I am working on for a different bike and I have not been able to find the answer.

I am making camshafts and cam followers for a 1929 AJS 350cc side valve bike. I was going to put stellite pads on the cam followers with silver solder. But................................... I don't understand how I can solder on the pad without losing the heat treating on the cam follower? Silver solder melts at 1000 degrees F (537 degrees C). The cam follower except for the pad is made out of carburized 8620 which I can't allow to get that hot?

I know lots of British bike such as Triumph have a stellite pad soldered on the cam follower. How did they do it?

Regards,
Bruce
Hi Bruce,
Sorry for the late answer,
Unfortunately you will need to re-heat treat the followers after soldering. Normally though I get my pads built up with metal spray if possible as this goes on hard and can only be ground to finish which is all it then needs.

Regards,
J

Edit after reading Greg's post.
You may get away without re-heat treatment but I think it may upset the stellite, try dropping in black oil immediately after soldering and cross your fingers.
It also depends on what the follower is running in. Soft steel in Cast iron is known for picking up, hard steel does very well, also soft steel in bronze etc tends to have a lot more issues than hard steel, many old engines run hard steel rollers direct on hard steel pins that last forever, even with bigger cams but it really depends what these things are doing.

As said before metallurgy is a funny thing and I am far from an expert, just got some personal experiences and small bit of schooling in it.
 
Last edited:
Most aftermarket car cams - for road cars anyway - are cast iron, chill cast. If there's no build-up on the lobe then usually only a short bed-in period with the right oil is needed, With a eutectic build-up the bedding in period is a bit longer,
Springs are a major factor too. Too many aftermarket car setups use excessive pressure IMO.
These days I believe it's only the oddball vintage/classic race stuff that uses billet steel cams - hence Julian's experience with steel on steel.
Lot of sense there written by Greg,
Agree, cams don't usually need to be silly hard.
We have had a lot of problems in the past with followers wearing badly in infancy, the break-in period is really crucial it seems. Had all sorts of followers fail for unknown reasons within 2 hours of running until we realized (a long time ago) that the cam/follower were the hardest loaded area in an engine, low RPMs absolutely kill new followers, Now we run the engines immediately up to 2500-3000 rpm for at least 10 minutes on a new startup before doing anything else while doing visual leak checks etc. after that if they are still alive we seem to have no issues. Roller followers seem to be exempt as long as the tappet clearance is kept tight and not allowed to hammer.

J
 
Finally the head is also now ready for final work to proceed, scanning, digitizing and then machining to pieces before welding and re-machining.
Also going to completely fill the void between the combustion chamber top and the cam tunnel area, there is a very large area of completely stagnant ail there that will not cool well at all. (look in just above the spark plug) this will be completely aluminium filled solid to get as much heat as possible moved and dissipated.
Cams starting manufacture this week, These will be absolutely alien to any Laverda 750SF you have ever seen.
Crank and main bearings starting final design this week or next,
Oil pump and oil plumbing will be worked on at the same time. Have this roughly worked out now so hope to be getting there shortly.
Still a lot of work to do though.

Will update next when I have some pictures.
J
 
Hi,
If you look closely you may be able to work out what I have done.
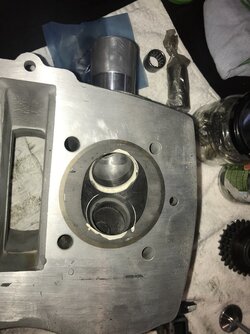
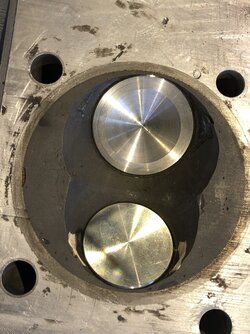
Basically to get a better short side turn and for it to curve more gently on to the back of the valve head evenly and not just one side, I moved the valves in (as if they were being opened by 4mm) and then the floor and seat lifted up to meet the valve. this however moves the valves too close together pic 3037 and still leaves me with a quite deep combustion chamber that would still need a large piston crown in order to get the CR that I desire. therefore I moved the valve heads outward (see pic 7795) and made the included angle less, thus allowing the combustion chamber to be 11mm shallower and only need a 3mm tall gentle dome to get me 13.5:1 CR It also gives me an even better run onto the back of the valves which actually give me the same flow at full lift as the head does without the valves fitted, so the valves are being used to their absolute best efficiency.
I could also integrate a small flowed divider between the valves to help stop crossover of gasses in the overlap period.

Hope this helps explain.
J
 

Attachments

  • IMG_3037.JPG
    IMG_3037.JPG
    147.2 KB · Views: 64
  • IMG_7795.jpg
    IMG_7795.jpg
    177.4 KB · Views: 63
next up - 4-valve head... :unsure: ;) Wonder why no-one re-used a Zane 750 or 668 head. they should be possible to adopt with your welding and other skills...

amazing work, really fun to watch! I really cross my fingers this will make for an awesome power development...!!
 
Back
Top