Building my Jota

sideshow

Hero member
Ok , so rather than hijacking the "what have you done with your Laverda " feed, I will start this  Topic on my Jota.

It all started a few years back when I saw a 1200 built with bright Orange SFC fairings. I was quite taken by it, and it was for sale. I called the owner and explained I was away for work, and I would be back on the weekend cash in hand to buy the bike, he accepted, and then promptly sold the bike to someone else. That lead me to buy my 1956 wide framed Norton Domi racer with a big bore Atlas engine in it.  But I could never get the Laverda out of my mind. I have never been one for keeping bikes standard, so it would not have bothered me that the 1200 that I saw wasn't standard either.

Last year, I decided it was time to build a bike, in the sense I would buy something with good bones, and change it to how I wanted to look. I came across a BMW R90,  well priced, but  I couldn't bring myself to change the bike from what it was , there are so many chopped BMW'S out there, and so i wanted something different, by chance the guy had a Laverda 500, he said a guy he knew  had  10 or 12 of them, but he didn't like to sell.

I made an appointment to see the guy, he ended up having several rooms in an old village house, with over 100 bikes in it, mostly european bikes , but also 12 Vf 1000's !

It was true there were 12 Laverda in the room I first walked into, The owner let me alone for an hour to look at his collection  and after talking for about 3 hours he asked me which Laverda I would choose if I could have one.  I chose two, My burgundy Jota, and a black 1200. The Burgundy Jota was badly painted burgundy over the original orange paint. My wife was with me, and she was a saint, being very patient .
A long story short , it took about 4 weeks to do the deal, it was more of an interview really, to see if I was the right sort of person to buy from his collection of barn finds, he warned me he was a collector and not a seller.... to this day thats true, he won't sell many more from the collection. He says once he has passed away then they can be sold.

So I finally bought the Jota, and with my wife's encouragement the 1200, she still wants me to get more !

I want to say, Im not experienced with engines, Im good with Carbs, as I raced two stroke 250 production racers in a past life, and was constantly playing with the reed valves  and jets . But I have never done anything more than very basic maintenance , so I knew given the Laverda was quite special  , I knew straight of the bat, I needed to find someone good to rebuild the engine for me. The rest I would handle myself  via sourcing parts and building things for the bike.

The Jota is a Spanish Jota, so nothing to do with the Slater ones, Its from 1980, had 36000Km on the clock, hadn't been started in over 25 years. It was a complete bike, matching numbers, but a complete mess as well, with the wiring loom more like a birds nest, broken bits here and there. Most people would call it a parts bike, I knew it for what it was to me , a bike I could do a resto mod on, without feeling guilty of changing something that was too nice to change .

I dont shy away from a challenge, and because of my work, its in my nature to make what I cant find when I need parts, or think something could be better.

Some may say its just an endless list of parts being procured, and bolted on, and that its not that special... well we all have different skill sets, and some of us can do more than others , and some less. What it really is , is me building my bike the way I want it, having some of my talented friends join in when their skill sets cover something I cant do, and to have a great time doing this project.

Already I have had some pretty cool adventures finding new and old , modern and vintage parts for the Jota , and its turning into something pretty special.
We have 5 kids from  8-18, they all come in and out of the shed and look and ask questions, loads of friends have dropped by, plenty of Espresso, rum and beer has been drank with them in the shed, while they all hang out on the sofa, listening to music, and some people even join in. Its become quite a social place to be. Even the 8 and 9 year olds come and hang out, drawing pictures of how they want the jota to look, and what colour it should be , and showing their disappointment that it will be a single seat, and not have two seats so they can join in on the ride...and the 8 and 9 year olds are girls!

So if you are interested please jump on in on the journey, i will put up new posts frequently as work and family time allow. I will also ask for a lot of advice, which may be inane and boring or probably has been asked a 1000 times before , but I will appreciate all advise given, as I do already from the people on the forum that have helped out a lot so far.

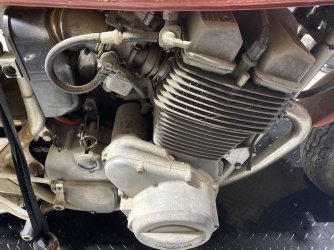
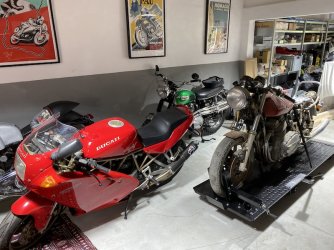
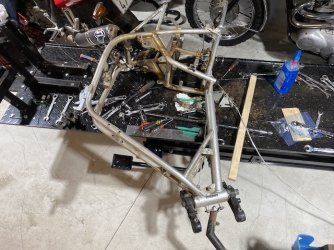
the first photo is my 1200 and the Jota in a red box ,  in a line of other Laverda. The other photos  are of the bike on its first day in my shed....
 

Attachments

  • the room..jpeg
    the room..jpeg
    200.1 KB · Views: 1,121
  • Home 1.jpeg
    Home 1.jpeg
    184.9 KB · Views: 1,086
  • Home 2.jpeg
    Home 2.jpeg
    182.2 KB · Views: 1,073
  • Home 3.jpeg
    Home 3.jpeg
    185.8 KB · Views: 1,106
Going to be a great read following your story. Looks like a brilliant starting point. Doesn't look all that modified to me, but I'm happy to hear that you'll be tossing a lot of the rivets in the bin  :D I love that the kids are in on it. Mine know I spend countless hours building my SFQ but aren't really into spending time out in the shed with me. Mine has a single seat half-fitted, but neither of them have expressed disappointment that they can't go on the back! My 15yo son is convinced I'm and uncontrollable speed demon anyway and thinks I'd do 160 down our sidestreet with him on the back!
 
Piranha Brother 2 said:
Going to be a great read following your story. Looks like a brilliant starting point. Doesn't look all that modified to me, but I'm happy to hear that you'll be tossing a lot of the rivets in the bin  :D I love that the kids are in on it. Mine know I spend countless hours building my SFQ but aren't really into spending time out in the shed with me. Mine has a single seat half-fitted, but neither of them have expressed disappointment that they can't go on the back! My 15yo son is convinced I'm and uncontrollable speed demon anyway and thinks I'd do 160 down our sidestreet with him on the back!

hahahahaha thats brilliant about you being a speed demon, my kids encourage me to be, but responsibility has kept me sensible, mostly.
You are right, its not that modified, but as this is my biggest project to date its a bit more sedate. The next bike I would like a Motodd frame, and go all out with engineering work, the mill and lathe will come into the shop for that... thats what the 1200 is set aside for.
 
Let the fun begin!! You sound like you?re a lot more able than I was when I returned to Laverda ownership so will have lots of fun. Good luck!
 
Looks like a quick wash with Mucoff and you should be away - check the tyre pressures before you go - some interesting items in that old building and your garage looks way too organised 8)
 
So pleased to see you doing this. I have been really interested in your previous posts on the other thread. I'm hoping to embark on a similar project, having never really letting go of that Laverda thing, ever since my first Jota when I was 19. Looking forward to learning loads and enjoying watching the project develop.
 
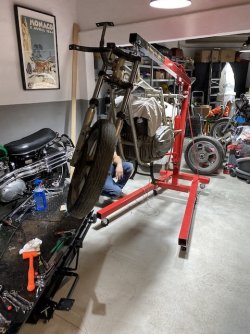
So As I started stripping the bike, I knew I wanted to have the bike look like an endurance bike from the late 70's. I wasn't sure what parts I would use  , that were already on the bike, and what parts I wouldn't , so when breaking the bike down I made sure to label everything, and I took a ton of photos (I should have taken more of photos of details in hindsight) and measurements of all manner of things. Everything is stored in plastic bins, they will all get cleaned, labelled again correctly rather than with my names of things that aren't always correct. What ever I dont use on the bike will be kept, so a future owner can put things back if they wish. Some things were beyond repair but I have kept them also because of 3d scanning and printing, and rapid prototyping, they can easily be reproduced if needed, and the cost of that is going down substantially.
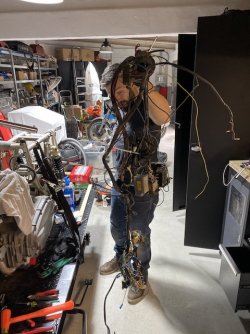
Early on in the disassembly I decided to run with a Motogadget blu system  I used the first M unit system on a Morini that I had, and learnt enough from an instrumentation tech friend of mine when we built the wiring loom for that bike, to know I can do the Laverda without too much help , I talked via message to Jlo, about what he did with his P12XX in regards to moto gadget as well, and he was kind enough to share his wiring diagram. I like having as much information as I can get, it lets me decide which way I will go with what ever I am doing. It also opens my mind up to other ways of doing things which means I can often end up with a better result than my initial idea. It also helps to avoid pitfalls when re inventing the wheel! So the wiring loom birds nest came straight out and was bagged and stored. I want to go with new electrical components rather than hunt for obscure and hard to get vintage electrical components which may or may not work, and end up having to spend a bunch of time fault finding things.
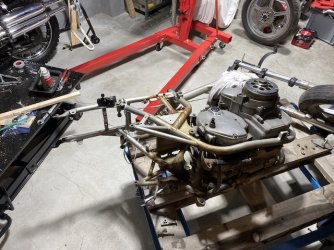
As the bike became further stripped down, I wanted to find an engine guy, at this stage with work commitments and my lack of engine experience and knowledge , as fun as it would be , I didn't want to attempt an engine rebuild on my own at this stage, ( i will start with an engine rebuild on something smaller that wouldn't be so costly if I royally screw it up) After research, it didn't take long to find who I wanted to do the engine re build, I chose Red, contacted him, and made a plan to get him the engine.  I looked on the two laverda forums to see how best the engine should be taken out, I think they are a great resource for finding out how to do things, searching for topics via key words can take a lot of work, and I have seen there is a bit of eye rolling when people bring up the same questions that have been asked time and time again over the last decade, but as a newbie for want of a better word, its really time consuming to  find  answers to questions that are specific to my bike by just trawling through pages and pages of key word and subject hits, especially when the threads can wonder of course of the topic easily. Im not really interested in what oils or brake pads to use,  they are personal choice I think, etc so Im never going to ask those questions , I can make my own decision there, but more pertinent info is often what I am after, so rather than waste hours of trawling, I may just ask the same questions again, I hope the more experienced gurus can understand that. . That segways me in to how I took the engine out.... wanting to know any tricks to it, so as to get the engine out easily, I spent time reading how its done , after trawling through said topics, I chose the lay the bike on its side method to lift the frame off the top of the bike. Some other methods were explained in threads, but Im a picture and diagram sort of a person, often my logic isn't the same as the person explaining something, so I find it hard to visualise what is being described, at work I work with lots of different nationalities that have different levels of knowledge, and i have found if you do sketches and use drawings , its a sure way to better understanding things for everyone involved. But I can understand,  lay the bike on its side and lift the frame off, I get that straight away. Perhaps I did it a bit more complicated and a bit novel to how other people with more experience would do it, but  I did it with a mate, and the use of an engine hoist, and a pallet on wheels. I took the top head cover off as well, just to give extra clearance, and I was also wanting to see what cams the engine had in it too, A11 by the way. I knew I was going to lay the bike down on its left side, so I took all the engine mounting bolts of that side so when it was flat on the pallet, I didn't need to take those mount bolts off. I took the rear wheel off and the swing arm and all other associated bits there, as the bike was being stripped anyway. I could have taken the front end off, but didn't really think of that or need to. Using the engine hoist to lift the bike , I pushed my bike elevator out of the way, and and pushed a wheely pallet in under the bike, and gently lay the bike on the pallet, it was easy with two of us, one on the hoist, the other manoeuvring the bike and pallet, I think i could have done it by myself with just the hoist, but having a mate there and yarning at the same time made it more fun. Probably the way I took the engine out was novel, but it worked, and no damage was done, I learnt a lot for when I will put the engine back in.  After an oil drain, engine was crated up and sent south to Red. In the mean time the rest of the break down of the bike was pretty easy and happened in a matter of hours. Im looking forward to weighing everything that came off the bike, and will stay off, a lot of it is really heavy!
Now the fun really started with what I was going going to do with the bike , and how I was going to make it look. Not having to deal with an engine re build gave me a lot more time to concentrate on other aspects of the build/ modification
 

Attachments

  • 2.jpeg
    2.jpeg
    127 KB · Views: 950
  • 6.jpeg
    6.jpeg
    146.1 KB · Views: 971
  • 4.jpeg
    4.jpeg
    143.2 KB · Views: 942
  • 3.jpeg
    3.jpeg
    131.1 KB · Views: 946
  • 1.jpeg
    1.jpeg
    151 KB · Views: 953
julian said:
Looks and sounds like a nice project,
Keep it up and good luck,

Jules

Thanks Jules, thanks for the help with the forks. A couple of other new guys on the forum asked me to do this so they could see a few things, It doesnt seem widely done, so people can see my triumphs and failures with this topic. Maybe it will help others  too.
My project isn't anywhere near yours, but maybe the next one will be !


thanks again
 
I've just joined this site and interested to see what you're up to. When you first mentioned this chap with his collection of bikes I visualised an area full of gleaming tasty machines. Well, they may be tasty, but they certainly aren't gleaming! Is the whole collection dust covered?
I was also interested to see your method of engine removal. Ive had the engine out of my Jota a couple of times. I just built a low wooden 'table', the same height as the bottom of the frame and lifted the engine sideways onto the support by hand. Surprisingly easy. Installation was the reverse, rags wrapped around the frame for protection and then engine lifted sideways back in. Good luck with the rebuild!
 
Once I had the frame stripped, I looked around for a powder coater for the frame, I looked as far as the Holland and the  UK, but with Brexit and currency exchange, I wanted to keep things closer to home. Fortunately I found a local guy who I visited and and checked out his work, arriving and seeing Porsche wheels and other exotic car parts in his shop, I knew I found the right place. Im used to checking out 3-4 places when contracting out work, so it made sense  to do it with my bike. Im glad I could keep it on the island to get it painted.
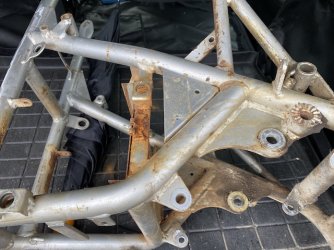
Before taking it to the powder coater, I welded in a strengthening gusset under the steering head, 6mm thick steel. I had fun getting out the swing arm bearings, I had to weld a home made slide hammer onto them to get them out, you can see what they looked like after they were out...
Otherwise the rest of the frame was a breeze, I did cut a few frame tabs off, but i also wanted to keep a few exposed, like the side cover tabs, so the bike had a bit of character to it when it is finished. Im not overly taken with totally de tabbed frames when people to these sorts of projects... some look good, but some just look to clean and sparse.
You can see from the stand as well that things were a bit rusted here and there. The next post the stand photo will be in, with how nice it came out , it is hugely different.
When I took the frame the first time to the powder coater, he recommended getting rid of the battery tray, as he thought that any accumulated dry battery acid from 40 odd years of acid dribbling into the joins under the tray , would cause the powder coating to bubble and break.
So i knocked out the battery tray . These sorts of little things happening, have helped my project to evolve into what it will be . It also lets me come up with solutions for any problems that arise, hence the new battery position and the carbon box that I am building for it.
The powder coater wanted the bike frame and swing arm and all parts delivered uncleaned, that way he knows when they blast and clean the parts that they know the brand and type of blasting media and that it won't have any adverse reaction to the coatings they use. First they blast and clean, then they epoxy prime and then powder coat.

I did miss a few small brackets and the like on the first round, as this is the first time I have gone this far on a project, so I had to do a second round of powder coating the last 6 brackets I found, as I came to dry assembly of the bike.
 

Attachments

  • Frame 5.jpeg
    Frame 5.jpeg
    133.8 KB · Views: 756
  • frame 2.jpeg
    frame 2.jpeg
    82.4 KB · Views: 740
  • frame 3.jpeg
    frame 3.jpeg
    126.1 KB · Views: 745
  • frame 1.jpeg
    frame 1.jpeg
    92.3 KB · Views: 750
  • frame 4.jpeg
    frame 4.jpeg
    123.2 KB · Views: 763
maurice turner said:
Looks like a great story evolving.
Let me guess your bikes were purchased in Spain.
They have that Spanish look about them.
That's an inside story.


yes they are Spanish bikes, basically the owner of them all just bought them as is, and did nothing with them, mostly because if you had 100 bikes here the tax department wants to know where you got the money for them from and he has been slowly doing them up himself, he has 15 immaculate ones that are more high value than many of these individual bikes., Septs as they are without humidity they are great barn finds, and to be honest aside from some interesting fixes, they are pretty straight bikes
 
sideshow said:
Once I had the frame stripped, I looked around for a powder coater for the frame, I looked as far as the Holland and the  UK, but with Brexit and currency exchange, I wanted to keep things closer to home. Fortunately I found a local guy who I visited and and checked out his work, arriving and seeing Porsche wheels and other exotic car parts in his shop, I knew I found the right place. Im used to checking out 3-4 places when contracting out work, so it made sense  to do it with my bike. Im glad I could keep it on the island to get it painted.
Before taking it to the powder coater, I welded in a strengthening gusset under the steering head, 6mm thick steel. I had fun getting out the swing arm bearings, I had to weld a home made slide hammer onto them to get them out, you can see what they looked like after they were out...
Otherwise the rest of the frame was a breeze, I did cut a few frame tabs off, but i also wanted to keep a few exposed, like the side cover tabs, so the bike had a bit of character to it when it is finished. Im not overly taken with totally de tabbed frames when people to these sorts of projects... some look good, but some just look to clean and sparse.
You can see from the stand as well that things were a bit rusted here and there. The next post the stand photo will be in, with how nice it came out , it is hugely different.
When I took the frame the first time to the powder coater, he recommended getting rid of the battery tray, as he thought that any accumulated dry battery acid from 40 odd years of acid dribbling into the joins under the tray , would cause the powder coating to bubble and break.
So i knocked out the battery tray . These sorts of little things happening, have helped my project to evolve into what it will be . It also lets me come up with solutions for any problems that arise, hence the new battery position and the carbon box that I am building for it.
The powder coater wanted the bike frame and swing arm and all parts delivered uncleaned, that way he knows when they blast and clean the parts that they know the brand and type of blasting media and that it won't have any adverse reaction to the coatings they use. First they blast and clean, then they epoxy prime and then powder coat.

I did miss a few small brackets and the like on the first round, as this is the first time I have gone this far on a project, so I had to do a second round of powder coating the last 6 brackets I found, as I came to dry assembly of the bike.

He has a bunch of immaculate bikes as well, but as with most people time is an issue in regards to restoring many bikes yourself. The best thing about these is aside from one or two that have had parts picked of them for his restorations, the majority are complete original survivors, which means for a rivet counter, those bikes would put a horn on a jelly fish..... unrestored, unmolested bikes completely original... you get the picture
 
So the frame went off for powder coating during the start lock down here, I was lucky to be able to work during all the lock down, with the exception of 14 days of hard lock down here in Spain. The powder coater took a bit longer to do the frame because of this, but he had everything bar the little brackets ,I found I would use later, done by the end of the first week after hard lock down. At this stage I could only go to and from work, I couldn't go and pick everything up, so I used one of my freight forwarders to go and collect it, as this is the nature of their job, they were allowed to go driving around the Island without too much hassle from the feds.
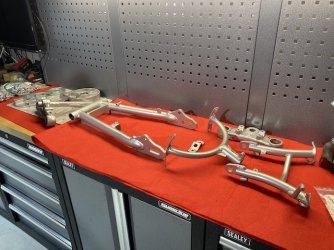
The frame came back stunning. I have to say i poured over all the different versions of Laverda RAL colours for the frame, both in this forum and on Laverdamania, and anywhere else I could find info, I even looked at zincing the frame briefly, but Marnix talked me out of that. I decided with the powder coater to go a completely different way on the frame, we used Tiger Drylac, Sparkle silver, and the frame has come out nothing short of stunning, many friends have seen the fame and all are really impressed by the colour.

It has been really a privilege to assemble a bike that has fresh powder coat, there's just something special about assembling something that feels this new. Its incredible to me, even though I have bikes from the 50's and 60's , i am still amazed that the frame is 40 years old, and it looks this good. I have assembled brand new 40 and 50 meter tall carbon fibre masts for new build yachts, and I get the same feeling of pure enjoyment putting a mast and its standing rigging together as I do putting my Jota  together, this time its the same feeling  as assembling a new mast, but the enjoyment is greater as its for once I am doing something for  me. The same care  assembling a super yacht mast goes into assembling my bike, all areas where fasteners are being tightened up are protected from spanners and sockets during the tightening process. Almost everything thread has tefgel on them, unless thread lock is needed. For brackets and fastening things non motor related , Nylock nuts and rubber faced washers are the order of the day, and nylon washers will go under the fastener heads on exterior painted surfaces when the fairing and seat unit goes on for final assembly. Where I have two powder coated surfaces  touching each other I have super thin mylar washers that I make with a hole punch set , its  .25 of a mm thick, and it helps protect the powder coating. Over the top maybe... but I dot want any powder coat cracking in 5 years with rust streaks appearing, and the mylar washers  work really well on yacht masts ! I often say I have been ruined by the yachting industry, as I t has made me become overly tidy and organised, with a high level of attention to detail,  and that is constantly getting me into trouble.  If you look at the photos, You might remember how the stand looked the other day before powder coating, it looks a world of different now . The colour looks really different in different lighting  too, I think it was a good choice.
 

Attachments

  • IMG_1916.jpeg
    IMG_1916.jpeg
    162.5 KB · Views: 420
  • 2c4f0caf-eaf9-428f-9264-1b4343f9f1ac.jpeg
    2c4f0caf-eaf9-428f-9264-1b4343f9f1ac.jpeg
    45.1 KB · Views: 404
  • IMG_2895.jpeg
    IMG_2895.jpeg
    130.6 KB · Views: 415
Looking fab.

Just a thought... These bikes vibrate, so ensure all your soft-faced fixings won't eventually compress a bit and come loose. A loose fixing causes a lot more damage than a tight one....
 
Back
Top