Front brake problem Laverda 750 SF

Laverda SLO 750

New member
Location
Slovenija
Hi.

Since my Laverda has been sitting in the garage for the past 15 years at the previous owner, it obviously needs a bit of refreshing in all areas.

I ran into a problem with the front brake. The lower brake lever wasn’t returning to its position when I released the brake lever, but was stopping about 3-5 mm short of where it should be.

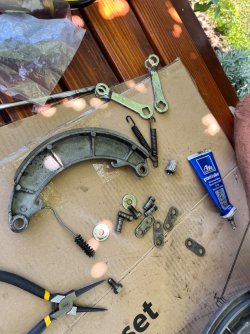
So I decided to remove both the front and rear brakes, clean them, and check the thickness of the brake pads. After reassembling, the rear brake works like new, but the front one is like it’s not even there. The brake lever goes all the way in, but the braking power is only maybe 20% of what it used to be.

If I tighten the brake more, the front wheel starts to brake (it won’t turn freely), but the brake lever still goes all the way in without much effect.

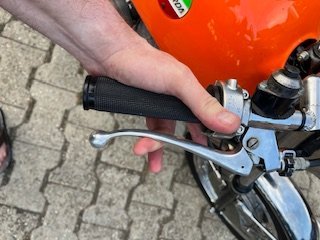
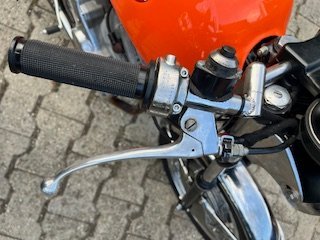
I’m attaching photos where you can see that I can almost press the brake lever all the way with one finger, but there’s no significant braking effect.

Cheers, Mitja
 

Attachments

  • IMG_2690.MOV
    IMG_2690.MOV
    24.2 MB
  • IMG_2686.jpeg
    IMG_2686.jpeg
    24 KB · Views: 12
  • IMG_2688.jpeg
    IMG_2688.jpeg
    22.4 KB · Views: 12
Did you check the spindles and bushes when you dismantled the brake? Did you very lightly grease the bushes with some graphite grease? Are the levers totally free to move by hand when the cable is not connected?
Then, use the adjuster on the bottom end of the cable so that front and rear arms are braking, shoes against the drum. Then back off one or two turns on that adjuster, any further adjustment is done at the handlebar lever.

And do as Tippie says to centralise brake plate BEFORE adjusting.

Paul
 
Also use a cable oiler and inspect the cable for wear which could cause rust inside of it and lube any moving parts inside the brake hub as mentioned above.
 
Thanks for all your answers. Will try tomorrow to adjust. I have lubricated all moving parts with ATE brake grease and clean all the parts. What is the minimum thicness of the brake pad that is still good to use and how thick is a new one?
 

Attachments

  • IMG_2648.jpeg
    IMG_2648.jpeg
    374.7 KB · Views: 29
Last edited:
Thanks for all your answers. Will try tomorrow to adjust. I have lubricated all moving parts with ATE brake grease and clean all the parts. What is the minimum thicness of the brake pad that is still good to use and how thick is a new one?
From your photo, shoe material is plenty thick enough.
New is 5mm.
Paul
 
From your photo, shoe material is plenty thick enough.
New is 5mm.
Paul
And that's the problem...

Closer to 6mm gives the levers the required geometry for optimal performance. Most drums by now are close to 231mm ID.

When re-lining, I request 8mm material be adhered. When I'm finished machining the shoes to size, they're a tad under 6mm. Re-lining with 6mm material results in a finished thickness of around 5.xxmm to have the full circumference finally contacting the drum surface.

The generally available replacement shoes are around 5mm and are anything but circular, these take ages to bed in to perform half-decently. Having only 50% or less contact area results in mediocre performance and quickly glazed linings, worsening matters further. The stories of using chalk and filing away the high spots has filled pages here... and when you're finally finished and satisfied, you end up close to where you started. A waste of time and effort.

I'm rather certain the linings were closer to 6mm ex-factory. The thinner linings now on offer make sure they will ALWAYS fit, no matter how wonky the brake may be. Having the cable adjustment ending close to the limits after fitting these is proof of how way off from factory spec these brake shoes actually are.

piet
 
Dont now if I schould open a new topic....

But have a new "little" problem:rolleyes:.

The engine starts right away if I put on the throttle it revs OK (in stand).

But when I am driving it it sims that the engine is struggles to work and the power is not there.

The next moment it works fine. It is anoying to drive so. Will have to see the carburetors (needle and jets).

The break contacts are new and the ignition was OK (Marked P/M and A - checked with stroboscope).

If I do the idle it is working fine in the range of 1300-1400 RPM, when I chage it to 1000-1100 RPM as it schould be the engine is dooing fine for a few seconds than it drops down to 700-800 RPM and gets off in next few second.

The carburetors are VHB 30 and are open (without air filter).

The mixture is more rich than lean.

It has not the original exhaust.

When I pull the choke lever when I drive nothing happens.

KR; Mitja
 
Last edited:
My guess is carburation - strip and clean, set float levels, absolutely chk choke plunger seals and that they are fully closing AND there is freeplay in the cables. Should be able to start with 1 1/2 turns out on the pilot (idle) mixture screws and tune on ce hot. Make sure the fuel cap is breathing properly.
 
Back
Top