gpzkat
Full member
- Location
- Mission Viejo, California
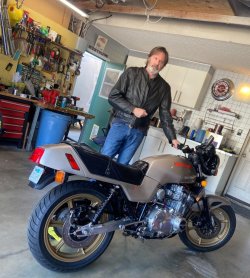
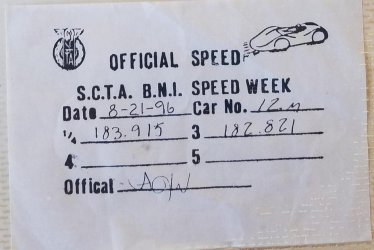
18x3.5 aluminum rear, 18x2.5 magnesium front. Bike was in great shape with as new take-offs (carbs, pipes) that the Don Vesco shop removed when they built it. It was fairly tarnished from Bonneville and El Mirage, but not terribly so, considering. The front tire was flat-spotted so I used a car jack to get the front up, balancing it on the sidestand in the seller's driveway, and threw the original rim with the stock Bridgestone on. Still with the nubs, still held air after being stored 40 years. The slicks had last run (184MPH) at Bonneville in 1996. I had to use a reciprocating saw to get them off.Those wheels look remarkably familiar. Can see why they find their way on 3CL's. Well preserved machine I might add.
Those white floats are too light to use with stock float heights. IIrc, these are 6.5gr. Stock floats are 10 or 8.5gr.Just before the ride, the right side carb started spewing. With the bowl off, I could see it would stay in the position I moved it to. I think this was the original problem. It was fine when installed, I'm sure of that. It was easy to fix by filing the ends of the plastic where indicated in the photo. I got focused in on the width of the floats, and now I don't think that was the problem.
This seller has in 10 and 12.5. They are listed as being for PHB. PHF not mentioned but I researched a bit and took a chance. They're fine.Those white floats are too light to use with stock float heights. IIrc, these are 6.5gr. Stock floats are 10 or 8.5gr.
As the origianals are hard to come by, you'll need to experiment a bit to find a suitable height for these, probably somewhere around 17mm instead of 18.
piet
I went with Ignitech on my '74. No fabrication. Unit zip tied to rear part of frame spine. Multipin plug fit to existing factory one. Nology coils mounted back to back to original hole using a single 6x1.25 isolation mount (used for 'feet' on electric motors and such). Can 'tune' the advance curve if a legacy laptop with old school serial port is available. Factory curve worked for me. Bike started literally first prod after sitting for 6 months stale fuel and all!Putting the Witt DMC/32 on, finally. Made a coil mount plate, even rubber mounted it, secured the control box to the tool tray, wired it up, and have spark. Ran out of time to strobe it, will get to it Monday.
The included paper instructions lack a wiring diagram. I don't think I've ever run into that before on any electronics. There's 'connect this to that' here and there in the text, but I found nothing about the coils. This forum has helped with such minor details. A hand-edited wiring diagram (DMC_2_fitting_instructions_triples.pdf) from a previous unit showed me the light, even with the 3rd coil and its brown wire crossed off. OK, got it, rolled the dice. Wasted spark for 1&3 of course, so that's a mod to the system and reduces wire x1, nice to know. Also, the picture and description of the pickup position "near the 4th tooth", WTF. Tooth centered on the pickup? 2/3 past, as someone mentioned in a thread here? Righty-o, static timing is a bit of a guess. And I hope the reluctor ring thingie isn't on back-to-front. Evidently, it matters. Who knew? As a systems tester, I wrote HW & SW avionics technical service bulletins and 'qual' docs for commercial aircraft installations, and this is a bit beyond the pale. OK rant over, I do have the greatest respect and sympathy for those who designed a system that works well, so I hear. But please document stuff!
If I weren't so damned clever, I'd have to go to the local Laverda mechanic for help! I'll take pics and do up a wiring diagram showing where I connected things on my bike so my lucky inheritor has a baseline.
Nice! I did a lot of research and think that this Moto Witt DMC unit will be fine for me, but we'll see soon. Price was certainly a factor. Fabrication of the coil mount wasn't tough, just cutting, drilling, and bending some 1/8" aluminum sheet, cutting some long 1/4" carriage bolt heads off, and securing them at each junction (pics may follow) with several nuts. Very solid and clean. The mounting plate is bolted to the original holes with home-made rubber donuts. I'm using Dyna-type 3-ohm knockoff coils, which I've fitted to many Jap bikes. They have never failed me, even on Mr. Turbo. The one time I lashed out and got a 'good' expensive Tri-Spark coil for my Norton, it failed after 2K miles, heat-sunk. I replaced it with a knockoff, and I've had no problems since.I went with Ignitech on my '74. No fabrication. Unit zip tied to rear part of frame spine. Multipin plug fit to existing factory one. Nology coils mounted back to back to original hole using a single 6x1.25 isolation mount (used for 'feet' on electric motors and such). Can 'tune' the advance curve if a legacy laptop with old school serial port is available. Factory curve worked for me. Bike started literally first prod after sitting for 6 months stale fuel and all!
Putting the Witt DMC/32 on, finally. Made a coil mount plate, even rubber mounted it, secured the control box to the tool tray, wired it up, and have spark. Ran out of time to strobe it, will get to it Monday.
The included paper instructions lack a wiring diagram. I don't think I've ever run into that before on any electronics. There's 'connect this to that' here and there in the text, but I found nothing about the coils. This forum has helped with such minor details. A hand-edited wiring diagram (DMC_2_fitting_instructions_triples.pdf) from a previous unit showed me the light, even with the 3rd coil and its brown wire crossed off. OK, got it, rolled the dice. Wasted spark for 1&3 of course, so that's a mod to the system and reduces wire x1, nice to know. Also, the picture and description of the pickup position "near the 4th tooth", WTF. Tooth centered on the pickup? 2/3 past, as someone mentioned in a thread here? Righty-o, static timing is a bit of a guess. And I hope the reluctor ring thingie isn't on back-to-front. Evidently, it matters. Who knew? As a systems tester, I wrote HW & SW avionics technical service bulletins and 'qual' docs for commercial aircraft installations, and this is a bit beyond the pale. OK rant over, I do have the greatest respect and sympathy for those who designed a system that works well, so I hear. But please document stuff!
If I weren't so damned clever, I'd have to go to the local Laverda mechanic for help! I'll take pics and do up a wiring diagram showing where I connected things on my bike so my lucky inheritor has a baseline.
I received the instructions in English, which seems to be a German translation. No diagram. Maybe it depends on the vendor or page(s) not included. Since I learned from another owner that it makes a difference, I'd like to confirm that the multi-tooth rotor has to be oriented a specific way. All I can see as a possible reference point is the set screw, which may need to be closer to the engine or farther. I'd appreciate it if you can give guidance on that - my only outstanding doubt.New DMC units are supplied with a manual that includes a very clearly understandable fitting and wiring diagram. The instructions and stated colours may be in german, but that's surely not too hard to have Google translate...
piet
I see you still have the factory charging system. With the headlight on, it won't charge the battery at less than 4K revs. It makes night time riding really fun as you hope to make it home before the battery is dead unless you have a road you can maintain the revs. Adding an additional charging coil will help with this.Got it strobed today, terrible video, I was a bit worn out. On the video, it sounds metallic at idle, hmm, but it's not pinging, at least that I could hear with my old ears - unless it is. With revs, the advance was at 34 degrees, and it was varying at 1K idle about where it should, between ~2 and 10 before TDC. Tricky to see exactly and ensure the timing wheel is perfect, for me anyway.
It's charging fine, and is much snappier picking up revs. It was running lean on idle and hard to start without some choke, so I enriched the mixture, which it liked. I expected that. I think the spark was feeble with the Bosch, and I had the screws in about 1.25. Now at 2.25, which set things sorta right. More fiddling to do as I get on with it. I'll go for a ride tomorrow to check it out. It's at the #1 setting, which seems a good baseline for the stock 3C. Time will tell if I got it right, hope so. First timer finding his way.
I did have the factory Bosch system, but that's now gone. This replacement Moto-Witt DMC has a shiny new 200W charge coil that seems to be doing its job. I did find that the original worked as you say, on high-RPM outings. It was hardly measurable with a voltmeter in the garage, whereas this unit, along with the SH775 is within the right output range through the revs.I see you still have the factory charging system. With the headlight on, it won't charge the battery at less than 4K revs. It makes night time riding really fun as you hope to make it home before the battery is dead unless you have a road you can maintain the revs. Adding an additional charging coil will help with this.
When replacing the factory ignition on my 1976 3CL, I upgraded to the later Suzuki alternator and no more problems.
I only need about 70 tops, so it should be OK. There are two coils, says it's 'up to' 200W, but yeah probably shy of that.I would be very surprised if the new charging coil makes anywhere near 200 watts but definitely more than stock.