Newbie jetting questions

helicopterjim said:
Your bike has the second version on crossover linkage
Thanks, good to know Jim.  I was just looking through the stash of papers that came with the bike and found this.


Attachments

  • left side gears.jpeg
    left side gears.jpeg
    79.6 KB · Views: 188
Looks like one of the cam blocks is starting to crack and collapse (RH exhaust), common problem if the head has been over-torqued. New cam blocks are available though.
 
lawrence said:
Which clever person is going to explain the meaning of the 2 0 3 stamp on the cylinder head?  I don't recall seeing that on any triple I've owned, but then again I forget things.... ::)

Head stampings often mean nothing... except to the Luigi that applied them.  While some stampings may bear resemblance with a production date, many seem quite random.

Tach is probably from a 500, these have a higher red line.

piet
 
Interesting use of parts!
"I'm NOT an expert but..."
Needing full choke to start is normal. But idling for too long (especially with any choke) will foul the plugs.
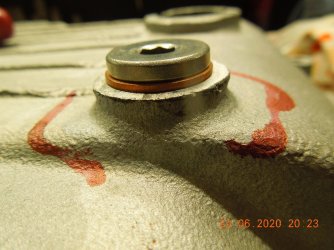
Lockwire the oil plug until you can repair or enlarge the thread.

Also, are those cracks in the rubber intakes?
 
Lancia Fulvia indeed.
Seems someone at the Laverda factory was also a fan of Italian Lost Causes.
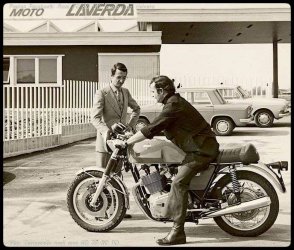
The car in the attached pic is a series1 Lancia Fulvia Berlina, the four door version of the popular two door car, an example of which appears to be parked in Richard's garage.
 

Attachments

  • Laverda3CDrummerMassimoLancia.jpg
    Laverda3CDrummerMassimoLancia.jpg
    95 KB · Views: 168
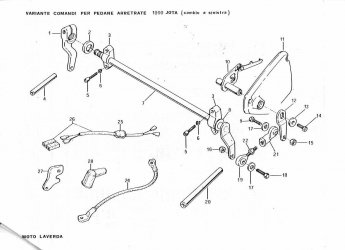
good pictures and diagrams showing the square ended gear change shaft as opposed to spline (wider) type that is normal, (fouls your boots) but very often found on later fitted cross over linkage or rear sets

A stripped sump plug is not that big an issue as the factory plug only used about half the height of the threaded hole, making a steel plug that uses all the thread and a 2mm protrusion can solve it for years, Doughty washers are best and I routinely lock wire and always will.

left side speedo is used on 1200TS (1 & 11) Jota 120, and RGA, so the longer cable you need is available, (950mm face to face of conduit)be aware of non original factory cables (read all cables now available) as these gave me lots of "don't works" issues, solved by a lucky find and gift of a genuine NOS cable from a much respected ex dealer.

CLEM
 
Just in case:
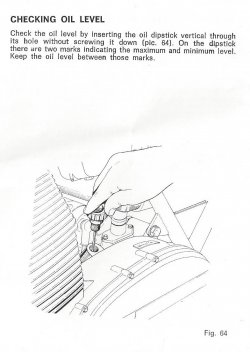
One of the frequent misunderstandings by people who haven't had previous Laverda experience, access to the Handbook, or the inclination to read it, is how to check the oil level.
Many overfills have resulted.
Here is the relevant page from the handbook:
 

Attachments

  • Laverda Oil0001.jpg
    Laverda Oil0001.jpg
    96.5 KB · Views: 228
Right, a few things to reply to this morning.

Clem has already made my day with his point about using a longer drain plug - the plug I have was maybe 5 threads long, but next oil change (pretty soon, this one was really for a flush), I'll measure and get something longer.  something like this one I suppose
https://www.rallysportdirect.com/part/dim-m14x1-5x16-dimple-magnetic-oil-drain-plug-m14-x-1-5  (only cheaper)
although they do come longer.  https://sharkind.com/product/d7853-drain-plug-14mm-1-50-long-includes-gasket-g7253/.  No, probably not.

Also about the speedo/tach options.  The cable for the tach has a terrible route crossing over the main frame spar under the tank, so that has to change. Thanks for the info that it's probably a 500 tach, therefore I should check it's calibrated correctly - not sure if my strobe/tach has a setting for 3-cylinders. Anybody know where I could look for a proper 1000 tach - or a face for this one if it's geared right

TheSock, thanks for the page scan, yes I used the dipstick that way - funny how there's always that dilemma with dipsticks in caps "do I screw it in or not?" and Laverda actually found a 3rd way.

Paul, the headlight brackets say "Verlicchi" on them but they look identical to Tomaselli when I googled them - which brings up a question - in 1981 would this bike definitely have had the big wraparound fairing like 120 Jotas had? or was that an option?  It's got the threaded bosses on the headstock but not sure what that means.

Could be a CB1000 tank, it's been well butchered so I'll probably never know, there's no part number left on it - plus the CB1100R is pretty rare and exotic for a Honda so would have been an expensive part, even used. It would be really nice but for the big scrape down one side that's been badly repaired.

And the Fulvia, good eyes everyone.  It's a Series2 1600HF Coupe, bought sight unseen off Ebay a couple of years back - because everyone needs to do that once to learn never to do it again. If you thought Laverda Dell'Ortos were a bit esoteric then try 2 x dual-sidedraught Solex C42s. On an 11.3degree V4.  Yes I am a serial victim of Italian lost causes, but haven't really regretted any of them, in the end...

-Richard
 
The 500 tach has the same gearing as the 750/1000/1200 item, just the dial and red line are different.

Swap the instruments over, will tidy up the area immediately.

"Lockwire the oil plug until you can repair or enlarge the thread."

Whatever you do to the drain plug thread, DO NOT enlargen the thread any further!  Simply passing a larger tap through the bore will tilt it when it hits a wall inside the gearbox, resulting in a thread about 10? off vertical.  Getting that oiltight will be more of a challenge than what it is now.

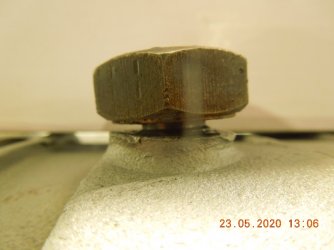
Repair thread for either Helicoil or Timeserts is about as large as you can go without having it go cock-eyed.  Below are before/after a proper repair.

piet
 

Attachments

  • Neu_DSCN9140.jpg
    Neu_DSCN9140.jpg
    180.1 KB · Views: 204
  • Neu_DSCN9186.jpg
    Neu_DSCN9186.jpg
    185.9 KB · Views: 201
Thanks Piet,

Yes the 2nd picture looks like a proper repair (first one is horrible, is that a square plug?) - not sure how to do that with the engine in the frame though?  I've done helicoil repairs on Alfa engines with about 80% success rate - so I usually prefer having a pro at a machine shop do them now.  But not always feasible.

Your point about only using Helicoil/Timesert is well taken.

-Richard
 
doublegarage said:
Thanks Piet,

Yes the 2nd picture looks like a proper repair (first one is horrible, is that a square plug?) - not sure how to do that with the engine in the frame though?  I've done helicoil repairs on Alfa engines with about 80% success rate - so I usually prefer having a pro at a machine shop do them now.  But not always feasible.

Your point about only using Helicoil/Timesert is well taken.

-Richard

No, it's a big mutha fucker of a hex, 27mm AF iIrc.  M18 x 2 had been cut into the case, in a horrible sort of way.  I made a plug, had it welded in and started anew.  Now M14 x 1.5 again with thread square to sealing surface.  Wasn't the only major repair necessary to this particular set of cases. ::)

piet
 
That magnetic sump plug must be made of gold. Local car accessory shop will provide one 10 times cheaper.

That snow plough fairing was unfortunately not an option.

Paul
 
sfcpiet said:
Whatever you do to the drain plug thread, DO NOT enlargen the thread any further!  Simply passing a larger tap through the bore will tilt it when it hits a wall inside the gearbox, resulting in a thread about 10? off vertical.

There's enough metal around the hole to take a larger thread if you do it properly (not simply bashing a larger taper tap through - it'll go off course as Piet said). You need to bore it to the correct tapping size first, obviously with the drill perpendicular to the sealing face. You have to cut a larger thread for timesert or helicoil, but I simply fitted a larger plug rather than an insert. The plug is properly aligned and doesn't leak. A timesert would have been a better solution but I didn't have one. That's why they're called timeserts - you have to have one at the time you need it ? 

Best way to do it is with the crankcase apart, but can be done on an assembled engine of you're careful.
 
I also did one in situ, tapped out to M16x1.5 and it worked fine.  But it needs to be done in a proper way, preferably by a machinist who is advised of the proximity of the crankcase wall.  I made a jig that bolted onto the camchain access hole face and which had a very robust guide for a 14.5 clearance hole and the M16 tap.  Not a trivial job to do right, these days I think I'd rather just pull the motor and do it properly.
As Piet noted, the original plug hole runs almost tangential to a wall inside the crankcase, so the more you open it out the harder the job becomes because of an increasing tendency for the clearance hole and tap to want to wander off, no matter how well guided in situ.
Obviously the best method is to remove the bottom crankcase half and timesert it back to the original size on a milling machine.
 
Back
Top