Paul LeClair new project and 1982 Mirage 1200 TS Series 2 FOR SALE

Yes. Thanks Baz. 4th March. This coming Saturday.

I'm often getting dates mixed up. What do you call dyslexia with dates?
It can be a bit inconvenient sometimes. I went for an appointment at the skin cancer clinic last week, but the receptionist had no appointment for me in her calendar for that day. The appointment is actually for March. I'd put it in my Outlook calendar for February.
There are 28 days this February, so as 4th Feb was a Saturday, so is 4th March, exactly 4 weeks later (28 days). Plenty of room for confusion!

cheers

bazzee
 
Yes. Thanks Baz. 4th March. This coming Saturday.

I'm often getting dates mixed up. What do you call dyslexia with dates?
It can be a bit inconvenient sometimes. I went for an appointment at the skin cancer clinic last week, but the receptionist had no appointment for me in her calendar for that day. The appointment is actually for March. I'd put it in my Outlook calendar for February.
What do you call dyslexia with dates? Dyslexia cake.
 
bike fired right up......:cool::eek:;)

added some inexpensive mirrors I had tried out on my 1978 KZ 650 project and had left over. While I have located stock mirrors in Italy available to buy, they are so ugly I have been resistant to spending $300 CAD on them.

I totally dis assembled all the fuel injection bits, ran everything through my ultrasonic repeatedly until clean, replaced the broken parts and the broken sensors. I did a basic mechanical synchronization of the throttle bodies with the linkages.

Fuel injection adjustments are limited. There is an "air screw" adjuster in each throttle body, like an idle mixture screw on a carb. There is a vacuum port on each throttle body that allows hook up of my balancer tubes, to then use the linkage adjusters to get the bodies fairly equal. The throttle position "potentiometer" is also adjustable to get correct for throttle close position and then throttle position throughout the opening of the throttle. That seems to be about it for adjustments, although there are a number of tests to be done using an electrical tester to be sure voltages and resistances are correct. I removed all the emissions equipment, the two carbon canisters, all the plumbing, etc, and ran appropriate new venting hoses. Need to pick up a couple of small inline "air" filters.

I still have a list of final set up things to address, clutch cable needs adjusting, rear brake light does not presently work even with a new bulb so switch(s) likely failed or electrical issues, need to bleed the brakes through again, there is a blemish on the left side tank panel I am going to cover with some adhesive tank knee grip material, and a few other dial in and fettling tasks, and likely more once I can actually test ride., With open pipes and low restriction x pipe, the bike sounds very "healthy", has a great bark. :cool::ROFLMAO:;)

has been a fun project, learned a lot, and more still to learn as I dial in the fuel injection as best I can.. Thanks everyone, and especially Helicopter Jim, for all the help, greatly appreciated!!!!
Paul,
You might look on Guzzitech.com, there is a wealth of info on Guzzi fuel injection issues and fixes!
Rex
 
Paul,
You might look on Guzzitech.com, there is a wealth of info on Guzzi fuel injection issues and fixes!
Rex
thanks, Rex, I will go have a look. EDIT - wow, lots of great stuff there, I wish I had seen the article about how crappy the brake rotor fasteners are, I thought it was just me chewing them up getting them out.......

I stripped the fuel injection totally, ran everything through my ultrasonic until sparkling clean, and had the pair of injectors professionally cleaned by being pulsed in an ultrasonic tank for three hours. Then I put it all back together with all new stainless fasteners

the bike fired right up. There are not a lot of obvious fuel injection adjustments. There is a single air mixture screw in each injector body that is used to adjust the idle, which also determines the amount of vacuum being drawn at idle. Then the two fuel injection bodies can be synchronized to each other. I replaced the air temp sensor and the air pressure sensor, and cleaned the throttle position potentiometer thoroughly as well. I also replaced all the various lines with new, and added drain hoses where I removed the carbon canister emissions system..

the process I followed was to use set the air screws equally for a relatively decent idle, then put my vacuum gauges on. The two sides were way out of adjustment with each other. Using the adjuster in the linkage between the two injection bodies, I equalized the vacuum draw. Then I adjusted the air screws again to get the highest vacuum draw and best idle with the vacuum draw remaining equal. Made a big difference in how smoothly the bike now idles and revs up. Too much snow on the ground to test ride yet, unfortunately. The only real "tuning" issue so far is getting at and adjusting the air screw one each injector body with the engine running and hot, I burnt both my hands, bloody hell, the air screws could not be placed more inconveniently.....:rolleyes: :eek:

have replaced the front brake microswitch with new, and have the brake light working off both the front brake lever and the back brake lever. Horns very weak and work intermittently, and the tail ight running light does not come on, so as far as I can see right now just those remaining two things, horn and tail light, to sort, pending an actual test ride. I fully bled all the brake lines through again with the vacuum bleeder while I was dealing with the rear brake light actuation issues.

with the solid rod vacuum gauges, I have found that hanging the gauge unit upside down gives more accurate measurements, the photo below is not upside down, the gauges are, hanging from the left handlebar grip. When I first put the vacuum gauge on, one cylinder was pulling 38, the other cylinder was at 16, I got them fairly close. When I first got the cylinders equalized, they were both pulling 26, then increased the vacuum draw to roughly 32 equally changing the air screws while the balance remained equal.
 

Attachments

  • Guzzi balance.jpg
    Guzzi balance.jpg
    163.7 KB · Views: 16
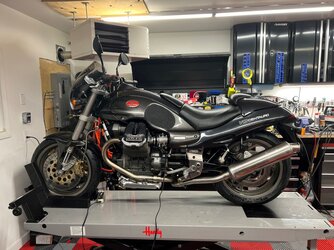
The 1997 Guzzi Centauro refresh appears to be finished, subject to the arrival of warmer weather and some test rides and final fettling. I have nothing left on my "To Do" list for the bike.

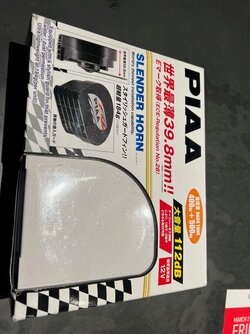
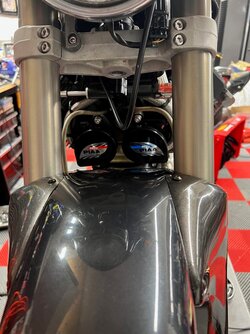
The stock horns are Japanese, made by Nikko, and both are dead. Haven't found stockers yet, but made some brackets and installed new 112 db PIAA horns with some minor rewiring. Loud!!!!!(y) Make you jump unexpectedly loud.

finished rewiring taillight, both the brake light and the tail light now work, with really bright 1157 LED. Installed a really high end H4 LED headlight bulb replacement after a minor bit of modification to the headlight bucket.

Bike fires right up, idles smoothly, revs up sharply. Could use a paint job to be perfect, but that has never been on my list for this bike, the stock paint is OK subject to some bumps, bruises, and scrapes. Covered up the one major blemish with the knee grip pads I made for the side covers. Only stock paint once.......;)

Now to weld up the cam belt tensioning tools and return Helicopter Jim's factory tool plus a spare or two, and subject to a test ride and final fettling, I seem to be done.........

Thanks to all who followed along and helped out!!!

Already on the lookout for the next project......:cool:
 

Attachments

  • Guzzi horns 1.jpg
    Guzzi horns 1.jpg
    136.7 KB · Views: 29
  • Guzzi horns 2.jpg
    Guzzi horns 2.jpg
    150.3 KB · Views: 30
  • Guzzi finished March 01 2023.jpg
    Guzzi finished March 01 2023.jpg
    172.5 KB · Views: 30
Horns are pretty simple devices. The original horns might only need adjusting. There should be an adjusting screw and locknut on the back. Loosen the lock nut, hook the horn up to a 12V battery, then turn the adjuster screw in or out until you get maximum noise. Lock it off there and it's done.

If you can't get them to honk at all, they may have rusted up inside. Depending how hard it is to get into them, they may be fixable. If they're riveted together (like the Voxbells on Laverdas) you can grind the rivets off and open them up. But if the two halves are pressed together with a crimped over edge, forget it.
 
Horns are pretty simple devices. The original horns might only need adjusting. There should be an adjusting screw and locknut on the back. Loosen the lock nut, hook the horn up to a 12V battery, then turn the adjuster screw in or out until you get maximum noise. Lock it off there and it's done.

If you can't get them to honk at all, they may have rusted up inside. Depending how hard it is to get into them, they may be fixable. If they're riveted together (like the Voxbells on Laverdas) you can grind the rivets off and open them up. But if the two halves are pressed together with a crimped over edge, forget it.
You can still try flushing them with some WD40 equivalent
 
the stock horns are crimped closed all the way around. Would have to destroy them to open them

In response to Cosi, the Jota on offer local to me has not run for a decade, and at an ask of $15,000 is priced the same as my totally freshly and comprehensively rebuilt 82 1200 Series 2 1200 Mirage, which to me is a much better bike in any event. I did offer $10,000 Canadian for the non running Jota and was rejected. Just because it is silver and orange does not mean, at least to me, that it is worth anywhere near the sellers asking price in its current condition.

I have already had two offers on the Guzzi Centauro from people who have followed the refresh. I have not said no, just that I want to ride it myself first in the spring and decide if I want to keep it. Its appearance is growing on me;):eek: I have no idea what it is like to ride. I might hate it. I might love it. We'll see.

It is looking likely my next project may be turbocharging my 2008 Kawasaki ZX 14 that I have had since new. It has less than 10,000 original kms, has brand new tires, brakes, chain, and a bunch of accessories. I have been chatting on the phone with Richard of https://rccturbos.com/ The basic Stage One turbo kit for a Gen 1 ZX 14 is $5,700 USD, to which needs to be added a few bits like a boost gauge, oil pressure gauge, upgraded clutch springs, appropriate fuel mapping (I already have a progressive lock up clutch added to the bike, and I already have a Power Commander 5 fitted), and I would probably upgrade fasteners and lines and fittings, and add the air fuel ratio monitoring LED screen for the Power Commander. So for say $7,000 USD and my time the bike would be at an easily streetable 260 rear wheel hp, with the potential to go to 400 hp for not a lot more money. We'll see, I have not made a final decision yet, the ZX 14 is quite enjoyable as it is, and I am still checking out other potential projects.
 
It always amazes me how many people spend years rebuilding a bike only to sell it after finishing it and never actually ride the bloody thing even just around the block. I just couldn't do that. That reminds me of a horror story I was told years ago as a kid. One of my Great uncles won a Jaguar Car in maybe a lottery once, no idea what model but he never got to drive it. If it got driven even around the block it lost resale value of thousands of and it was a long time back Ozzie Pounds, must have been pre-1967 when we went Ozzie Dollars. That must have been hard to do. He sold it and bought a Home Unit just up the hill from Bondi Beach. That unit would be worth Millions now.
 
The stock horns are Japanese, made by Nikko, and both are dead. Haven't found stockers yet,

Finally got the seacan cleared of snow. I'll have a look for horns tomorrow ...... just in case. Also I may have a tank/sidepanel but not clear on quality. Lucky you have the tank badges as they are at a very high level of unobtainium. The ones from a Griso almost fit but are a bit too small.

Jim
 
It always amazes me how many people spend years rebuilding a bike only to sell it after finishing it and never actually ride the bloody thing even just around the block. I just couldn't do that. That reminds me of a horror story I was told years ago as a kid. One of my Great uncles won a Jaguar Car in maybe a lottery once, no idea what model but he never got to drive it. If it got driven even around the block it lost resale value of thousands of and it was a long time back Ozzie Pounds, must have been pre-1967 when we went Ozzie Dollars. That must have been hard to do. He sold it and bought a Home Unit just up the hill from Bondi Beach. That unit would be worth Millions now.
I realized a few years ago that I liked building and restoring more than keeping. It was the process that I loved, not the disposition of the end product.
 
But how do you know your restoration is successful unless it works well on the road? Another question is how do you keep them pristine if you do test them to the max. Can they be both, looking perfect and running perfectly and looking like human hands haven't touched it?
 
Back
Top