Paul LeClair's new project (Non Laverda)

I built my rear-sets with a drill press, upright or on it's side, using eBay Hayabusa, Suzuki,  Moto Morini and 12 gauge cleaning rod parts plus manual taps and threaders ;o)

4854410909_7e5b8ebed7_o.jpg

Back Ass Morini Heel Toe mated to a Hayabusa Bell Crank
The shifter is internally spring loaded on a thread. 

4854410621_66dd3e3483_o.jpg

I believe that's a inverted Suzuki 500 right hand shifter.
That Brake rod is a Honda Head Stud - LOL

Main Bolts are Head Bolts outta Ford 4 Cly.

Hasn't failed in over 10 years of use.

I've a lot of 750SF riders wanting my rear sets but there's no way I can afford to mass produce the design.

Use your imagination and skills - It will work on any ride - Keep it clean and simple and it will look great and perfectly functional.
 
Anyone setting up their rear brake whether disc or drum with the torque arm anchored to the frame (floating) MUST fit a bush or bearing into the plate that holds the shoes or caliper so that it can rotate as the swingarm moves. I use reverse link with the torque arm crossing the swingarm, caliper underslung and torque rod to the frame above the swingarm pivot. This originated with MX bikes in the ?80s and was used on GP bikes by Gardner etc. It makes the rear end squat a bit with rear brake and keeps the bike more level under brakes, sort of rear actuated antidive and virtually eliminates the chance of rear wheel lockup. I love the system.
 
Thanks for the info. Steve, will keep an eye on things, I certainly wasn't aware that there could be issues in this
area of the swinging arm. Regarding rear brake efficiency, to use the JMC arm, I had to do away with the factory
obimination of rear brake rearset mounting, & mount a plate onto the original rear master cylinder mounting point, move the master cylinder up & back, & connect the brake lever directly to the master cylinder with a longer tie rod. This certainly improves the brake as travel is minimised & most of the previous mechanical
inefficiency is eliminated, the alternative is to squeeze the front ones harder. 8)   
 
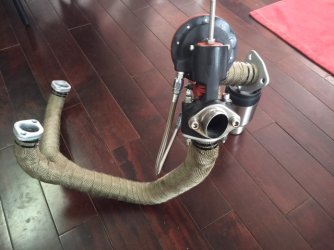
a bit more progress. Waste gate rebuilt, painted with silica ceramic extremely high heat paint and baked in the oven, O2 sensor bung welded into the turbo plumbing feed, exhaust is now heat tape wrapped over the side of the engine, over the alternator, and into the turbo, which has a heat blanket installed on the exhaust side and further heat shielding under the seat and around the battery.

using a new (to me) heat tape, supposedly more heat tolerant and more efficient. Nicer to work with than the other black stuff I have used in the past.

https://www.heatshieldproducts.com/automotive/exhaust-and-header-wrap/lava-exhaust-wrap

Paul LeClair
 

Attachments

  • exhaust plumbing 1.JPG
    exhaust plumbing 1.JPG
    107.8 KB · Views: 13
  • exhaust plumbing 2.JPG
    exhaust plumbing 2.JPG
    135.7 KB · Views: 14
  • exhaust plumbing 3.JPG
    exhaust plumbing 3.JPG
    125.4 KB · Views: 16
bsab31 said:
Thanks for the info. Steve, will keep an eye on things, I certainly wasn't aware that there could be issues in this
area of the swinging arm. Regarding rear brake efficiency, to use the JMC arm, I had to do away with the factory
obimination of rear brake rearset mounting, & mount a plate onto the original rear master cylinder mounting point, move the master cylinder up & back, & connect the brake lever directly to the master cylinder with a longer tie rod. This certainly improves the brake as travel is minimised & most of the previous mechanical
inefficiency is eliminated, the alternative is to squeeze the front ones harder. 8) 

The stock rear brake caboodle was originally designed to be operated by a lever approximately 3 times the length of the rear-set lever.  In stock form, the rear brake performance is actually quite acceptable, provided the brake components themselves are in reasonable condition.

The factory simply failed to re-design the linkage when some twat decided that Jotas had to have those rubbish rear-sets ex-factory...

piet
 
chrisk said:
8) You're banging along at a rate of knots.

Hi Chris

I can't help but think that putting a turbo on a Laverda triple would be easy...... the only real issue would be an oil feed under sufficient pressure to the turbo bearings, but suspect that could be solved with a separate oil supply and pump......

anyway, this CBX motor is built for a lot of boost - Falicon crank, Carillo rods, custom cylinder liners with custom pistons, head has been flow balanced, heavy duty hardware holding everything together - this is going to be interesting if everything works the way it is intended to work - I am going to start out around 5 - 7 pounds of boost and work up from there...... ;) ;)

Paul LeClair
 
Probably way to big but I seem to remember seeing on one of those car shows on TV had fitted a turbo with its own oil supply, might have been a supercharger though. Anyway it was a stand along gadget
 
Paul LeClair said:
I can't help but think that putting a turbo on a Laverda triple would be easy...... the only real issue would be an oil feed under sufficient pressure to the turbo bearings, but suspect that could be solved with a separate oil supply and pump......

Paul LeClair

I suspect Malcolm Cox might be your man there, Paul. From memory his 'Social Climber' is turbocharged though might even be supercharged :o. I understand the cops bagged him at 170mph+ :o :o so is/was probably the fastest Lav triple ever built; I expect Clem could advise on necessary oil pump mods required..

rgds
AndyW 8)
 
the 79 Honda CBX turbo project is finished, with one exception. I am waiting on a Mikuni HSR 42 flat slide carb that I ordered a month ago from Terry Kizer at Mr. Turbo in the U.S., and which seems to have disappeared into the maw of Canada Customs, never to be seen again...... ::) ::) Going to order another one Monday and deal with the shipping claim on the first one.

everything is finished, motor is fully back together, all valve clearances set, made silicon hose manifolds for all the turbo manifolds, and Earles braided hoses with all Aeroquip fittings for all the oil and vacuum lines, including the boost gauge and the mechanical oil pressure gauge. Learned quite a lot about hot rod stuff in the process, and turbo installs.

Metmachex swing arm was a bit of a challenge to fit, wound up having some custom bits made, but it all worked out in the end, even got the stock chain guard installed (has to have a chain guard to pass provincial inspection to get a plate) by "modifying" it with a hack saw and a Dremel ;) ;)

the front end is lifted directly from an 82 CBX, slightly larger diameter fork tubes, slightly better brakes, but still period looking. Adapted the 79 front wheel to fit the 82 forks, as well as the 79 front fender.

the entire bike has been gone through carefully and thoroughly, every last nut and bolt, I even rebuilt the turbo myself with a new plain bearing and new carbon seal, after I bead blasted it thoroughly.

did lots of heat containment, hot side of the turbo is wrapped in a "turbo blanket" intended for a Garret T3 that I made fit with some trimming and stitching with stainless steel safety wire, battery is wrapped in several layers of heat block, lots of heat block material under the seat and tank to keep my gentleman bits untoasted. Also used the ever controversial heat wrap tape on the exhaust piping to keep temps down, this heat wrap is made from basalt fiber, actual crushed lava rock supposedly. Should hopefully keep me from burning myself, since I have started this build I have seen video of a similar turbo CBX running, bloody exhaust was glowing purple red, way to close to the riders parts..... :o :o

brand new charging system, complete, too hard to get at the alternator stator etc., don't want any charging surprises that would require the turbo to come back out to get at the charging bits.

"finished" is a bold claim, and nothing is really finished until the carb arrives, the bike is running, then the fettling begins, but assembly is certainly finished now, including making and installing an intake manifold, running the fuel line, vaccum line, and dual throttle cables for the Mikuni flat slide I am waiting on. Hopefully when the carb arrives I can just install it and fire the bike.. :LOL: :LOL: :LOL: :LOL: 8) ;)

left the bike with its "in period" air brush "art" so far, still undecided on a paint job. Way too much time and money in this build already, frankly, not overly inclined to pay for paint even if I paint it myself, at least not until after it is running and if it proves mechanically sound....

Paul LeClair
 

Attachments

  • IMG_3343.JPG
    IMG_3343.JPG
    146 KB · Views: 46
  • IMG_3344.JPG
    IMG_3344.JPG
    152.8 KB · Views: 44
chrisk said:
:D Sweet Paul, I'd love to have a fang on that sucker!

Hi Chris

I previously talked to the engine builder, a Honda dealer named Doug Fischer, who confirmed a lot of the engine build details, the Falicon crank, special rods, flow balanced head, etc., etc. Last week he tracked the original owner down for me, and I chatted with the original owner for about 3/4's of an hour.

Original owner confirms the bike has 6,600 original miles on it from him buying the bike brand new, and that the turbo motor was built at about 3,600 miles, so the motor has roughly 3,000 miles on it. That supports what I saw on dis assembly, all the bearing clearances etc. were pretty much perfect, all the engine internals in great shape, even most of the valve clearances were close.

Original owner describes the bike as a "monster" and claims he routinely did 5 gear wheelies with it, even with stock swing arm and stock front end. I can't imagine....... :o :o :o :o :o

Paul LeClair

ps there are an awful lot of parts in a Honda CBX 6 cylinder motor, 24 valves, twice as many internal bits as a Laverda triple, the next Laverda triple engine build is going to seem pretty simple

pps a Laverda turbo triple build would be pretty straightforward, hmmmmmm......... ;)
 
Paul, sounds like it will be awesome. Fire it up and blow some of that hot turbo air 1300 km east Need to dry up the sloppy spring met going on here. 
 
Vince said:
Seat looks slippery, better hang on tight

Hi Vince, actually I was also wondering about that smooth seat, so I went looking for a Corbin Gunfighter, then stumbled on a new old stock Corbin Canyon Dual Sport for cheapish, which I bought. Have not put it on the bike yet, although I did add passenger pegs to the build for anyone mad enough to get on the bike with me..........
http://corbin.com/honda/7980cbx.shtml

Paul LeClair
 
Back
Top