Redax Generator and Ignition upgrade to Laverda Jota 180 series 1

I spent a bit of time on the project today...I drew a wiring diagram for my model of bike which is fairly detailed ie not schematic.  I took time to clean up the loose wires so the colours were easily identified.

I produced a shopping list for Lucar type connectors and a kit of 0.75mm automotive wires in various colours along with a nice set of heat shrink tubing..

The worst thing to do in my book is to start hacking into wiring without the full understanding of the circuits involved and bodging in crappy connectors cuz they are all you have in the box. I'm in absolutely no rush only to keep some continuity ( sori for pun ) so that it stays fresh in my mind.

When these materials arrive I'll be able to hook everything up and connect the battery. Then I'll be able to follow the voltage path...to cross check the loose wires. I have the benefit of a buddy who is a qualified electrical engineer. I don't like to call him in until I have wrung out a problem in my head,,and then get him to double check my work. That way I'll learn a little rather than just having him do it for me..

I am enjoying the work and it has helped me get a better understanding of the bikes wiring.

Joe


lemonjelly said:
Hacking into looms its put me off for life ever doing this, Joe!

It is fairly straightforward Shaun...and I hope my pedestrian rate of work isn't putting you off.!.  There is actually no cutting of the existing loom. I am only having to order a few connectors and lengths of wire as 1 ) The new TK coil terminals face the opposite  way to the originals so I need a couple of fly leads..and generally tidying up.

It is enjoyable and I am sure the end results will be worth any head scratching.

When all is done I'll print up the actual wiring diagram in detail for my bike..ie not schematic...This may help..  : )

ps I have  a little box of spares here for you Shaun ; )

joe

 
jotajoe said:
I produced a shopping list for Lucar type connectors ...

Don't buy the connectors with the hard plastic coloured insulation. They're rubbish and a blight on any wiring system. I often find them on old bikes that have had the wiring modified by a PO, and I make it my mission to eliminate them. I think there are still a few on my Guzzi, but I haven't had the bike long enough to go through all the wiring.

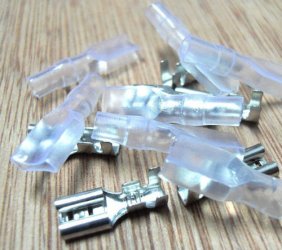
Get the un-insulated connectors and use soft PVC sleeves on them. Like these ones below. Use a proper crimping tool. If you don't have one, crimp them with pliers and solder them. Don't forget to slide the PVC cover onto the wire before you attach the terminal!

You can find them on ebay
http://www.ebay.com.au/itm/100x-6-3mm-Crimp-Terminal-Male-Spade-Connector-Case-/290567611191?pt=AU_B_I_Electrical_Test_Equipment&hash=item43a72de337
http://www.ebay.com.au/itm/200x-6-3mm-Crimp-Terminal-Female-Spade-Connector-Case-/290562031011?pt=LH_DefaultDomain_15&hash=item43a6d8bda3

Or get them from http://www.vintageconnections.com/

Cam
 

Attachments

  • Spade connectors.jpg
    Spade connectors.jpg
    79.5 KB · Views: 20
Couldn't agree more D-man. Nothing says half-assed cobbled more than cheap aftermarket terminals. Second on the soldering. Consider buying a piezo butane torch for the heat shrink and shrink-solder connectors as well if not already on hand. I'm a big fan of the Tesa cloth harness tape,  looks/works great.
 
The Tesa cloth tape looks interesting, does it get all gooey like the electrical tape does? Can't stand it when people put that shit all over the place. Makes a mess.
 
No goo. Tesa tape is OEM for Benz & others. Fabric is not shiny, looks proper. Make sure harness/wiring is clean and wrap tightly. You'll dig it.
 
IAG said:
Couldn't agree more D-man. Nothing says half-assed cobbled more than cheap aftermarket terminals.

Those rubbish Lucar type aftermarket terminals aren't that cheap either. They usually cost more than the decent ones!

I've not tried the Tesa cloth tape either. I'll give it a try next time I have a wiring harness to build.
 
lemonjelly said:
Hacking into looms its put me off for life ever doing this, Joe!

is not so much a matter of hacking into the loom as opposed to removing totally around 1/2 of the wiring loom that is not necessary
new system frees up a lot of space
 
Thank you Reggie. I will keep this info for future reference.  I'm with you 100% on the cheapo pre-coloured connectors. I was given some free on Saturday but I'm not going to use them. I ordered some decent connectors with insulated sleeves off fleabay and some correctly rated wiring lengths.

There is a big difference in a home mech. doing a job like this, as one doesn't have materials immediately at hand in most cases, as a professional motorcycle workshop will...I refuse to bodge using whatever is lying about just to get the job done quickly.

 The season is drawing to a close and I am off to France on the old Beemer in November so there is no pressure to rush. I do want to get it finished off in the next couple of weeks..That's my target..work and Coronation street permitting  :LOL:

joe

 
Dellortoman said:
Don't buy the connectors with the hard plastic coloured insulation. They're rubbish and a blight on any wiring system. I often find them on old bikes that have had the wiring modified by a PO, and I make it my mission to eliminate them. I think there are still a few on my Guzzi, but I haven't had the bike long enough to go through all the wiring.

Get the un-insulated connectors and use soft PVC sleeves on them. Like these ones below. Use a proper crimping tool. If you don't have one, crimp them with pliers and solder them. Don't forget to slide the PVC cover onto the wire before you attach the terminal!

You can find them on ebay
http://www.ebay.com.au/itm/100x-6-3mm-Crimp-Terminal-Male-Spade-Connector-Case-/290567611191?pt=AU_B_I_Electrical_Test_Equipment&hash=item43a72de337
http://www.ebay.com.au/itm/200x-6-3mm-Crimp-Terminal-Female-Spade-Connector-Case-/290562031011?pt=LH_DefaultDomain_15&hash=item43a6d8bda3

Or get them from http://www.vintageconnections.com/

Cam

Thanks Cam,  That is exactly what I have bought..  and I invested in a decent crimping tool a year or so ago.

Great minds think alike eh ?

joe
 
Mounting the Redax Sachse Electronic Box.

I'm just wondering where is the most popular mounting point on a Ex BTZ 180 Jota for the little black box ? :)


Any advice gratefully received. 

joe
 
I normally bolt a small plate onto the side of the electrical box where the Bosch black box was and then stick the Sachse box onto the plate
is just behind the side cover that way and easy to get to if you wish to change curves

 
redax5 said:
I normally bolt a small plate onto the side of the electrical box where the Bosch black box was and then stick the Sachse box onto the plate
is just behind the side cover that way and easy to get to if you wish to change curves

Thank you Red..Just what I was thinking me sen as the amplifiers have gone now so that is a perfect location...Might be room to put something in to shield the unit from vibration too..

cheers

joe
 
Back
Top