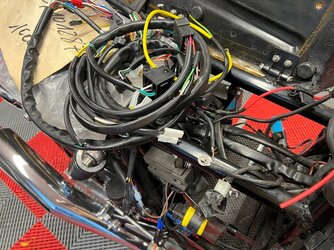
Rewiring 79 1200?

Paul LeClair

Administrator
Staff member
Hi all

earlier this summer I purchased a new Odyseey PC 680 battery for my 79 1200 Mirage. The battery I took out of the bike was dead and past charging.

when I installed the new battery, the bike was still dead. The bike had been on a battery maintainer but due to personal challenges had not been run for close to 3 years. I have drained the stale fuel and in addition to rebuilding the stock Dellorttos again, I have gone off on a tangent of installing a used set of Mikuni RS 36. See my other thread.

However, the bike is still dead apparently due to a failing wiring harness. Wires are heavily deteriorated, connectors are falling off wire ends, and I have patched the harness so many times over the last 20 years it is a bit of a mess, with work arounds, etc.

Also, the bike has a now vintage IIS TA 120 ignition and charging system conversion (for which I can't find the original wiring diagram) non-standard fuse junction box, parts of the original ignition control boxes still in place, non-standard coils, etc., etc.

I have known the need for a proper re-wiring has been there for a long time, which is why I had purchased one of Wolfgang's then next to last original wiring harnesses several years ago, maybe a decade or more ago. How time flies........ Then earlier this summer I stepped away from the 79 1200 electrical issues to finish up the Gilera I built for the September 2022 Moto Giro but now the Moto Giro has passed, I am now back looking at the Laverda.

I am a bit electrickery challenged... I am wondering whether to modify the brand-new wiring harness however may be needed to suit my bike, or just start from scratch and build and install a rationalized modern harness if I can talk someone (Cam ;)) into digging out one of the wiring diagrams he has previously drawn for other LAverda triples... Thoughts? Has anyone installed a stock harness in recent memory? Would you start from the back of the bike and work forward, or from the front to the back? Maybe something like an M Unit while I have the wiring harness out anyway?

I also need new handlebar switch gear. I had bought a pair from Wolfgang year ago same time as the harness, but the bar end switch gear got destroyed in my garage fire a couple of years ago, and I think Wolfgang is still away?

and "while I am at it I might as well...." finally ship the tach and speedo away for total rebuild over the coming winter.....

EDIT - see the fuse photos I just added - the fuse cover housing is melted, as is the patched in inline fuse receptacle, the red wire of the inline fuse holder is heated browny orange, but the metal part of the fuse is still intact - never seen that before.....

2nd EDIT - just had a good look through the Moto Gadget web site - they apppear to have come a long way. The new M-Unit Blue, the new Mo.Button, and the Mo-Stop, plus the cable kit all look really appealing. Didn't find the handlebar swiches to go with. Then the instrument package looks really cool...... Just debating whether to throw the time and money of the Moto Gadget stuff at the 79 1200 or just proceed with the replacement stock wiring harness I already have. Decisions, decisions.....

Paul LeClair
 

Attachments

  • 1200 wiring 1.jpg
    1200 wiring 1.jpg
    250.5 KB · Views: 57
  • 1200 wiring 2.jpg
    1200 wiring 2.jpg
    226.2 KB · Views: 59
  • fuse 1.jpg
    fuse 1.jpg
    241.2 KB · Views: 52
  • fuse 2.jpg
    fuse 2.jpg
    177.8 KB · Views: 55
Last edited:
What have you done to my bike Paul?😁. Looks like you tried to burn it to the ground! I have just done 2 ground up wiring looms, sf2 and the 6 plug racer, and after Bellingen I'll do the same to the 3C. Time consuming, but hey, you can sit next to the beer fridge. New loom from Wolfgang is a good start.
 
Ditto, I had the local wiring bloke make a complete harness to replace the scary crap it came with maybe 15 years ago and since then it's had addons and changes, I love them but some think There the devil's work, HEATED GRIPS, volt meter on the dash, a completely new EI, uprated headlight globe, modern left switch block, plus wear and tear. It's still way better than the original loom but I expect at some point it will need redoing before it leaves me stranded BTW that's happened anyway on 2 or 3 occasions, usually for stupid wiring fails like a loose connection. It doesn't take much to be stopped by this stuff.
 
Hi Paul

Are these red connectors part of the new wiring harness?
connectors.jpg

If so. I'm not impressed with the quality of the harness. As far as I'm concerned, those things are OK for a band-aid repair on the side of the road (I often carry a couple in my tool kit with some spare electrical cable) but they're not suitable for permanent connections in a wiring harness.
 
From my experience rewiring my 3C, start in the middle, that's where it's all happening. From there, going front or rear is easy.

Paul
 
Unless keeping everything else standard I would build my own loom. Modern wire has thinner insulation so packaging is easy and if installing relays or a mo.unit then there is opportunity to reduce wire nominal size Between these and loads. Personally I start at both middle and front running wire to destination from terminals at these ends. Then decide on earth points, how to group shared earth and shared common live wires using zip ties to temporarily bundle until the loom layout meets my satisfaction in the process deciding where to locate any intermediate connectors. Then sheath each bundle typically working from bundle junctions or intermediate connectors / earths towards load / source. This tends to leave enough material at load / source ends to trim wires to final length to get a neat job and so finally add terminals. Tend to use loads of temporary zip ties as build loom on the bike. If planning to install relays, my last build added 5, then I would suggest you consider the mo.unit. This would massively ease wrapping your head around wire layout to / from relays and use less space. Not used one myself, but next time will.
 
Paul, like you I am no expert at this, once years ago I built a new harness for my 74 750 SFC and have made changes to other bikes.
Knowing you and all the changes to the current harness you would be happier with a new one unless the changes to Wolfgangs are few and easy to do. That being said you don't want it to turn into a shit show and end up with a charging system or ignition problem or some other issue thats a pain in the ass to resolve.

I would start in the middle nodes where the wires all congregate at the fuse box, regulator, coils etc. Focus on the handlebar and ignition switches next, followed by the end points like alternator, starter then the lights etc. Decide where you may want to relocate the relays you may have added.

Leave the old harness in place then plan and run the new wires and/or draw it out. Use masking tape to label the wires so you don't loose track of things. Take pictures if you need to know the routing through the frame and to the guages and handlebars.

I can't advise on the best block connectors anymore, but important to get good ones. And be careful on your crimping and mating the connectors....easy to bend pins on some. You can always do a continuity test on each circuit as you go along to make sure your ok.

Farmers Almanac says a long cold winter....so you can take the time to do it and still have another few months of winter to enjoy.
 
Free advice, worth every cent you paid for it, my experience passed on is as worthless as any one else, done all three, repaired the oem wiring, fabricated a "new" replacement similar to factory harness, and made up a modern relay controlled load distribution pcb. All have advantages and disadvantages. Of the 3M Scotch Locks, an IDC ( insulation displacement connector ) which will bring much sorrow into your life, if not today, then by the noisy highway as you sit and ponder, tomorrow.

Somewhat of a conundrum Paul, your well above the gifted amateur status all the same, mechanicals and electricals. Suppose it comes down to effort in and results out equation, distances and time remaining in life to ride around. Least complex outcome would be fit a close to original wiring harness, minus any unreliable added items like IDC's. Maybe the colour code scheme will be replicated, factory wiring diagram a plus in future mods or reliability issues. My thought would be replica wiring harness fitment.

Load centre control pcb or commercial variant, has many advantages at completion, non standard wiring will be the resultant. Need your wits about you all the same, making up a custom schematic and colour definition as you go. Cam has walked the walk, as to talking to himself as he did so i will resist upon that speculation, a wry smile here. Bit miffed at being being called author of a Vintage system... just get my zimmer frame and make a pot of tea to recover, least i fall over doing same.... j.
 
laughing out loud, John, re "vintage system"......... still holding up to the test of time:)

Cam, yes those Scotch Loc clips are standard in hte factory replacement harness and startled me when I unpacked the wiring harness. Obviously I would not use them.

With Cam's help I built up the simple wiring harness from scratch for my recent 1957 Gilera 150 Moto Giro project, integrating the VAPE conversion to 12 volt charging and digital ignition, and LED lights, modern instruments with Speedhut GPS speedo. etc.. My electrical connection workmanship has improved dramatically, using much better quality connectors, crimps, etc with better quality tools and supplies.

The Moto Gadget M-Unit.blue and related bits look tempting for the Laverda. I have recently been shopping for a replacement Moto Giro bike for next year, have been looking at 1960's Ducati 250's, and if I actually go that route for another bare frame bare engine cases build I am not sure I really would want to have a scratch rewiring project of the Laverda on the table this winter as well.

all the comments in this thread helped, thanks everyone. I have some thinking and planning to do. I gather the new old stock Laverda triple wiring harness is now rare as rocking horse poop, maybe I could sell it to defray the costs of the Moto Gadget bits....;)

Marty, that weird melted fuse housing startled me, after my 1990 Bentley Turbo R burnt to the ground a couple of years ago in my garage I have added a bunch of "Element" fire extinguishers scattered all around my garage and I have one in each of my cars. Maybe I am going to have to add one to each motorcycle as well. https://elementfirecanada.com/ Highly recomended and well worth a look. https://www.motortrend.com/features/element-fire-extinguisher-review/
 
All noted Paul, your retention of Wit and pithy observances a must have... grin. When contemplating a load centre installation, factor in that the handle bar switches are rated for larger current loads, "wetting" current may become an issue for these contacts inside the switch assemblies. 12-20mA should be sufficient, coupled with, from time to time, high quality lube and clean spray chemical, to mitigate any wetting current issues. The ND type of reliable, much preferred handle bar controls, have basic contact material inside. Well done you with the Gilera electricals, your well provisioned to call the job approach early. HTH j.
 
Paul,
FWIW, there is not a lot wrong with the original wiring harness, especially the BTZ version (totally different to earlier ones) as you have. The only real issue (early or late type) is a lack of a proper earth wire up in to the headlight. Ditto the LH switchblock IIRC, the horn relies on the handlebar for earth even though there is a wire in the switchblock but no corresponding earth wire in the loom (note, all from memory, trust but verify...).

Also as you're painfully aware, it's a good idea to have a main fuse, an easy way to do this is one of the 90's Jap bike start solenoids with the integrated 30A fuse. Then you only have one unfused heavy gauge positive wire on your battery and it is short, just running to the solenoid. Main supply to original (or replacement blade type) fusebox and regulator charge wire connect to the other side of the main fuse, so are then protected.

When I rebuilt my 79 Jota I assumed the original wiring would be junk but I opened it up and found nothing really worth worrying about. I had already threaded through a proper earth to the aforementioned, so all I did was make a few repairs and re-terminations where some corrosion was present, but otherwsie just cleaned it up and then re-sleeved it. Pay attention to the big 6-pin blade connector under the fusebox if re-using any of it, it is prone to corrosion. I totally re-terminated all of that.

You may find it better to just use the NOS harness you have and make a few addditions / alterations for the equipment you're using. Turning it into a big project is interesting if you've nothing better to do but might be effort for no return if you have other pressures on your time.

If modifying (or making new) the main thing is to get good quality wire & terminations and equipment/technique to fit them. There is a lot of info out there these days, one particular youtube channel I have watched and recommend is HP Academy. They have a whole lot of vids on motorsport/custom wiring and I found this one particularly useful as it backs up a lot of what I took years to learn the hard way.
Between this sort of info and suppliers like Kojaykat, Eastern Beaver, Vintage Connections, it makes it possible for almost anyone to make high quality modifications and even entire harnesses if they take notice and don't cut corners. With your attention to detail and recent experience with the Gilera I'm sure you'll be fine either way but I'd lean toward the NOS one. Regarding your non-standard ignition and charging, the ignition is a seperate sub-loom anyway, so make the ignition sub-loom new to suit the IIS or an Ignitech if you change it out.
 
Spot the electrically qualified mechanical engineers at Breganze in the day, why run a battery negative return wire from the headlight shell and front end, when you have perfectly good greased ball/needle bearings to carry the return current.... "next problem Mario..." " maybe we can save a few dollars on crank centre mains" we just saved a fortune on 1metre of wire.... pass the vino subito! j
 
Totally agree with Steve, having rewired all 3 of my Lavs Ive found the original looms easy to work with, you can ditch some of the runs and add others in as you see fit.
Its defiantly not rocket science and does not need to be confusing.
Dont let the wordsmiths dazel you with their BS, just get in there and do it.
Relays are always a bonus, takes load away from switchblocks.
For what its worth I dont see the need of the Moto Gadget path but others will disagree.

cheers
Tom
 
Mmmmm of the oem to bike harness, need to ascertain the condition of the plastic insulation degradation, the contamination level of the copper wire, requiring mechanical abrasion to remove the orange oxide like contamination pre crimp to new connectors etal. Hardening of the outer sheath material, oil contamination leading to cracked insulation at various vulnerable areas on the frame and motor. You can assess the above and retain the oem harness, much depends on the weathering of the whole bike, location and storage notwithstanding. Prep is everything, new replacement harness should be a net gain, chasing intermittent problems can soon eat away at any gain in retaining the "refurbished" original harness, owner choice of course in the end. j.
 
Hi Paul.

You have plenty of options. The pros and cons of patching up, extending and modifying the original wiring have been discussed. And that's probably the way I'd go if it were my bike. But I'm not so fussy about how things look, so long as they work.

But if you decide to rip out the old harness and use the new one, please start by getting rid of those awful Scotch Lock devices. There are more reliable ways to join wires together than those stupid things. Just remove them and re-join harness. You can use barrel crimps or simply solder the wires together. In either case, cover the joint with heat shrink tube. Avoid pre-insulated barrel crimps. I usually use soldered connections in that sort of application.

The rest of the harness doesn't look too horrifying, although there are a few places where joints in the black tubular sheathing need to be wrapped. But that can be left until the end of the job. It's actually useful to leave those sections unwrapped for now because it makes it easier to add or remove cables during installation. You have a non-standard ignition system so some modification will be necessary.

The Motogadget stuff has a high-tech appeal and incorporates features such as keyless ignition and an alarm system if you're into that sort of thing. But you still need wires to connect the brains of the unit to all the normal stuff like ignition, lights, etc. so I don't think it'll be any easier to install than a basic old-style harness. If you decide to go the full monty with the Motogadget stuff. It'll be an interesting project and eliminate one or two wires. The mo.button accessories are interesting; in that they condense the physical connection between the handlebar switches and the central mo.unit down to a single wire that carries a digital signal telling the mo.unit what switch operation has been activated. So, if nothing else, the massive financial outlay for all the technical wizardry will save a couple of dollars' worth of wire.

Whatever way you choose to go, I'm happy to offer what assistance I can. I could draw up a CAD wiring diagram for the bike if you wish. But only on the proviso that I have sufficient information about the equipment you choose to use.

Cam
 
thanks for the further input. I think I will install the new old stock wiring harness, with added grounds as recomended, and with the minor required modifications. Cam I will email you once I have planned things out, thanks for the offer, will find some way of compensating you.

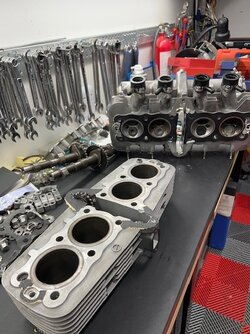
I went out to the garage this evening to look at the 79 1200 wiring, then thought I might as well run the RS 36 Mikuni's through the 30 litre ultrasonic, plopped them in, then the 1978 KZ 650 caught my eye. I have been accumulating parts for it for a while now, Kawasaki factory new old stock 1 mm over rings (from various eBAy vendors one ring set at a time) to go with the 1 mm overbore, Keyster Japanese made carb rebuild kits,new Suzuki armoured 7 mm valve stem seals, a top end gasket set, new rubber bits, factory valve shim kit, etc. etc.. Didn't even put teh KZ on hte bike lift, just started stripping it on the floor. Amazing how quickly a Kawasaki engine comes apart when you have done it a number of times before.......carbs, exhausts, head, and barrels off before the Mikuni RS 36's were finished in the ultrasonic..... :eek: :eek: :rolleyes::rolleyes: If only they went back together as quickly.....
 

Attachments

  • RS 36 1.jpg
    RS 36 1.jpg
    106.4 KB · Views: 27
  • KZ 650 1.jpg
    KZ 650 1.jpg
    126.2 KB · Views: 26
  • KZ 650 2.jpg
    KZ 650 2.jpg
    107.9 KB · Views: 26
  • KZ 650 3.jpg
    KZ 650 3.jpg
    115.1 KB · Views: 27
I thought I was looking at an Alan Milyard converted triple into a four, well for 10 secs anyway.
It will happen one day, you just know it will, or even an air cooled V6 Lav! well a 1000 or 1200 triple is realy only a 750 plus one with DOHC conversion
CLEM
 
Back
Top