
You are using an out of date browser. It may not display this or other websites correctly.
You should upgrade or use an alternative browser.
You should upgrade or use an alternative browser.
SFC1000 Hydraulic Clutch - engaging early in lever release
- Thread starter ngiles
- Start date

G
Grant
Guest
I thought it was to do with the level of crystallinity formed on slow cooling.


Sir Sidney Ruffdiamond
Hero member
- Location
- Cotwolds
The change in my Corsa became a bit more crunchy so I topped the mc up , same happened again there was no sign of any fluid but once the cover was off you could see fluid being distributed by the chain but not on the deck - the seal had gone and the chain was crocked ! Seals from Wolfgang

CLEMTOG
Hero member
just take off the gearbox sprocket cover, clean it all up, install new "O" ring and dust seal, take out the pushrod and have a quick look at both of its ends and the ball in the slave piston, (check the tiny oils seal around the pushrod as well) if all looks good don't bother with the centre ball and the other pushrod or the thrust bar, re-fit the cover bleed the system and see how you go after that, you can always remove the primary cover later as a seperate job, don't do it if you don't have to.
CLEM
CLEM

Tippie
Hero member
- Location
- Dr?bak, Norway
But Clem, that is against the principle "if it ain't fucked, keep fixing it until it is!"

CLEMTOG said:<snip> see how you go after that, you can always remove the primary cover later as a seperate job, don't do it if you don't have to.
+1. Beware Paul LeClair syndrome, "While I'm there ..."
Sorry Paul - couldn't resist! :-*

ngiles
Senior member
- Location
- Sydney, Australia
Whipped off the cover, extracted the slave cylinder piston, removed the seal and will change the seal as a first port of call. Couple of questions referencing attached photos:
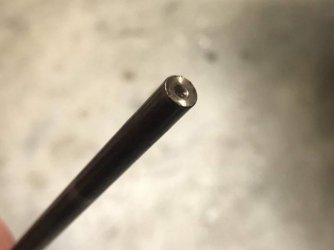
1. Photo_2_Rod.JPG is the internal end of the clutch push rod, small indentation which I figure is fine - the outer end shows an even smaller indentation. I am not sure how I would go about extracting the internal ball bearing and second/LH rod - unless its strongly recommended I shall not bother.
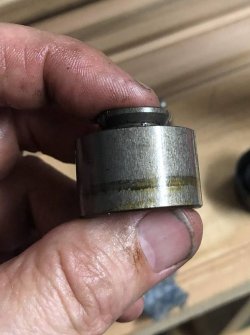
2. Photo_3_Piston.JPG - The piston seems fine although there is some residual marking from the old seal which creates a very minor roughness - any suggestions what is best to clean off - and failing that I figure a replacement piston is worthwhile to improve the seal?
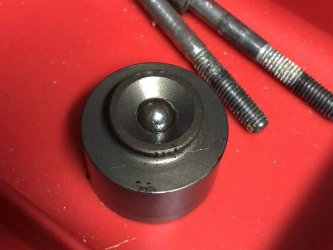
3. Photo_3_BallBearing.JPG - Should the ball bearing drop out of the piston - I have cleaned it pretty thoroughly and despite using a magnet to try and draw it out it will not oblige - moves within the piston easily.
1. Photo_2_Rod.JPG is the internal end of the clutch push rod, small indentation which I figure is fine - the outer end shows an even smaller indentation. I am not sure how I would go about extracting the internal ball bearing and second/LH rod - unless its strongly recommended I shall not bother.
2. Photo_3_Piston.JPG - The piston seems fine although there is some residual marking from the old seal which creates a very minor roughness - any suggestions what is best to clean off - and failing that I figure a replacement piston is worthwhile to improve the seal?
3. Photo_3_BallBearing.JPG - Should the ball bearing drop out of the piston - I have cleaned it pretty thoroughly and despite using a magnet to try and draw it out it will not oblige - moves within the piston easily.
Attachments

hooksey
Hero member
- Location
- Vic , Australia
New rod and balls required by the looks of that indent 
Grab a piston whilst ya in there Piston and ball come as one part I think :

Grab a piston whilst ya in there
Piston and ball come as one part I think :
motoddrob
Hero member
- Location
- S/W Australia
Also get a new seal for the push rod as you'll need to remove that to extract the ball and rod, that is if you don't want to remove it via the clutch housing. Don't know if it's possible to shine a light down that shaft to look at the other end where the rod rides against.
That actuating key has been known to have a hole bored into it.
Mate's RGS had it happen. nearly bored throught it, so much that the piston came pass the seal, no clutch and a mess!!!
That actuating key has been known to have a hole bored into it.
Mate's RGS had it happen. nearly bored throught it, so much that the piston came pass the seal, no clutch and a mess!!!

Laverdalothar
Hero member
- Location
- Germany
if the ball moves freely in the piston, the damage (at that point) is minimal. Also it looks as it is in the right position, no sign of it having drilled itself into the piston (yet).
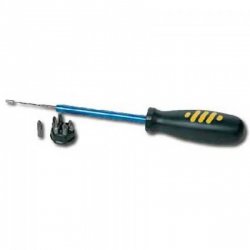
The push-rod looks not OK though. If that is the side that pointed inside the main shaft, you can expect the ball between the two rods having caused this and that means, you will need to replace it (if it is still there... sometimes they simply give up and disintegrate into very small pieces). If you have a magnet on a stick (sometimes screw-drivers with bit-inserts have that with a telescope-extention, like in the pic below), you can pull the ball and the 2nd rod out from the clutch slave side easily.
My personal recommendation: order a new piston with rubber seal, 2 new O-rings, ball-bearing, 2 new push-rods with according ball and a new oil-seal to go into the main shaft and re-assemble. Put the piston you have into your "emergency kit" together with a fitting O-ring and you should be fairly safe for the next 30 - 40.000 miles.
Make sure you measure both rods before you order and check the lengths of the new ones.
The push-rod looks not OK though. If that is the side that pointed inside the main shaft, you can expect the ball between the two rods having caused this and that means, you will need to replace it (if it is still there... sometimes they simply give up and disintegrate into very small pieces). If you have a magnet on a stick (sometimes screw-drivers with bit-inserts have that with a telescope-extention, like in the pic below), you can pull the ball and the 2nd rod out from the clutch slave side easily.
My personal recommendation: order a new piston with rubber seal, 2 new O-rings, ball-bearing, 2 new push-rods with according ball and a new oil-seal to go into the main shaft and re-assemble. Put the piston you have into your "emergency kit" together with a fitting O-ring and you should be fairly safe for the next 30 - 40.000 miles.
Make sure you measure both rods before you order and check the lengths of the new ones.
Attachments
Did you find moisture under the dust cap? What does the sealing o-ring look like?
Parts look quite OK and re-useable. Wear pattern is normal. Second rod inside the mainshaft shouldn't be much worse, only unknown that remains is the lifter bar at the clutch hub. If you can remove the ball between the rods you could replace that as a precautionary measure.
Check the o-ring groove for corrosion build-up, clean out as neccesary. Clean up the piston with a light rub of Scotchbrite, renew the o-ring and off you go. Dust seal usually requires replacement as well if fluid has been standing inside for any length of time.
piet
Parts look quite OK and re-useable. Wear pattern is normal. Second rod inside the mainshaft shouldn't be much worse, only unknown that remains is the lifter bar at the clutch hub. If you can remove the ball between the rods you could replace that as a precautionary measure.
Check the o-ring groove for corrosion build-up, clean out as neccesary. Clean up the piston with a light rub of Scotchbrite, renew the o-ring and off you go. Dust seal usually requires replacement as well if fluid has been standing inside for any length of time.
piet
ngiles
Senior member
- Location
- Sydney, Australia
sfcpiet said:Did you find moisture under the dust cap? What does the sealing o-ring look like?
Parts look quite OK and re-useable. Wear pattern is normal. Second rod inside the mainshaft shouldn't be much worse, only unknown that remains is the lifter bar at the clutch hub. If you can remove the ball between the rods you could replace that as a precautionary measure.
Check the o-ring groove for corrosion build-up, clean out as neccesary. Clean up the piston with a light rub of Scotchbrite, renew the o-ring and off you go. Dust seal usually requires replacement as well if fluid has been standing inside for any length of time.
piet
The dust cap was pretty grimy on both sides but has cleaned up well. The o-ring is quite rough on the outer side where it sits in the cylinder rebate and that also needs a good clean. I am pretty confident that the root cause was loss of fluid due to a poor seal, so a minimum is to clean things up and replace the o-ring.
I will see about getting to the internal ball bearing and the other rod as a next step and will clean things whilst I figure out where to renovate and where to replace.
Thanks to all - will let you know how I go in due course.
Cheers, Nick
CLEMTOG
Hero member
I agree with Piet and disagree with Lothar, the pushrod looks perfectly OK and fit for further use, so does the piston, clean it with metal polish.
If you really do want , really must, extract the ball that separate's the two pushrod halves, this can be done, by first removing the oil seal, (your renewing that anyway) and then inserting a short length of plastic tubing (windscreen washer piping?)into the gear shaft, press the tube against the ball and suck, then withdraw, still sucking, but don't drop it when it appears!!! it helps if you warm the end and flare it a little, but remember it must still slide inside the gear shaft.
CLEM
If you really do want , really must, extract the ball that separate's the two pushrod halves, this can be done, by first removing the oil seal, (your renewing that anyway) and then inserting a short length of plastic tubing (windscreen washer piping?)into the gear shaft, press the tube against the ball and suck, then withdraw, still sucking, but don't drop it when it appears!!! it helps if you warm the end and flare it a little, but remember it must still slide inside the gear shaft.
CLEM
Laverdalothar
Hero member
- Location
- Germany
Hi Clem,
maybe I am seeing something different than you do, but I seem to see that the end of the push rod is a) curved inside and b) has a "hole" or pocket. The push-rods I removed from several bikes never had that - except if they were worn. Normally, the surface was - at least on the ones I took out - flat with slightly angled edges. You can see these angled edges a bit on the following picture (taken from the Laverda-Paradies.de webpage):
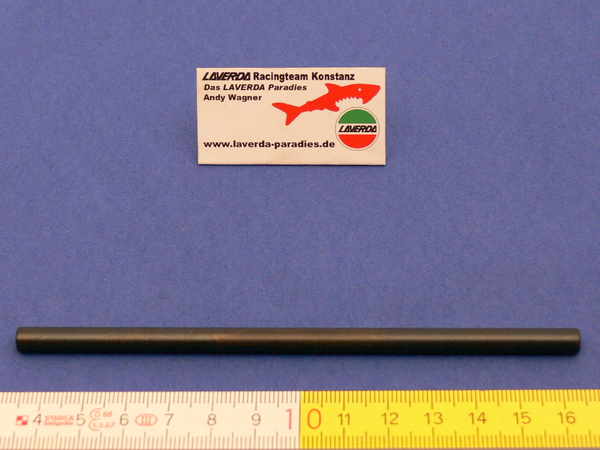
To my understanding, having this "pocket" in the end of the push rod means, you have more contact surface to the ball-bearing and therewith more friction = more heat transfer = better chance of melting the ball and weld it to the end of the push rod = higher chance of damaging the whole system.
Pretty sure you teach me wrong now, but as said, the look of this looks to me as it was worn by the ballbearing.
maybe I am seeing something different than you do, but I seem to see that the end of the push rod is a) curved inside and b) has a "hole" or pocket. The push-rods I removed from several bikes never had that - except if they were worn. Normally, the surface was - at least on the ones I took out - flat with slightly angled edges. You can see these angled edges a bit on the following picture (taken from the Laverda-Paradies.de webpage):
To my understanding, having this "pocket" in the end of the push rod means, you have more contact surface to the ball-bearing and therewith more friction = more heat transfer = better chance of melting the ball and weld it to the end of the push rod = higher chance of damaging the whole system.
Pretty sure you teach me wrong now, but as said, the look of this looks to me as it was worn by the ballbearing.
ngiles
Senior member
- Location
- Sydney, Australia
CLEMTOG said:by first removing the oil seal, (your renewing that anyway)
CLEM
Hi Clem - thanks for the feedback - can you just clarify for me which oil seal. I am replacing the o-ring/oil seal that stops the brake fluid getting past the piston, but I figure you mean one associated with the rod - where is it and how do I access it?
Cheers, Nick
Clem means the oil seal in the mainshaft where the rod exits. Held in place with a circlip, the seal can be levered out with a 6mm screwdriver blade. New one can be popped in using a wrench socket/bit of tube, etc.
Mainshaft seal rarely gives problems, usually only once the rods and balls have experienced melt-down...
The pictured parts show normal wear, nothing to get your undies in a twist about. New bits will show similar wear after about 3-4 months of use.
piet
Mainshaft seal rarely gives problems, usually only once the rods and balls have experienced melt-down...
The pictured parts show normal wear, nothing to get your undies in a twist about. New bits will show similar wear after about 3-4 months of use.
piet
ngiles
Senior member
- Location
- Sydney, Australia
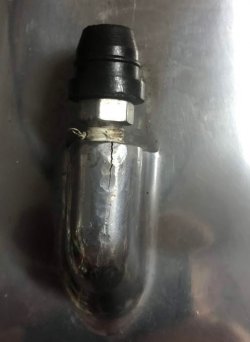
I was cleaning up the cover when I noticed that there has been some over ambitious tightening of the bleed nipple and a small crack exists (see photo) - some attempt to compensate using plumbers tape by the looks of it.
Any guidance on fixing - is a welder (with appropriate skills) the answer; has anyone used epoxy based products with any success (such as weicon aluminium repair stick)...other thoughts?
Cheers, Nick
Any guidance on fixing - is a welder (with appropriate skills) the answer; has anyone used epoxy based products with any success (such as weicon aluminium repair stick)...other thoughts?
Cheers, Nick
Attachments
CLEMTOG
Hero member
very sad and ham fisted, the tape may have become torn and found its way into the hydraulic system which you don't want, and the crack may have caused loss off fluid and pressure if the seat was not under sufficient load.
plumbers tape......or PTFE tape to be more accurate stands for plumbers tape fixes everything, err well actual polytetrafluroethalene,
bad luck on that score, first try and find a replacement, maybe not as hard as you think as all 120's have this cover, if that fails use a die grinder and cut a vee track in the crack area and get it welded, be careful to not destroy the seat that the bleed nipple bottoms onto, following welding there will be a fair bit of cleaning up ( which it seems to need anyway due to hammer marks) and shaping with the die grinder, then re-tapping the thread, and to keep it square it should be mounted on an angle block and drilled/tapped in a mill (might as well Timcert it while in there) and then overall polishing of the cover, it is not beyond repair, but much easier and possibly cheaper to buy another.
CLEM
plumbers tape......or PTFE tape to be more accurate stands for plumbers tape fixes everything, err well actual polytetrafluroethalene,
bad luck on that score, first try and find a replacement, maybe not as hard as you think as all 120's have this cover, if that fails use a die grinder and cut a vee track in the crack area and get it welded, be careful to not destroy the seat that the bleed nipple bottoms onto, following welding there will be a fair bit of cleaning up ( which it seems to need anyway due to hammer marks) and shaping with the die grinder, then re-tapping the thread, and to keep it square it should be mounted on an angle block and drilled/tapped in a mill (might as well Timcert it while in there) and then overall polishing of the cover, it is not beyond repair, but much easier and possibly cheaper to buy another.
CLEM