Sprag clutch repair

doublegarage

Junior member
Location
California
My series2 Jota started well enough after a carb rebuild/re-jet, but with some strange noises from the starter system. The bike is new to me so I don't have anything to compare the sound with, but definitely some sort of gear-whining and maybe "squeal"
Then after reading through this thread: https://www.laverdaforum.com/xf/threads/90447/ I thought I'd better take a look at the sprag clutch assembly before I rode the bike for the first (yup) time.

I got the rotor/clutch assembly off and found this:
hub ring.jpg

Heads of the screws scraped/burned against the freewheel gear - I think mainly because they're too long (20mm, should be 18?) and therefore bottomed out and proud - and also barely hand-tight. The rollers are removed in this pic but the plungers are still in there, I think they should be poking out of their holes. But...no.

Every plunger was stuck in its hole - 2 of them had the tip broken off and rotated/jammed in the hole - took a while to dig them all out.
plunger.JPG
Lots of pieces of dead spring littering the area. More than one spring-type in there for sure. BIC biro springs maybe..

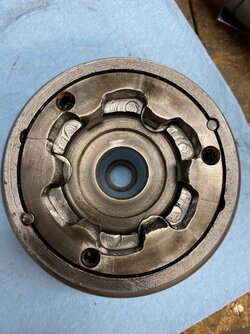
So now I'm left with a hub (not sure what to call the ring that houses the plungers/rollers) that looks like this.
empty.jpg

2 cracks around 4 o'clock and a big one at 10. Also, now I look closer, welded up cracks in the holes at 11 and 2.

So I'll get a set of plungers, rollers and springs for sure. Assuming the hub/housing ring is also available, how do i get the old one off, it has those 2 pins in the circumference to retain it but I'm not seeing how it comes apart?

How much does the roller wear visible in the 'base' (outboard of the rollers) matter? It's not a driven surface I suppose?

The freewheel gear looks to be in good shape, with some marks from the heads of those screws. Its hub, that gets driven by the rollers, is a bit ripply, but not that much - is there any way to know if/when they're too far gone?

Also, the free wheel gear, the needle-roller bearing in the centre looks and feels fine. But that big gear really wobbles on its hub, so I'll definitely replace the bearing, but I can't really see anything worn so wondering if they're meant to be a bit loose?

Any other advice or criticism of the plan welcome.

Thanks,
Richard
 
Those little retaining screws are not too long, they've never been done up tight enough... There is a definite procedure that has proved itself with long-term reliability.

These clutches require very careful assembly, and even then they remain problematic. Your centre ramp thingy(does anybody have a proper technical term for this?) is thoroughly knackered, any attempt at repair is doomed to failure. Only cure is replacement, I can supply new replicas that are actually made to closer tolerances than the factory items. Rollers, plungers, springs, screws and cover plate are also available, but postage to the US has become, even for small parcels, quite expensive.

The inside of the housing should be skimmed to allow the rollers to move smoothly. But it all won't work if the diametre of the drive gear collar is worn, minimum diametre is around 49.2mm, otherwise the clutch will not engage properly and keep on screeching. The ripples will give the new springs a proper bashing while the engine runs, be prepared to replace these on a regular, short-term basis, should the gear be re-used. You should find 2 holes in the alternator rotor that allows insertion of a punch to push out the ramp thingy(providing the rotor has been correctly assembled prior). These usually break up because of weak batteries or starter motors allowing the engine to backfire on starting due to incorrect ignition impulses. The resulting forces are enormous. Replacing the needle bearing will result in about exactly the same amount of slop as before. ;) Make sure the little retaining tab for the gear is present at 12 o'clock., this prevents the gear from flopping around and rubbing on the clutch housing when the engine is running.
piet
 
Thanks, Piet,

Good to know the parts are available - I'll call Wolfgang on Monday and see what he has in my timezone - understood re. postage to USA from Europe. Not as fast as it used to be either. I'll PM you if he's missing stuff.

I'll look for the holes to push off the "ramp-ring" (I'm using that from now on) but I reckon it will fall into about 5 pieces when I do.

The drive gear collar is about 49.7 all around. I can see the ripples but barely feel them, not too bad, but point taken about it mashing the rollers when the engine runs - here's a picture attempting to show it.
free gear.jpg
The roughest spot is on the inside edge of the collar, closer to the main gear face. I might try to clean that up a bit. Going to need someone with a lathe anyway to clean up that roller backing face.

Also, should the bearing protrude out of the gear hub like that? There doesn't seem to be a stop for it on the other side, so could push it all the way through - should it maybe be flush with the gear?

Thanks for the help.

-Richard
 
Push the bearing back a bit, either flush with one side or centred, doesn't make any difference.

49.7mm is good.

piet
 
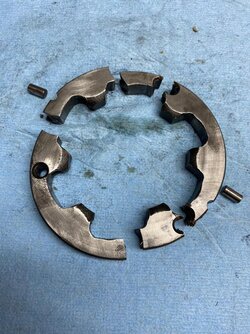
Two of the cracks in the ramp-ring were right above the holes in the rotor for removing it - so maybe somebody tried before, saw them crack, and quickly pressed it back in. No idea.

Here's what it looked like after removal
ramp ring.jpg
I guessed 5 pieces.... I reckon I might need a new one :unsure:

With the two location pins it'll be tricky to press the new one back in - never done one like that before. There's some clean up to do on the housing before that.

-Richard
 
One of the Biggest repairs for a Sprage Clutch is to ensure the "Back Plate" is parallel and firmly attached to the Fly Wheel.

To prevent the Dogs from Rattling or Binding.

Really not the greatest design but we Breganzie Enthusiasts have to live with it. Considering we do NOT have a Kick Start.
 
Last edited:
Two of the cracks in the ramp-ring were right above the holes in the rotor for removing it - so maybe somebody tried before, saw them crack, and quickly pressed it back in. No idea.

Here's what it looked like after removal
View attachment 55787
I guessed 5 pieces.... I reckon I might need a new one :unsure:

With the two location pins it'll be tricky to press the new one back in - never done one like that before. There's some clean up to do on the housing before that.

-Richard
Yow! Get in touch with Wolfgang, I think he said that he has some in stock.
 
Yow! Get in touch with Wolfgang, I think he said that he has some in stock.
Thanks, yes he did have some in stock and one is on the way here already - along with the kit of plungers/springs/rollers to rebuild it.

He also warned me that it won't work if I don't clean up the "backing" surface - i.e. the face of the housing that's outboard of the rollers. You can see the rounded gouges in the picture above. So I need to find someone who can weld up the dings and then face it off. Should be okay.

"ensure the backplate is firmly attached" okay I'll do that - I think i'll have to detach it to put in the lathe. Right now it seems very firmly attached with the 3 flat-head allen screws and 3 roll-pins.
 
Considering we do NOT have a Kick Start.
Sprung Ron:cool:.
Your post said we had a kickstart at 09:03,
I said we have a bump start at 09:26,
and you edited your post to include the NOT at 09:31.
Either that or I have completely lost it :oops:
:LOL::ROFLMAO::LOL:
 
In my experience, the main reason the springs getting damaged, plungers gets stuck, is the bungs in the end of the hole which works as a stop for the springs. Given time these bungs will tilt, damaging springs - plungers.
Since making longer bungs that is filed flush with the outer circle of the ramp ring preventing them to tilt, remaining square to the springs, my starterclutch has been without trouble.
The ramp ring can be welded if not in too many pieces, but a new one is of course best.
 
Sprung Ron:cool:.
Your post said we had a kickstart at 09:03,
I said we have a bump start at 09:26,
and you edited your post to include the NOT at 09:31.
Either that or I have completely lost it :oops:
:LOL::ROFLMAO::LOL:

Well picked up Terry.

Ron Ron Ron. Ya gotta learn to cover ya tracks, take a lesson from our politicians, they are experts at it it.
 
Thanks, yes he did have some in stock and one is on the way here already - along with the kit of plungers/springs/rollers to rebuild it.

He also warned me that it won't work if I don't clean up the "backing" surface - i.e. the face of the housing that's outboard of the rollers. You can see the rounded gouges in the picture above. So I need to find someone who can weld up the dings and then face it off. Should be okay.

"ensure the backplate is firmly attached" okay I'll do that - I think i'll have to detach it to put in the lathe. Right now it seems very firmly attached with the 3 flat-head allen screws and 3 roll-pins.
Don't weld up the dings. Just lightly skim the surface to remove the largest ridges. No problem to have a couple of scratches left visible.

The roll pins can be punched out, the screws are likely to have been coated with Loctite upon assembly, apply a little heat to loosen that. Avoid directly heating the magnets in the rotor.

piet
 
Don't weld up the dings.....Avoid directly heating the magnets in the rotor.
Okay good, I'll take it apart and just clean it up. The pictures make it look worse than it is - doesn't feel too bad when you run a finger over it.

And I was wondering about any heat demagnetizing the rotor, so it's good that you mentioned that.

-Richard
 
Max safe temp is around 80C for most magnets. You may be able to sneak up to 100C for some specific magnetic materials, but I wouldn't risk it. If it sizzles when you spit on it, you've overcooked it.

While on the subject of magnets, don't drop them on the floor or hit them with a hammer either.

If your alternator rotor is stuck on, heating it or belting it with a sliding hammer could bugger its permanent magnets. I've seen both of those methods used on other bikes.
 
Back
Top