
You are using an out of date browser. It may not display this or other websites correctly.
You should upgrade or use an alternative browser.
You should upgrade or use an alternative browser.
stalled project getting moving again
- Thread starter Paul LeClair
- Start date

- Location
- Calgary, Alberta, Canada
Hi Vince
laughing out loud....... hoping for not much more snow here, it is early spring and warming up nicely, thankfully, leaves are starting to bud on the trees, the first early flower bulbs are poking heir heads up, only to be browsed back to the level of the earth by the pesky deer.
Paul LeClair
laughing out loud....... hoping for not much more snow here, it is early spring and warming up nicely, thankfully, leaves are starting to bud on the trees, the first early flower bulbs are poking heir heads up, only to be browsed back to the level of the earth by the pesky deer.
Paul LeClair
- Location
- Calgary, Alberta, Canada
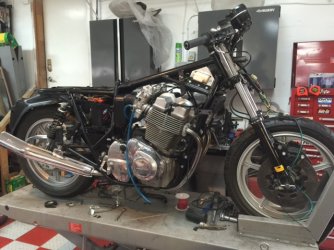
current progress as of late afternoon Saturday April 25, 2015. Still on track (hopefully) to finish the bike by Thursday April 30, 2015, so far.
see photo.
all electrical now completed, RedAx ignition installed, wired, and static timed, all other electrical wiring completed/repaired as needed, just need to hook up the turn signals.
exhaust system is coming back off, don't know what I have done wrong but it doesn't fit properly, the collector is hitting the oil filter housing nuts. This is the exact same system that came off the bike originally, so I am obviously doing something wrong.
still need to hook up tach cable, speedo cable, fill the engine with oil and crank it with plugs out until enough oil is circulating, check for oil leaks, then stick the new plugs in it, add some fuel, and see if it will start, first time since 1999........ Hoping to try and start it Sunday April 26, 2015 if all goes well...... 8) 8)
Paul LeClair
see photo.
all electrical now completed, RedAx ignition installed, wired, and static timed, all other electrical wiring completed/repaired as needed, just need to hook up the turn signals.
exhaust system is coming back off, don't know what I have done wrong but it doesn't fit properly, the collector is hitting the oil filter housing nuts. This is the exact same system that came off the bike originally, so I am obviously doing something wrong.
still need to hook up tach cable, speedo cable, fill the engine with oil and crank it with plugs out until enough oil is circulating, check for oil leaks, then stick the new plugs in it, add some fuel, and see if it will start, first time since 1999........ Hoping to try and start it Sunday April 26, 2015 if all goes well...... 8) 8)
Paul LeClair
Attachments

Laverdian
Senior member
- Location
- Brigadoon, Scotland
Paul, if you are taking the exhausts off, check the obvious thing, like are the headers are on in the correct order. Probably not that as you've done this more than a few times but in your haste to meet your deadline, you never know.........
Had a similar problem with my RGS, pattern headers that were stamped 1 2 3, pretty obvious you'd think, the order must be from the left 1 2 3. Well I had the system on and off 4 times before reassembling from the left 3 2 1, then I vaguely remembered when I took it apart that the header stamped #3 might have been on the left side. No idea as to the history of the pipes but it all seems to fit now.
Cheers
Ian
Had a similar problem with my RGS, pattern headers that were stamped 1 2 3, pretty obvious you'd think, the order must be from the left 1 2 3. Well I had the system on and off 4 times before reassembling from the left 3 2 1, then I vaguely remembered when I took it apart that the header stamped #3 might have been on the left side. No idea as to the history of the pipes but it all seems to fit now.
Cheers
Ian
- Location
- Calgary, Alberta, Canada
Hi Ian
these are factory original header pipes, and are marked with the factory numbers. I did check my notes when installing as to which was which, but I have obviously screwed something up somehow. Good suggestion to check the pipe numbers again when I pull them off. Otherwise, I was fiddling around with the rear muffler mounts trying to figure out which way they are supposed to go, they seem to haul the mufflers and collector up higher than is desirable. Anyways, I'll pull it all off and figure it out, I hope.....
Late Saturday evening here, put in quite a long day working on the bike the bulk of the day, I am going to fill with oil Sunday, get the oil circulating by cranking the engine without plugs. Once oil is circulating, I am thinking Sunday will be the day to add fuel and attempt to start the engine, first time since 1999, if it all works out. 8) If it starts, there will be video of the event!
Paul LeClair
these are factory original header pipes, and are marked with the factory numbers. I did check my notes when installing as to which was which, but I have obviously screwed something up somehow. Good suggestion to check the pipe numbers again when I pull them off. Otherwise, I was fiddling around with the rear muffler mounts trying to figure out which way they are supposed to go, they seem to haul the mufflers and collector up higher than is desirable. Anyways, I'll pull it all off and figure it out, I hope.....
Late Saturday evening here, put in quite a long day working on the bike the bulk of the day, I am going to fill with oil Sunday, get the oil circulating by cranking the engine without plugs. Once oil is circulating, I am thinking Sunday will be the day to add fuel and attempt to start the engine, first time since 1999, if it all works out. 8) If it starts, there will be video of the event!
Paul LeClair
Laverdian
Senior member
- Location
- Brigadoon, Scotland
Paul, from your description it sounds like the collector is also too far forward. The oil filter should be accessible with # 1 header removed. I think the factory header part numbers should end in the following three digits Left (#1) 051; Centre (#2) 052; Right (#3) 050. It's not a logical sequence. If the headers are not in the correct order it throws everything out as I found to my frustration before.
Good luck and hope to see the video clip later.
Cheers,
Ian
Good luck and hope to see the video clip later.
Cheers,
Ian
T
Terry Dymond
Guest
Paul, to ensure the headers are in the correct location; slide the headers into the collector (off the bike), splay them out so the distance is roughly the same as the gap between the exhaust manifolds then lay a straight edge across the three header inlets, the inlets should lay flat against the straight edge. I do this before assembly to ensure the load on each header is equal when the manifolds are tightened up.
HTH
Terry
HTH
Terry
G
Grant
Guest
41, 42, 40
- Location
- Calgary, Alberta, Canada
Grant said:41, 42, 40
Hi Grant and all
so 41 is primary side cylinder 1, 42 is centre cylinder 2, and 40 is alternator side cylinder 3?
heading to the garage now to pull the exhaust. Good thing I have a large supply of header pipe copper seals..... :
 :
hoping to hear some vroom vroom noises later today, we'll see.
Paul LeClair
G
Grant
Guest
Yup
- Location
- Calgary, Alberta, Canada
just took the exhaust off, I had the header pipes in correct order, but had the collector sunk pretty deep onto the three header pipes. Anyway, obviously some fettling to be done to how I had them installed, even though the pipes were in the correct order.
Paul LeClair
Paul LeClair
- Location
- Calgary, Alberta, Canada
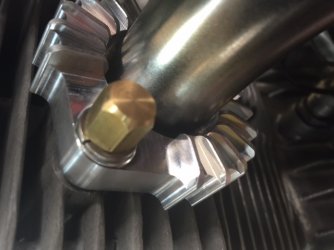
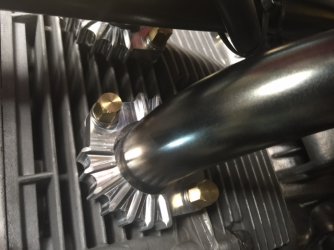
exhaust properly re installed. The problem turned out to be that although I had the pipes in the right order, I had the collector pushed way to far forward onto the header pipes. Installer error. While I was at it I installed the lovely alloy exhaust pipe clamps recently arrived from Red, and a set of closed end brass exhaust nuts from Bill M.
photos
went and bought a small gas can's worth of fresh premium fuel, and a 5 liter bulk jug of Castrol 20W 50 oil. Filled the sump and cranked the engine over, on and off, until I was sure the oil was circulating.
hooked up the gas can to the fuel lines to the carbs......and experienced a flood of gasoline leaks. All three float bowls, and two of the three fuel banjoes. As I rebuilt the carbs over a year ago, I guess I should have checked them better before I installed them. Anyways, fixed all the fuel leaks, mopped up all the spilled fuel, and presently have both garage doors open waiting for the last of the spilled fuel to evaporate and all the fumes to dissipate, would hate to set the bike and garage on fire on the first attempt to start the bike........ :-X
going to video the first start up attempt, for better or worse, fingers crossed. This engine has not run since 1999, although it is now totally freshly rebuilt, hope I got everything right..... : :
Paul LeClair
photos
went and bought a small gas can's worth of fresh premium fuel, and a 5 liter bulk jug of Castrol 20W 50 oil. Filled the sump and cranked the engine over, on and off, until I was sure the oil was circulating.
hooked up the gas can to the fuel lines to the carbs......and experienced a flood of gasoline leaks. All three float bowls, and two of the three fuel banjoes. As I rebuilt the carbs over a year ago, I guess I should have checked them better before I installed them. Anyways, fixed all the fuel leaks, mopped up all the spilled fuel, and presently have both garage doors open waiting for the last of the spilled fuel to evaporate and all the fumes to dissipate, would hate to set the bike and garage on fire on the first attempt to start the bike........ :-X
going to video the first start up attempt, for better or worse, fingers crossed. This engine has not run since 1999, although it is now totally freshly rebuilt, hope I got everything right..... :
:Paul LeClair
Attachments
- Location
- Calgary, Alberta, Canada
engine fired right up, about second crank rotation, runs beautifully, idles well, smokes like a chimney. I had soaked both mufflers completely submersed in EvapoRust for a couple of days, did a great job removing all the surface rust. However, it leaves an anti rust coating. I wiped it all off the outside of the pipes, but it is going to have burn off from inside the pipes.
As far as I can tell I have solved my fuel leaks, but will let the bike sit for a few hours and check back. Anyways, all the mechanical and electrical wiring systems are finished, just have to do a few heat cycles of the engine then retorque the head, then synchronize the carbs on the vacuum gauges. Brakes are done, hydraulic clutch is done, suspension is done, now just need to sort out fuel taps, install the bodywork (all of which has already been test fitted but still needs to be striped) install the turn signals, do whatever adjustments and fettling are required, and call it COMPLETE!
YEAH!
Paul LeClair
ps
did video the start up, now have to figure out how to upload it somewhere.....lots of smoke!
As far as I can tell I have solved my fuel leaks, but will let the bike sit for a few hours and check back. Anyways, all the mechanical and electrical wiring systems are finished, just have to do a few heat cycles of the engine then retorque the head, then synchronize the carbs on the vacuum gauges. Brakes are done, hydraulic clutch is done, suspension is done, now just need to sort out fuel taps, install the bodywork (all of which has already been test fitted but still needs to be striped) install the turn signals, do whatever adjustments and fettling are required, and call it COMPLETE!
YEAH!
Paul LeClair
ps
did video the start up, now have to figure out how to upload it somewhere.....lots of smoke!

Kiwi Laverda
Hero member
- Location
- The wobbly bit of New Zealand
Congratulation on the successful rebuild and start up, now just need to see the video.
Always good to see a stalled project finished.
Must get back to my SF2......
Always good to see a stalled project finished.
Must get back to my SF2......

Simonr501
Hero member
- Location
- Lympne, Kent. UK
Good Job Paul,
Once you have the bit between the teeth there is no stopping you is there?
Once you have the bit between the teeth there is no stopping you is there?
- Location
- Calgary, Alberta, Canada
started to "dress" the bike. I had test fit all the bodywork and brackets previously, including the Jota Series 2 fairing and the Jota fairing. However...... I had not test fit the Jota fairing side/rear brackets with the 1200 tank....bloody hell. Looks like the 1200 tank must be narrower at the bottom/sides than the 1000 Jota tank, the 1200 tank will not sit down over top of the side fairing brackets.
then I got the bright idea to bend the side brackets down, tank now fits, but the mounting points for the rear of the fairing are now way out of wack, and the lowered brackets now interfere with the mounting of the Mirage Series 2 engine fairings......
looks like I am going to have to go get some strip steel in appropriate width and thickness, get out the hand sledge and the vise, and make my own modified brackets to accommodate the 1200 tank in mounting the Jota fairing. Either that or do some cutting/welding on the existing brackets.
Odd, from the looks of the 1200 tank I would have thought it would be wider than a 1000 tank, although I don't have a 1000 tank here to compare to. Maybe the brackets I have are just bloody bent from the crash they endured. Anyway, some metal bashing and drilling in my immediate future.
anyways, charging ahead, I want to ride the bike before my self imposed Thursday deadline and begin the fettling process.
Paul LeClair
then I got the bright idea to bend the side brackets down, tank now fits, but the mounting points for the rear of the fairing are now way out of wack, and the lowered brackets now interfere with the mounting of the Mirage Series 2 engine fairings......
looks like I am going to have to go get some strip steel in appropriate width and thickness, get out the hand sledge and the vise, and make my own modified brackets to accommodate the 1200 tank in mounting the Jota fairing. Either that or do some cutting/welding on the existing brackets.
Odd, from the looks of the 1200 tank I would have thought it would be wider than a 1000 tank, although I don't have a 1000 tank here to compare to. Maybe the brackets I have are just bloody bent from the crash they endured. Anyway, some metal bashing and drilling in my immediate future.
anyways, charging ahead, I want to ride the bike before my self imposed Thursday deadline and begin the fettling process.
Paul LeClair
T
Terry Dymond
Guest
Get going Paul, the clock's ticking (thumbup)

markQLD
Hero member
- Location
- QLD Australia
well done Paul. and enjoy that 'sense of achievement' feeling.
when fitting the Mikuni carbs to Clyde ('78 1200), i noticed the bottom edge of the tank sits lower down and closer to the cam cover than the Jota does.
so i can understand that there may be an issue with the lower fairing brackets.
have fun.
i believe the 1200 tank is narrower and maybe also taller than a Jota tank? but haven't measured them to compare.Paul LeClair said:Odd, from the looks of the 1200 tank I would have thought it would be wider than a 1000 tank, ...
when fitting the Mikuni carbs to Clyde ('78 1200), i noticed the bottom edge of the tank sits lower down and closer to the cam cover than the Jota does.
so i can understand that there may be an issue with the lower fairing brackets.
have fun.
- Location
- Calgary, Alberta, Canada
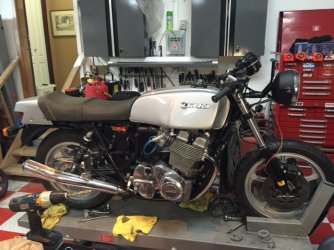
Monday evenings progress.....
bloody hell, test fitting the seat and tail piece, the original seat cover looks positively shabby. I happen to have a brand new Eldorado seat cover in stock, so to speak, so "while I am at it I might as well.. : :
looks almost done, and runs and stops, but still a surprisingly large amount of detail work left to do, and I still have to deal with the Jota fairing bracket issue conflicting with the 1200 tank.
Paul LeClair
bloody hell, test fitting the seat and tail piece, the original seat cover looks positively shabby. I happen to have a brand new Eldorado seat cover in stock, so to speak, so "while I am at it I might as well..
: :looks almost done, and runs and stops, but still a surprisingly large amount of detail work left to do, and I still have to deal with the Jota fairing bracket issue conflicting with the 1200 tank.
Paul LeClair
Attachments

tom3c75
Hero member
- Location
- Cape Town South Africa
Paul, unless the cover is cracked or has hardened, that seat does not look too bad, only faded.
Looks better than the condition of the seat on my TS Mirage when I bought it.
After I applied polish, etc. it came up very well. May be worth a try.
If you plan not to use the cover again, and depending on the condition, I'd be interested in taking it off your hands.
Tom
Looks better than the condition of the seat on my TS Mirage when I bought it.
After I applied polish, etc. it came up very well. May be worth a try.
If you plan not to use the cover again, and depending on the condition, I'd be interested in taking it off your hands.
Tom