swingarms and frame bracing?

having seen this bike in person have some photos not seen on the web
but uploading them though this new Flickr account is seriously doing my head in
adjustment of first chain run is concentric but not the rear main chain run
so impressed with this out of the box thinking

not that bothered if it works or not, was just impressed with the "give it a go and see attitude" that I thought was the most impressive, hence we asked Herman to build our race bike frames
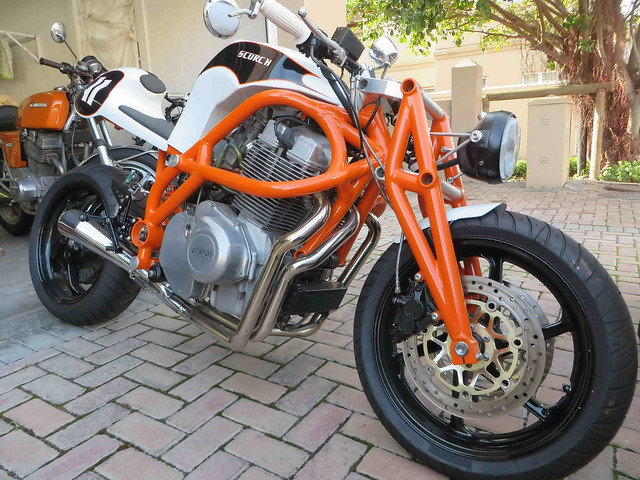
Scorch swingarm 3
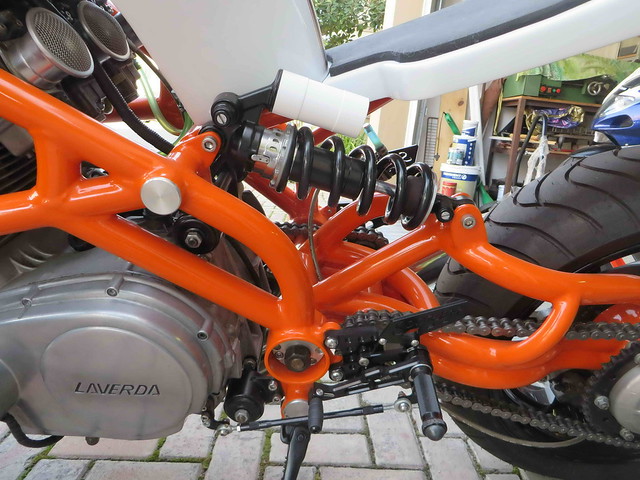
Scorch swingarm 2
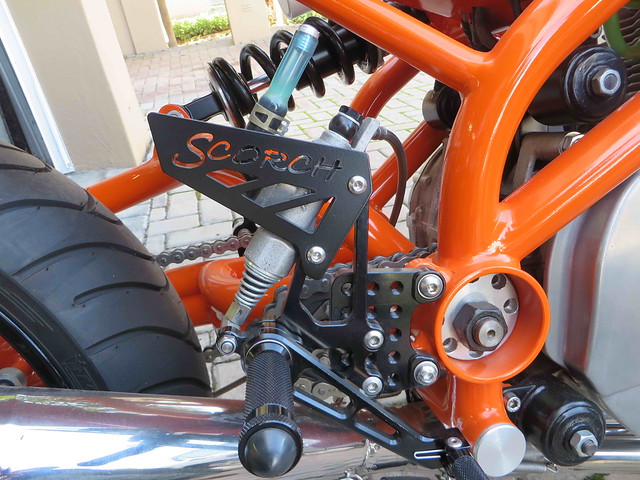
Scorch swingarm 1
 
The craftsmanship is impeccable. Overall styling is subjective (probably designed to be) but I like it.
I think it's out of the box, across the road and down the street thinking!  :D :D :D
 
It is an incredable frame-desing, even though it might be a bit over the top for most of us. But the finish and the love for details is just awesome...

Reds 2 bikes I saw pictures off are simply another class of its own, too!
 
henrywillms said:
Paul. I reinforced my RGS steering head a few months ago. Got good advice on different methods on this forum. From what I gathered most owners choose to gusset only (different ways to do this) and a few including Grant actually extend the steering head. Since I did not have any cracks, run stock wheels, brakes etc, and don't drive it that hard, I did not go the more complex route of extending the steering head. I have some pics and diagrams as well.  Regardless of the different designs you need to consider two common factors. Leave enough room for your coils...they are already a tight fit, and have an experienced welder do it so the frame does not get warped. I made the gussets up myself, extending the current factory gussets down to the top loop frame members (probably would have been just as easy to remove the small factory ones and replace with larger ones), and putting in new small gussets between the bottom of the top loop and the back of the down tubes. I did not put a brace above the oil cooler between the downtubes.

I'm getting ready to do this myself. Did you post any pics of the gussets you made and the finished frame? I have the Laverda drawings, but it seems opinions vary on what's the best route. My bike's like yours; no cracks at present, stock everything and used for touring. I have the engine out for a top end overhaul, and what with the frame paint showing the effects of 34 years of use and the threat of cracks seems like the perfect opportunity.
Richard
 
Laverdalothar said:
It is an incredable frame-desing, even though it might be a bit over the top for most of us. But the finish and the love for details is just awesome...

Reds 2 bikes I saw pictures off are simply another class of its own, too!
Yep, attention to detail, craftsmanship and thinking outside the square really is something else.
 
started the fitment process of the used JMC swing arm on my 79 1200.

I have the shifter cross over linkage fitted to my bike. First issue is the flared outer ends of the JMC swing arm that house the largish tapered roller bearings are large enough that they foul the shifter cross over shaft. The cross over shaft will need to be "modified" to reduce its diameter for clearance, likely with a grinder as I do not presently have easy access to a lathe.

Second issue, with cross over shaft removed for modification and the swing arm then test fitted, the left arm of the swing arm fouls on a round frame bracket. Swing arm is back off to get access to the offending frame bracket with a grinder tomorrow.

Third issue, due to the big closed bracing arm, the drive chain had to be split to allow the braced swing arm to be fitted, although the drive chain does not have to be split with the stock swing arm when the stock swing arm is removed or replaced. I had not thought of the drive chain.

None a big deal, but not plug and play either. Also have not yet reached the point where I can figure out if I can keep the center stand, or not.

Main comment, beside being pretty and shiny the aluminum swing arm, even with all the extra bracing, seems significantly lighter than the stock steel swing. arm I just removed. I am having fun fiddling with the fitment.

Paul LeClair
 
Paul LeClair said:
The cross over shaft will need to be "modified" to reduce its diameter for clearance, likely with a grinder as I do not presently have easy access to a lathe.

It's a much better engineering solution doing it with a grinder anyway.

Since the crossover shaft only rotates through a few degrees, you only need to take metal off one side where it fouls the swing arm. If you do it with the lathe, you'll be taking metal off all around, which will significantly weaken the shaft.

Remember that a shaft's torsional strength is proportional to it's polar moment of inertia, which is related to the 4th power of the diameter. So a small change in diameter gives a huge change in shaft torsional strength.

I think the shaft is 10mm dia. If you only need to shave off half a mm to clear the swing arm, doing it on the lathe will take half a mm off all around, and would therefore reduce the diameter by 1mm. You'll end up with only 66% of its original strength. If you shave off 1mm (dia down to 8mm) it'll only be 41% of its original strength. Much more than that and a good stomp in the gear lever might snap it off!

You're way better off filing (or grinding) a flat in one side of the shaft, which won't reduce its strength by much at all. I can't be bothered working out the polar moment of inertia of a circle with different sized flats cut in side, but take my word for it that it won't be much less than the full circle.

Cheers,
Cam
 
Paul, do the taper rollers fit nice and snug in the frame?
When I fitted my Aluminium box section to my Kawasaki I had to dress the end spacers so the frame wouldn't crush when doing the spindle up.
I had the same issue with the chain being split to get through the arm sub-frame. By some miracle Izumi supplied links for their endless chains!
I riveted it on after feeding it through.
 
Dellortoman said:
It's a much better engineering solution doing it with a grinder anyway.

Since the crossover shaft only rotates through a few degrees, you only need to take metal off one side where it fouls the swing arm. If you do it with the lathe, you'll be taking metal off all around, which will significantly weaken the shaft.

Remember that a shaft's torsional strength is proportional to it's polar moment of inertia, which is related to the 4th power of the diameter. So a small change in diameter gives a huge change in shaft torsional strength.

I think the shaft is 10mm dia. If you only need to shave off half a mm to clear the swing arm, doing it on the lathe will take half a mm off all around, and would therefore reduce the diameter by 1mm. You'll end up with only 66% of its original strength. If you shave off 1mm (dia down to 8mm) it'll only be 41% of its original strength. Much more than that and a good stomp in the gear lever might snap it off!

You're way better off filing (or grinding) a flat in one side of the shaft, which won't reduce its strength by much at all. I can't be bothered working out the polar moment of inertia of a circle with different sized flats cut in side, but take my word for it that it won't be much less than the full circle.

Cheers,
Cam

Hi Cam

I will take your word for it..... ;) ???  :D

and yes, I am just going to grind or file a flat in the shaft in two places.

from the seller (great bloke)of the used swing arm I know the swing arm was straight bolt on for his 1200 which also had a shift cross over, must be something different about my particular bike or the mounting of my cross over shaft maybe, but no worries, I am having fun with the fettling to get the swing arm to work on my bike.

Paul LeClair
 
so, that cross over shaft is made of tough material. I expected to just quickly file two flats, bloody file barely scratched the shaft. Out with the grinder and hey presto, two lovely flats for clearance of the bearing cups on the swinbg arm.

then, once I know the cross over shaft now works, off with theswing arm to grind back the frame bracket that was interfering on the left, swing arm back on, only to realize the carbon fiber chain guard from Boba that has been on the stock swing arm with a perfect fit does not even come close to fitting the JMC swing arm.....

swing arm back off, some radical carbon fiber surgery with a grinder and then drilling a new mounting hole, modified carbon fiber chain guard mounted and swing arm back on yet again.

so, wheel back in and ready to button everything up, once I get the chain tensioned and the rear wheel aligned. The handy dandy home made adjuster tool Bear provided works great, but the precise wheel alignment process is a bit tougher than on the braced aluminum Metmachex swing arm I have on the turbo CBX. Taking a break to clean up before doing final alignment then buttoning everything up to go for a test ride.

The JMC swing arm looks great, it is a LOT lighter than the stock swing arm I removed, and.... it is very shiny ;) ;) ;)

Paul LeClair
 
God Damn Paul: Why do you even bother or put out the expense - Considering our old legs can't deal with it.

Really! Youngster today care less when he or she can buy a turn key motorcycle for 1/2 the price of a Breganzie that will WALK over us.

Not saying, when feeling our oats, we could not  out run them on a 45 year old bike when we were 20 years old ;o)
 
If things don't quite line up fix it the D****i way.
Just line it up and stick the holes in later, it's not like they have to be in the middle of the mounting bosses :D
 

Attachments

  • ducati-v4-010.jpg
    ducati-v4-010.jpg
    136.9 KB · Views: 40
so hopefully final fitment challenge of the JMC swing arm......

the deep brace in the front of it fouls the "silencer" from the authentic Laverda 3 in to 1 exhaust I have had on the bike the last couple of years. No amount of fiddling with spacing of the exhaust will cure the interference.

Looked at cutting a chunk out of the swing arm brace, but decided against.

Now looking at putting a substantial "dent" in the silencer. There is already a factory installed clearance dent in the silencer which is of no help to the present fitment challenge, and the proposed new "dent will not really be visible either with the JMC swing arm or a stock swing arm fitted.

Figured out where the new dent/crease has to go, lined up with a big hunk of angle iron and a hand held small sledge hammer, gave a big swing, and the silencer remains undented, barely scratched in fact. Laverda built them thick and strong, apparently.

now deciding whether to apply a large amount of heat to the necessary area of the silencer to achieve dentability, or just fit a dual exhaust back to the bike...... ::) ;)

Paul LeClair

 
Laverda SF said:
God Damn Paul: Why do you even bother or put out the expense - Considering our old legs can't deal with it.

Really! Youngster today care less when he or she can buy a turn key motorcycle for 1/2 the price of a Breganzie that will WALK over us.

Not saying, when feeling our oats, we could not  out run them on a 45 year old bike when we were 20 years old ;o)

Hi Ron

as I am only a youngster of 63, I figure I am hopefully good for a significant few more years. In fact the rear sets are significantly more comfortable, allows me to stretch out my legs....

as for way more performance and superior handling, I have other bikes for that.  :D :D

Paul LeClair
 
Paul, I too had to make some exhaust dents to clear my 750 frame. Like you all attempts failed to be satisfactory.

I went to a hardware store and bought a wood gauging tool that fits a 6" grinder, people with no lives make wooden bowls and the like with them.

I used a big chunk of hardwood and dug out a form that fitted the exhaust area, opisite to to the area I want to dent, then grabbed some 2" round bar and set everything up in a press, and pressed away. Nice dent, just where it needed to be and no deformation of the other part of the exhaust. Patent Pending, but with your background, you'll find away around that.
 
Back
Top