
Cams are ID'ed by stampings on the shaft in between the RH cylinder lobe & sprocket drive. If cams were reprofiled they should have some mark from machine shop.Okay sounds like my next steps are
- re-torque head
- re-measure clearances
- split the chain while at TDC - maybe move pistons/valves to safe distances apart
- remove cam-cap nuts only, in sequence and torque-steps
- cams out - measure shims - order shims and new chain + tensioner blade
Reading around the forum tappet discussions I think I do have 4/C sprockets - they have 'A' and 'S' stamped on them and the holes line up with tooth peaks not valleys. I need to find the valve-timing article on LaverdaMania that everyone refers to. Then i'll put the degree-wheel on it when I get closer with clearances and a new chain.
I've got a good quality clicker torque wrench although its calibration was a few years (12?) back - might be the excuse I've been waiting for to get a new one!

You are using an out of date browser. It may not display this or other websites correctly.
You should upgrade or use an alternative browser.
You should upgrade or use an alternative browser.
valve clearances, valve timing
- Thread starter doublegarage
- Start date
& here's a link to the degree wheel posted by Dellortoman, absolutely brilliant for setting cam timing!

doublegarage
Junior member
- Location
- California
That's great, thanks - Got some studying to do! Just waiting for shims.

Not necessarily.Cams are ID'ed by stampings on the shaft in between the RH cylinder lobe & sprocket drive. If cams were reprofiled they should have some mark from machine shop.
Sometimes, no stampings.
Paul
doublegarage
Junior member
- Location
- California
While I'm waiting for shims and chains to show up... Does anybody have a description or pictures of what my bike (82 S2 Jota) is supposed to have here for a breather? I can't make it out from the parts book.

I can't believe it's this garden hose arrangement that also required the front of the airbox to be removed. Also any theories as to why anybody would do that in the first place?
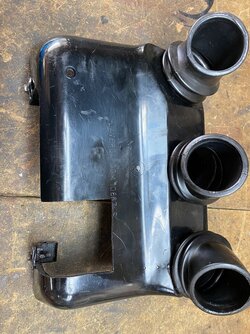
Thanks,
-Richard
I can't believe it's this garden hose arrangement that also required the front of the airbox to be removed. Also any theories as to why anybody would do that in the first place?
Thanks,
-Richard

Rob
Hero member
- Location
- Midlands, UK
Previous owner didn't bother buying the pre-shaped breather hose which has a tighter, more compact bend and decided to use a straight length instead.

The Sock
Hero member
- Location
- London, England
Also any theories as to why anybody would do that in the first place?
Because they're a dick?

mauricejota7604
Hero member
- Location
- Victoria Australia
In fact that is the correct engine breather for your bike.
In its normal position sits just inside the base of the airbox, without the need to cut a square out of it!
In its normal position sits just inside the base of the airbox, without the need to cut a square out of it!

Legs
Hero member
- Location
- Adelaide Hills
Going through a problem with the RGS' crankcase breather myself. Not enough clearance under the airbox to bend a hose, got a bit of a jury-rig using an irrigation 90 degree joiner until I can get my mitts on the proper pre-formed hose.
doublegarage
Junior member
- Location
- California
Yes, having removed the whole assembly and cleaned it up, it seems like I have all the parts, and the hose is definitely formed into a shape that looks right. I thought I was going to take it off and find it was made out of a straight piece but it isn't.In fact that is the correct engine breather for your bike.
In its normal position sits just inside the base of the airbox, without the need to cut a square out of it!
i'll reassemble it all and see if I can fit it together better. If anybody has a picture of the correct setup, that would really help - i haven't managed to find a good pic of the whole thing with the hose in the right place.
doublegarage
Junior member
- Location
- California
Just a quick follow-up. I found a supply of shims so was able to get the clearances where i wanted them - a couple are a bit wider than intended, probably due to feeler-gauge ambiguity measuring the clearance originally - but they're all within the correct bracket now.
I got the cams timed on the marks (didn't attempt anything more accurate with a degree wheel for now). It took a few goes but got there in the end.
And the result is..way better! It starts immediately (new starter clutch helps too) on full choke - idles with zero choke after maybe just 20seconds. It wasn't even close to doing that before. I probably have the idle set too fast but won't know until it's been ridden properly - just sorting out footrest/handlebar position then test ride.
Thanks for all the help/suggestions, much appreciated.
-Richard
I got the cams timed on the marks (didn't attempt anything more accurate with a degree wheel for now). It took a few goes but got there in the end.
And the result is..way better! It starts immediately (new starter clutch helps too) on full choke - idles with zero choke after maybe just 20seconds. It wasn't even close to doing that before. I probably have the idle set too fast but won't know until it's been ridden properly - just sorting out footrest/handlebar position then test ride.
Thanks for all the help/suggestions, much appreciated.
-Richard
Rob
Hero member
- Location
- Midlands, UK
Excellent news - well done. Now enjoy the fruits of your labours! 

Laverda SF
Hero member
Providing you have set the Engine cam timing to Spec:
As for Valve Adjustment with a new assembled engine, I use a Dial Indicator keeping the intake to minimum specs and the exhaust to maximum specs - After that and having run the new built engine for an hour or two or say 200 or 300 hundred miles you have a bases to check clearances and adjust accordingly using feeler gauges.
By then the cam lobes to lifter clearance have smoothed out. I've always buffed both the cam lobes and lifter followers with say 600 grit during assembly and used plenty of cam break-in lube. (Valve train Seating Period)
I change out engine oil and filter after 500 miles of break-in always varying rpm. A constant rpm is not good to break-in your valve train.
I would never recommend attempting to reach your Max rpm before the break-in period after with an oil change and after checking your valve clearances as you don't want to scuff or bruise the valve train before its time - I've done 8000rpm, for short periods, with a SOHC 70 Breganzie 750 SF using open mouth Dellortos VHB 30A's and did not hurt her ;o)
From my experience, the main jetting using open mouth Dellorto VHB 30A is critical on a Breganzie 750 SF.
As for Valve Adjustment with a new assembled engine, I use a Dial Indicator keeping the intake to minimum specs and the exhaust to maximum specs - After that and having run the new built engine for an hour or two or say 200 or 300 hundred miles you have a bases to check clearances and adjust accordingly using feeler gauges.
By then the cam lobes to lifter clearance have smoothed out. I've always buffed both the cam lobes and lifter followers with say 600 grit during assembly and used plenty of cam break-in lube. (Valve train Seating Period)
I change out engine oil and filter after 500 miles of break-in always varying rpm. A constant rpm is not good to break-in your valve train.
I would never recommend attempting to reach your Max rpm before the break-in period after with an oil change and after checking your valve clearances as you don't want to scuff or bruise the valve train before its time - I've done 8000rpm, for short periods, with a SOHC 70 Breganzie 750 SF using open mouth Dellortos VHB 30A's and did not hurt her ;o)
From my experience, the main jetting using open mouth Dellorto VHB 30A is critical on a Breganzie 750 SF.
Last edited:

- Location
- Calgary, Alberta, Canada
reviving this useful thread... just printed off Cam's excellent degree wheel, to modify for my use on the Gilera single again. I have not been able to get the engine to start since I pulled it and split it to sort the major oil leak, and after checking everything else ( 5 or 6 times) I am wondering if the cam got moved in relation to the crank when I split the cases, bloody hell......
really fundamental question.... I have the 1957 Italian Gilera 150 manual which translated says intake valve to open at 34 degree BTC, and to close at 64 degrees after BDC.
I am used to using 1 mm initial valve lift to be the starting point of when the intake lobe is opening, and again for closing when the valve clearance is down to 1 mm. Is that correct for an old Italian single engine?
to double check, I have also calculated intake lobe center as being 105 degees after TDC which I can use as a control check.
Checking cam timing is my project for tommorrow, the Moto Giro is only two weeks away and at the moment I do not have a running bike.... If I screwed up cam timing when fixing the oil leak the engine will have to come back out and be split yet again. WIll report back
really fundamental question.... I have the 1957 Italian Gilera 150 manual which translated says intake valve to open at 34 degree BTC, and to close at 64 degrees after BDC.
I am used to using 1 mm initial valve lift to be the starting point of when the intake lobe is opening, and again for closing when the valve clearance is down to 1 mm. Is that correct for an old Italian single engine?
to double check, I have also calculated intake lobe center as being 105 degees after TDC which I can use as a control check.
Checking cam timing is my project for tommorrow, the Moto Giro is only two weeks away and at the moment I do not have a running bike.... If I screwed up cam timing when fixing the oil leak the engine will have to come back out and be split yet again. WIll report back