
You are using an out of date browser. It may not display this or other websites correctly.
You should upgrade or use an alternative browser.
You should upgrade or use an alternative browser.
What did you do to or for or with your Laverda today?
- Thread starter CLEMTOG
- Start date

sideshow
Hero member
Had a cracking two days this weekend, I was supposed to be travelling to Holland for work, but had to postpone for a week, so I had two great days in the shed that I didn't think I would have.
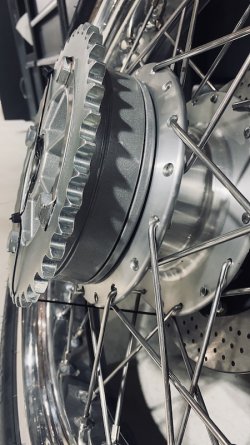
I finished assembling the wheels with discs and carriers, I have gone 530 sprockets and chain on the bike, so fitted the new sprocket and cush drive rubbers to the rear wheel as well, the sprocket plate and cush drive were powder coated the same colour as the bike frame, which is a nice detail on the rear wheel.
I installed the upper steering head bearing and lower race in the frame, stupidly I forgot my bearing grease at work, so I couldn't put the bearing on the lower yoke stem. I lined the bearing seats and spacers with tefgel, which is an amazing product prolifically used as an isolator in my industry for mast assembly, its good for isolation and anti seizing and stops gawling as well when doing up fine thread titanium hardware, basically its a silver bullet for bad shit happening where threads, corrosion or where earth leaks could happen with carbon fibre. A box of parts arrived late last week, with tank rubbers, main stand rubbers and springs etc , so that was good to get all those things in their place .
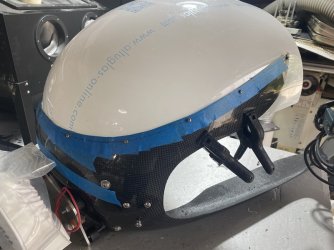
I also had the new un cut screen arrive from europlast. The screen I had previously, was cut already, and didn't fit my fairing. I confess to being lazy on that one, preferring to go with ease, by it being cut to shape, pre drilled and edge polished. Serves me right that it didn't fit. So i bit the bullet and and spent a couple of hours centering the uncut screen and getting it where I wanted it. I drilled it for 10x M3 fasteners. I also started to design the battery box and electrical bulk head where I am going to put the regulator , starter solenoid and m unit. I templated it out of cardboard, next step is building out of thin templating ply, and final step will be making a plug and laying up in carbon.
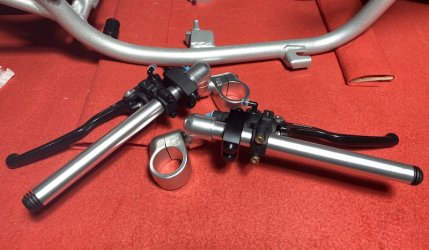
And i even managed a return trip to the shed last night and started fitting the switch blocks and master cylinders for the clutch and front brakes, I have moto gadget switches and Brembo PS 13 for the clutch and a PS 16 for the front brake. Im going to machine up my own oil reservoirs for them. The moto gadget switches aren't the micro switche option , as i am not sure how they would be to use with gloves on and as I haven't seen them in person, I used their other ones as I already have these on my Morini and they work well, its a bit tight with the the button protrusion on the front of the switch block where it comes close to the master cylinders, but once I have the forks in and clip ons on, Im sure it won't be too hard to find the correct orientation. Red has now bored out the cylinder head from 1000 to 1200, and put the new liners in, so that is off to get vapour blasted. I really want to finish the bike for late September, lets see how I go ! It seems to be going to schedule so far.
I finished assembling the wheels with discs and carriers, I have gone 530 sprockets and chain on the bike, so fitted the new sprocket and cush drive rubbers to the rear wheel as well, the sprocket plate and cush drive were powder coated the same colour as the bike frame, which is a nice detail on the rear wheel.
I installed the upper steering head bearing and lower race in the frame, stupidly I forgot my bearing grease at work, so I couldn't put the bearing on the lower yoke stem. I lined the bearing seats and spacers with tefgel, which is an amazing product prolifically used as an isolator in my industry for mast assembly, its good for isolation and anti seizing and stops gawling as well when doing up fine thread titanium hardware, basically its a silver bullet for bad shit happening where threads, corrosion or where earth leaks could happen with carbon fibre. A box of parts arrived late last week, with tank rubbers, main stand rubbers and springs etc , so that was good to get all those things in their place .
I also had the new un cut screen arrive from europlast. The screen I had previously, was cut already, and didn't fit my fairing. I confess to being lazy on that one, preferring to go with ease, by it being cut to shape, pre drilled and edge polished. Serves me right that it didn't fit. So i bit the bullet and and spent a couple of hours centering the uncut screen and getting it where I wanted it. I drilled it for 10x M3 fasteners. I also started to design the battery box and electrical bulk head where I am going to put the regulator , starter solenoid and m unit. I templated it out of cardboard, next step is building out of thin templating ply, and final step will be making a plug and laying up in carbon.
And i even managed a return trip to the shed last night and started fitting the switch blocks and master cylinders for the clutch and front brakes, I have moto gadget switches and Brembo PS 13 for the clutch and a PS 16 for the front brake. Im going to machine up my own oil reservoirs for them. The moto gadget switches aren't the micro switche option , as i am not sure how they would be to use with gloves on and as I haven't seen them in person, I used their other ones as I already have these on my Morini and they work well, its a bit tight with the the button protrusion on the front of the switch block where it comes close to the master cylinders, but once I have the forks in and clip ons on, Im sure it won't be too hard to find the correct orientation. Red has now bored out the cylinder head from 1000 to 1200, and put the new liners in, so that is off to get vapour blasted. I really want to finish the bike for late September, lets see how I go ! It seems to be going to schedule so far.
Attachments

sideshow
Hero member
LJ-2 said:Very impressive Todd,look forward to finished article,& trust it makes coffee too.
I sure am putting some coffee thing in it....
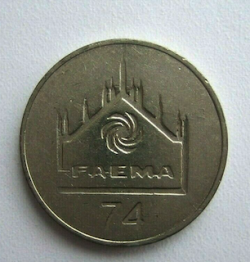
I have a bunch of these old Faema coffee machine tokens, they are what used to be used instead of money when getting coffee at a vending machine. One or two of these will be strategically placed on the bike. I used one on my Morini where one of the starter cables used to go. It left just the right sized recess for one of these to fit in when I 86'd the starter in favour of just having the kick start to get her going.
Attachments

piranha-bro2
Hero member
- Location
- Melbourne
Looking the goods, Todd. Nice rear hub!
I'm in the middle of creating a complete exhaust system (or three!) for my SF-based twins, all twin systems (ie, not 2/1). I had hell trouble finding anywhere in Melbourne that could roll my metal (mild steel for mega section and parallel stainless for mufflers) for less than a king's ransom so i ended up buying my own 610mm pinch rollers. What cost me $20 20 years ago people are asking $100 for today - multiply that by four just for the baffle section and you can see why I said fuk the lot of 'em - I'll do it myself! Once rolled, I have someone who can TIG seam weld.
A few ideas in the mix, one a siamese, almost an X-pipe idea, the other a bit like a 2-1-2 with a large 3C collector before splitting. Perforated baffles and packing for sound control but a much more open tail section than a Jota. I might fabricate a completely separated twin system, try them all out on a dyno and see which one performs best with two different motors. Also have some lovely Staintune Conti copies that might be good if I run a std cam. Both bikes have an SFC 750 style centrestand, with v-shape to allow pipes to tuck completely out of the way. If I like the outcome I may offer a system for sale to someone with and SF with the centrestand mod (or a genuine SFC wanting performance without the ear-splitting noise).
Will post some pics as things progress.
I'm in the middle of creating a complete exhaust system (or three!) for my SF-based twins, all twin systems (ie, not 2/1). I had hell trouble finding anywhere in Melbourne that could roll my metal (mild steel for mega section and parallel stainless for mufflers) for less than a king's ransom so i ended up buying my own 610mm pinch rollers. What cost me $20 20 years ago people are asking $100 for today - multiply that by four just for the baffle section and you can see why I said fuk the lot of 'em - I'll do it myself! Once rolled, I have someone who can TIG seam weld.
A few ideas in the mix, one a siamese, almost an X-pipe idea, the other a bit like a 2-1-2 with a large 3C collector before splitting. Perforated baffles and packing for sound control but a much more open tail section than a Jota. I might fabricate a completely separated twin system, try them all out on a dyno and see which one performs best with two different motors. Also have some lovely Staintune Conti copies that might be good if I run a std cam. Both bikes have an SFC 750 style centrestand, with v-shape to allow pipes to tuck completely out of the way. If I like the outcome I may offer a system for sale to someone with and SF with the centrestand mod (or a genuine SFC wanting performance without the ear-splitting noise).
Will post some pics as things progress.
sideshow
Hero member
Piranha Brother 2 said:Looking the goods, Todd. Nice rear hub!
I'm in the middle of creating a complete exhaust system (or three!) for my SF-based twins, all twin systems (ie, not 2/1). I had hell trouble finding anywhere in Melbourne that could roll my metal (mild steel for mega section and parallel stainless for mufflers) for less than a king's ransom so i ended up buying my own 610mm pinch rollers. What cost me $20 20 years ago people are asking $100 for today - multiply that by four just for the baffle section and you can see why I said fuk the lot of 'em - I'll do it myself! Once rolled, I have someone who can TIG seam weld.
A few ideas in the mix, one a siamese, almost an X-pipe idea, the other a bit like a 2-1-2 with a large 3C collector before splitting. Perforated baffles and packing for sound control but a much more open tail section than a Jota. I might fabricate a completely separated twin system, try them all out on a dyno and see which one performs best with two different motors. Also have some lovely Staintune Conti copies that might be good if I run a std cam. Both bikes have an SFC 750 style centrestand, with v-shape to allow pipes to tuck completely out of the way. If I like the outcome I may offer a system for sale to someone with and SF with the centrestand mod (or a genuine SFC wanting performance without the ear-splitting noise).
Will post some pics as things progress.
cheers mate, looking forward to seeing that exhaust !

Bigfeesh
Full member
- Location
- Geordieland UK
Removing the alternator for a Redax conversion, got outside nut off no problem but inner nut that carries the sealing face is too far from crank end for even a deep 3/4 36mm socket, machined socket a tad deeper on pals lathe, bingo it just fits the nut and it whizzed of with the Milwakee rattle gun. Waiting for the thinner 5mm thick seal now, should be here tomorrow.

RCGBOB44
Hero member
- Location
- Coulsdon,Surrey, sometimes Germany
I re fitted my carbs today. Tomorrow I'll connect them up and see if they leak.

henrywillms
Hero member
- Location
- Canada
RCGBOB44.....LHave you not heard of the power of positive thinking?

Yogi
Hero member
- Location
- Bellingen NSW Australia
Fitted new starter motor to OR600 Atlas. Refitted carburettor with two new CNC inlets and started fitting new exhaust system from Malcolm Cox. Should finish exhaust tomorrow then time to start it up. Have rebuilt all master cylinders and calipers and just need to bleed clutch and brakes. Then it is time to order new sprockets and chain, plus a couple of indicators and a Brembo brake light switch. Fit new tyres and then off to see the scrutineer about getting it registered.
Looking forward to having this on the road on historic plates in another month or so. Then the plan is to get Vince over for a ride..
Yogi
Looking forward to having this on the road on historic plates in another month or so. Then the plan is to get Vince over for a ride..
Yogi
sideshow
Hero member
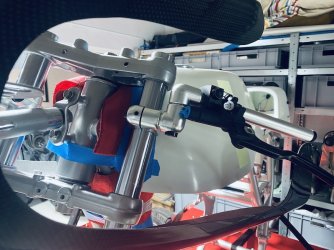
I snuck in a another two hours in the shed last night. My wife came up with the idea of a girls only dinner, so our 4 daughters and her had a dinner that I wasn't allowed to attend, leaving me to be with the Jota. The bottom steering head bearing went on, the triple clamps were installed, and the clip ons put in a very aggressive position for the moment. The last few small brackets that I needed powder coating are yet to be finished, of which one is the steering stop. So the clips dont hit the fairing , they are mounted low. I still think it will be an aggressive steering position , but once the stop is in I will really see where I am at. This was just one of those moments where I wanted to see how it looked! Im using the old fork stanchions for dry fitting everything at the moment, when the final assembly goes ahead, I will put the CRS forks in. Excuse me for all the photos, but I think its a pretty cool project.
Attachments
Yogi
Hero member
- Location
- Bellingen NSW Australia
Vince said:Done, but arranging me and Sydney won't be easy.
It?ll happen in time, Vince.

sideshow said:Excuse me for all the photos, but I think its a pretty cool project.
Always good to see pics, looks like a heap of fun, nice work
cheers
Tom

sideshow
Hero member
Paul H said:Todd - I think it would be great to break your build out on to its own separate forum thread, it is far too interesting to be lost in this general purpose 'I rode my Jota to the shops' thread.
Keep up the great work!
Righto thanks for the idea
I will give that a go
cheers
piranha-bro2
Hero member
- Location
- Melbourne
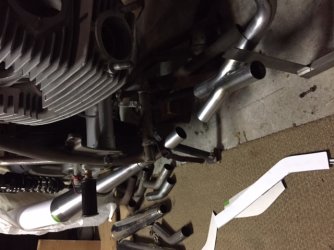
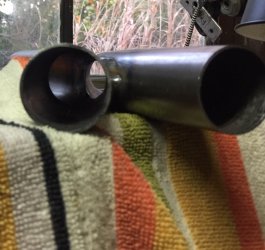
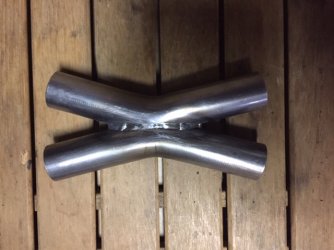
Hand cut my crossover/collector/x-pipe and had the header flanges and X welded ... whatever you wanna call it. New zorst system coming together. A few variations in the mix, this one a2/1/2 with an X mixer/splitter. No idea what's gonna work, but finally getting somewhere. Have gone with small bore headers (35mm ID) for exhaust velocity but opens out gradually to a big fat perf baffle mega (45mm at inlet) and rear section with a reverse cone at the outlet, max dia before reverse cone around 90mm. Fat can with plenty of room for baffle material so I can ride in those little German villages on weekends 
Can't seem to rotate the 3rd pic. Everything is loosely in place at the mo - X piece has to come further fwd yet and only one side connected for an idea of how everything is sitting.
Can't seem to rotate the 3rd pic. Everything is loosely in place at the mo - X piece has to come further fwd yet and only one side connected for an idea of how everything is sitting.
Attachments

The Sock
Hero member
- Location
- London, England
Putting the front end back on after changing the steering head bearings.
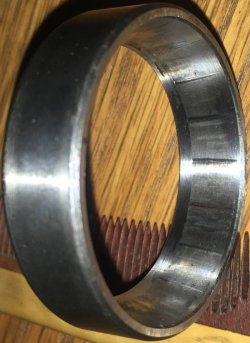
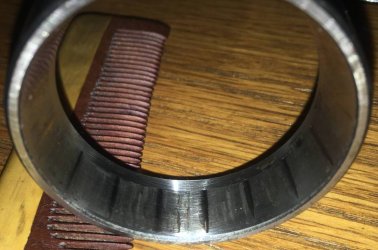
Replacing the Timken Y-30205 taper rollers, top and bottom. They'd been in there for thirty plus years and had earned their retirement.
Many thanks are due to Clem and Phil for their assistance.
Given the visible ridges in the outer race there was no effect on stability at high speed or I would have changed them sooner.
From here on in, I think I'm going to add them to my change at interval list.
Also attached: My Father's Day Card from my daughter, Nathalie.
Replacing the Timken Y-30205 taper rollers, top and bottom. They'd been in there for thirty plus years and had earned their retirement.
Many thanks are due to Clem and Phil for their assistance.
Given the visible ridges in the outer race there was no effect on stability at high speed or I would have changed them sooner.
From here on in, I think I'm going to add them to my change at interval list.
Also attached: My Father's Day Card from my daughter, Nathalie.
Attachments


a14rgs
Hero member
- Location
- Wiltshire, UK
I think you've had your money's worth out of those bearings Hamish 
Could you feel any 'notches' in the steering once the front wheel was removed? I guess that the new set will see you out, if they do another 30+ years...
Could you feel any 'notches' in the steering once the front wheel was removed? I guess that the new set will see you out, if they do another 30+ years...

CLEMTOG
Hero member
difficult to see the difference between colour changes/staining and indentations Alan, but remember this is the sock we are talking about, I could say that he asked me if I had any good second hand bearings, but then I might be telling porkies, never knowingly overspent, that's our Hamish
CLEM
CLEM