You are using an out of date browser. It may not display this or other websites correctly.
You should upgrade or use an alternative browser.
You should upgrade or use an alternative browser.
What did you do to or for or with your Laverda today?
- Thread starter CLEMTOG
- Start date


Yogi
Hero member
- Location
- Bellingen NSW Australia
Early morning run out to Kulnurra to catch up with Brian Wilson from NSW Laverda Club, and Peter Addison who I must have known for over 40 years. Great stories from Peter about touring with Mike Hailwood and Jim Scaysbrook. The temperature was a bit brisk this morning, but no traffic at all on the way out around daylight.
Great to be out for a couple of hours this morning - now back home in front of heater...
Yogi
Great to be out for a couple of hours this morning - now back home in front of heater...
Yogi
Simon Yates
Senior member
My Jota obtained is first MOT for more than 20 years today. 
Victor Robatti
New member
- Location
- Tayside Scotland
Rebuilding 3 Laverda Scooters 1959 1961 Slow process, Have one powder coated front end built, starting to fit fuel tank. Engine to be installed( completely rebuilt ) ,Then fit all wiring and cables,. If anyone has parts for these please let me know.
G
Grant
Guest
(needpics)

redfox
Hero member
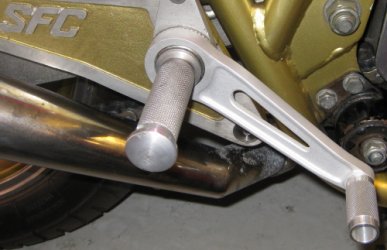
well today I finally got to sort out my old Jota pedals, that I've been having on the shelf for a decade.
So, I filed the rough casting edges off and had them sanded. Installed both new bolts, locking nuts and two brand new Laverda 500 toe pieces from Montydon, who tragically passed away soon after I bought them. Each side complete with bolt and nut, pedal and toe piece, weighs in at 116 gram. The original SFC1000 models weighs 143 gram, so saving 54 gram and having easier shifting and far better looks.
The central holders that are screwed together are modified by my friend Peder some years ago, to adapt two narrow ball bearings each side, so they move real smooth with no play ever.
Anyway, here's a pic of the article.
Kind regards,
Jacques
So, I filed the rough casting edges off and had them sanded. Installed both new bolts, locking nuts and two brand new Laverda 500 toe pieces from Montydon, who tragically passed away soon after I bought them. Each side complete with bolt and nut, pedal and toe piece, weighs in at 116 gram. The original SFC1000 models weighs 143 gram, so saving 54 gram and having easier shifting and far better looks.
The central holders that are screwed together are modified by my friend Peder some years ago, to adapt two narrow ball bearings each side, so they move real smooth with no play ever.
Anyway, here's a pic of the article.
Kind regards,
Jacques
Attachments

chrisk
Hero member
- Location
- Brisbane, Australia
redfox said:Installed both new bolts, locking nuts and two brand new Laverda 500 toe pieces from Montydon, who tragically passed away soon after I bought them.
Phew, lucky they fitted OK, otherwise the return policy could have been a nightmare!
8) Looks good.

piranha-bro2
Hero member
- Location
- Melbourne
I've got a Jota lever setup on my SF, but found that the knurled alloy toepiece ripped my shoes/boots, so used a bolt with a std 3C rubber over it.
Nice work Redfox.
Nice work Redfox.
redfox
Hero member
I like it and it gives me less travel to shift. Easier. Vibes? Nope, only an expression of harmony when the Laverda and the rider is in tune.
So, today I finally changed the original rubber rear brake hose for a steel braided one. Overhauled the rear goldline caliper and changed fluid on front and rear. Need to bed pads in tomorrow. But I forgot how the hose was originally routed If someone have a clear Picture or explanation, I would be gratefull.
Kind regards,
jacques
So, today I finally changed the original rubber rear brake hose for a steel braided one. Overhauled the rear goldline caliper and changed fluid on front and rear. Need to bed pads in tomorrow. But I forgot how the hose was originally routed
If someone have a clear Picture or explanation, I would be gratefull.Kind regards,
jacques

Laverdalothar
Hero member
- Location
- Germany
Hello Jacques,
if you look at the cut-outs in the rear mudguard (or better: the plastic battery protection shield that sits behind the battery, screwed to the frame), I think it is quite obvious how it starts on the right side: From the top of the brake master 45 degrees front left, between frame tube and the plastic cover. Then over to the other side, exit at the equivalent place and down to the swing-arm. left of the swing-arm, you guide it down to below the swing-arm and from there to the rod that connects the caliper-holding plate with the frame. zip-tie it to that rod until it reaches the caliper.
that is at least how I did it.
if you look at the cut-outs in the rear mudguard (or better: the plastic battery protection shield that sits behind the battery, screwed to the frame), I think it is quite obvious how it starts on the right side: From the top of the brake master 45 degrees front left, between frame tube and the plastic cover. Then over to the other side, exit at the equivalent place and down to the swing-arm. left of the swing-arm, you guide it down to below the swing-arm and from there to the rod that connects the caliper-holding plate with the frame. zip-tie it to that rod until it reaches the caliper.
that is at least how I did it.

Laverda SF
Hero member
You really don't need a battery flopping around with a pin hole in the tank on a SF.
It will FLAME your ARSE.
That can happen with a Breganzie.
You have to secure the Battery and ensure there is NO Weak Metal under the Gas Tank.
My solution to that MESS was to construct a base to fit the original battery tray using Aluminum, Maple or a Hickory Hockey stick buffered by a layer of rubber then tie the battery down with a good old leather belt.
Great dampening - Against vibration and shock.
Definitely poke around the base of your tank for weak spots and repair it with something like Lepage's or 3M 24Hr Metal Epoxy.
The biggest issue with the Jaguar V12 XJS was that it burnt before it reached the end of it's life Cycle.
This is not the day I'm going to die - Ride Safely ;o)
It will FLAME your ARSE.
That can happen with a Breganzie.
You have to secure the Battery and ensure there is NO Weak Metal under the Gas Tank.
My solution to that MESS was to construct a base to fit the original battery tray using Aluminum, Maple or a Hickory Hockey stick buffered by a layer of rubber then tie the battery down with a good old leather belt.
Great dampening - Against vibration and shock.
Definitely poke around the base of your tank for weak spots and repair it with something like Lepage's or 3M 24Hr Metal Epoxy.
The biggest issue with the Jaguar V12 XJS was that it burnt before it reached the end of it's life Cycle.
This is not the day I'm going to die - Ride Safely ;o)

Dellortoman
Hero member
- Location
- Tasmania, Australia
redfox said:Vibes? Nope, only an expression of harmony ...
Expression of harmony eh? I like it. I might use that next time someone asks about my bike's vibration
It's not quite as indecorous as euphemisms like throbbing, pulsating, quivering ...
Laverda SF
Hero member
Dellorto:
Love vibrations just make sure your seals are top notch or will blow a Head Gasket - LOL
Love vibrations just make sure your seals are top notch or will blow a Head Gasket - LOL
chrisk
Hero member
- Location
- Brisbane, Australia
Dellortoman said:throbbing, pulsating, quivering ...
:-X :-X :-X
redfox
Hero member
Hi Lothat, Thanks for the explanation. I did get the general idea, but when it reaches the swingarm, I don't get it.
So, I passed it from the brake master tthrough the hole in the lower rear mudguard, horizontally to the other side , through the similar cut out, and then Down on the outside of the rear swing arm, not to interfere with the rear tire, then under and along the rear swing arm, zip ties two placed on that, and over to the rear brake caliper.
Where I am confused, it how it comes Down from the cut out to the swing arm. Should it just sit close to the swing arm, or should it go say through a narrower passing at the mounting of the foot rest plate, and then under the rear swing arm?
Kind regards,
Jacques
So, I passed it from the brake master tthrough the hole in the lower rear mudguard, horizontally to the other side , through the similar cut out, and then Down on the outside of the rear swing arm, not to interfere with the rear tire, then under and along the rear swing arm, zip ties two placed on that, and over to the rear brake caliper.
Where I am confused, it how it comes Down from the cut out to the swing arm. Should it just sit close to the swing arm, or should it go say through a narrower passing at the mounting of the foot rest plate, and then under the rear swing arm?
Kind regards,
Jacques
Laverdalothar said:Hello Jacques,
if you look at the cut-outs in the rear mudguard (or better: the plastic battery protection shield that sits behind the battery, screwed to the frame), I think it is quite obvious how it starts on the right side: From the top of the brake master 45 degrees front left, between frame tube and the plastic cover. Then over to the other side, exit at the equivalent place and down to the swing-arm. left of the swing-arm, you guide it down to below the swing-arm and from there to the rod that connects the caliper-holding plate with the frame. zip-tie it to that rod until it reaches the caliper.
that is at least how I did it.