What did you do to or for or with your Laverda today?

Shaeza brother! What a piss off! I'll give you a buzz at a decent Norsk time and get the gories. Ice on road? Moose? Reindeer? Hope your forks aren't too badly damaged.
 
Until an hour later and.....

Until an hour later and.....
Sorry to hear this Lee, count yourself lucky that you walked away from this get-off and were still able to ride your bike home. Us old farts don't bounce back as easily as when we were in our primetime. I love those wheel rims you have on your SF what are they? A speedy recovery to you mate, Cheers Dave.
 
After disconnecting the rear brake cable on my 3c and judisatly squirting some Penrite High Tech lube in a can into the cable and all the pivot points on the rearset and brake links I now seem to have a much better functioning rear brake. I guess after 46 years some lube helps. Check it tomorrow.
 
Did you just replace the brushes - is that a two brush plate ? Have seen some of the posts lately but these are the first pics
Yeah, standard 2x brush plate, so am just going to replace the brushes.

There's a well documented 4 brush conversion - thanks to Dick Büthker - which uses a Honda plate (part #31206-MM5-008, plus a brush kit, part #31201-KG7-000).

It used to be available ready prepared from OCT and Gijs, but I haven't gone down that route.

Dunno. Maybe I should. Or maybe not.
 
Yeah, standard 2x brush plate, so am just going to replace the brushes.

There's a well documented 4 brush conversion - thanks to Dick Büthker - which uses a Honda plate (part #31206-MM5-008, plus a brush kit, part #31201-KG7-000).

It used to be available ready prepared from OCT and Gijs, but I haven't gone down that route.

Dunno. Maybe I should. Or maybe not.
Maybe i will take a look in the winter - got a few jobs planned that wants it off the the road
 
Wore a Laverda hoodie to a pop-up Eat Street last night. A bloke accosted me telling me about the Yota he had when a young bloke....... he asked if I had a Yota ...... I said I’d had an orange one and a black one. He rolled his eyes and said the non orange one wouldn’t have been a Yota.

:rolleyes: Reckon he knows more than me......
Get the rigging t short back on , less people tell you how to do things
 
Maybe i will take a look in the winter - got a few jobs planned that wants it off the the road
Well, you've inspired me to order up the bits anyways :). To be honest, the main reason I haven't done it before was 'cos of the hassle of getting the starter motor out. And seeing that that is no longer a factor/excuse ...

If you need documentation/photos/whatever, feel free to ask ...
 
Well, you've inspired me to order up the bits anyways :). To be honest, the main reason I haven't done it before was 'cos of the hassle of getting the starter motor out. And seeing that that is no longer a factor/excuse ...

If you need documentation/photos/whatever, feel free to ask ...
Would like to know if you use any special (unusual spanner / socket to get the starter off ? - be interesting to know if you can complete without lifting the tank which i know involves a lot of work as i had to replace the breather pipe
 
Would like to know if you use any special (unusual spanner / socket to get the starter off ? - be interesting to know if you can complete without lifting the tank which i know involves a lot of work as i had to replace the breather pipe
Nope, no need to lift the tank or even muck about loosening the sub-frame (as I have seen said).

It's an easy but tedious job, made so simply by the restricted access to the 4 Allen screws that hold the plastic cover that goes over the starter motor 'well'. To get these out, you need:
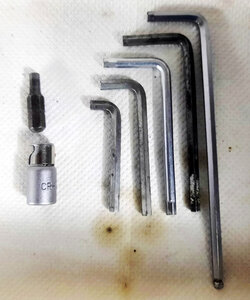
A collection of Allen keys including some cut-down specially for the task.
An Allen key bit in a socket holder, just to speed up getting the screws out once they're moving.
Patience.

Photo of what I use attached.

The motor comes out on the left side of the bike. To have enuf room to do this, you need to:
1. Remove the fairing support bracket.
2. Detach the coolant hose where it comes out from the block - careful because coolant will flood out.
3. Detach the breather hose at the airbox end and push it up and towards the right side of the bike.

After that, there's a pesky small circlip (which I always fight with) that retains the drive pinion of the starter motor . And then 3 easily accessible Allens that hold the starter to the crankcase. And Bob's Yer Uncle.
 

Attachments

  • Allens.jpg
    Allens.jpg
    126.6 KB · Views: 11
Nope, no need to lift the tank or even muck about loosening the sub-frame (as I have seen said).

It's an easy but tedious job, made so simply by the restricted access to the 4 Allen screws that hold the plastic cover that goes over the starter motor 'well'. To get these out, you need:
A collection of Allen keys including some cut-down specially for the task.
An Allen key bit in a socket holder, just to speed up getting the screws out once they're moving.
Patience.

Photo of what I use attached.

The motor comes out on the left side of the bike. To have enuf room to do this, you need to:
1. Remove the fairing support bracket.
2. Detach the coolant hose where it comes out from the block - careful because coolant will flood out.
3. Detach the breather hose at the airbox end and push it up and towards the right side of the bike.

After that, there's a pesky small circlip (which I always fight with) that retains the drive pinion of the starter motor . And then 3 easily accessible Allens that hold the starter to the crankcase. And Bob's Yer Uncle.
Brilliant thankyou - I hate those coolant hoses , I had a job to get them sealed - needed replacing along with the breather hose which is another pita
 
Nope, no need to lift the tank or even muck about loosening the sub-frame (as I have seen said).

It's an easy but tedious job, made so simply by the restricted access to the 4 Allen screws that hold the plastic cover that goes over the starter motor 'well'. To get these out, you need:
A collection of Allen keys including some cut-down specially for the task.
An Allen key bit in a socket holder, just to speed up getting the screws out once they're moving.
Patience.
Like re-decorating the hallway... through the letter box slit. :rolleyes:

Remove the throttle bodies, loosen off the sub-frame and slide the tank back a couple of centimetres. Sounds like a load of extra work, but, in the end, it saves both time and aggro.

To each his own.;)

piet
 
Like re-decorating the hallway... through the letter box slit. :rolleyes:

Remove the throttle bodies, loosen off the sub-frame and slide the tank back a couple of centimetres. Sounds like a load of extra work, but, in the end, it saves both time and aggro.

To each his own.;)

piet
The wise thing is not to do the little darlings up too tight, so you're ready for the next time :). And a dab of coppaslip helps as well ...
 
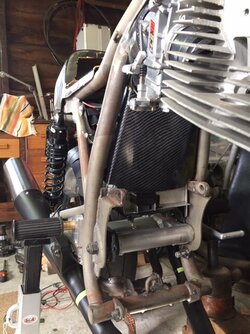
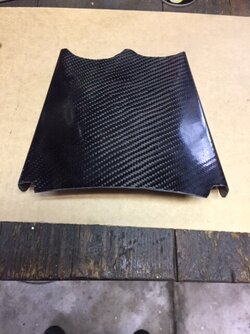
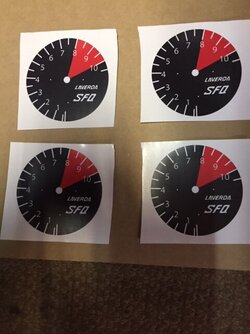
Been sneaking in some SFQ time of late - new tacho face that the ever-versatile Cam (aka D'man) produced the graphics for arrived today - stick one on and put the tacho back together! Made up the carbon cover that closes in the area formerly occupied by the SF airbox; I refused to leave it open - creates a bit of an airbox and protects all the lectrics. Pretty happy with my homebuilt mould (gal sheet) and the final result. Carbon OW01 front guard is repaired, reshaped and ready for paint, so are the carbon SFQ sidecovers. Various other accomplishments over the past week or two. Ugly SFC seat repair and prep is next.
 

Attachments

  • Carbon mid cover fitted low kb.JPG
    Carbon mid cover fitted low kb.JPG
    74.6 KB · Views: 40
  • Carbon mid cover-low kb.JPG
    Carbon mid cover-low kb.JPG
    56.6 KB · Views: 42
  • Tacho face done.JPG
    Tacho face done.JPG
    48.7 KB · Views: 40
Wore a Laverda hoodie to a pop-up Eat Street last night. A bloke accosted me telling me about the Yota he had when a young bloke....... he asked if I had a Yota ...... I said I’d had an orange one and a black one. He rolled his eyes and said the non orange one wouldn’t have been a Yota.

:rolleyes: Reckon he knows more than me......
You should told him the black one is actually a 'Hota' ........ even more rare and authentic than the orange ones!

Jim
 
Back
Top