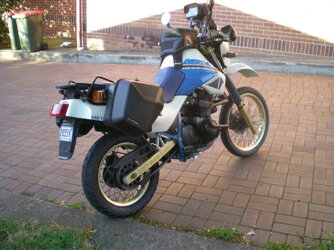
Atlas Questions

I couldn't help myself and fitted the lever and purch that softens the clutch pull and it did, BUT as I suspected and yes Q even with absolute zero and probably less than zero freeplay it's impossible to get Neutral with the engine running. The clutch takeup point is really close to the handlebar, so its a no-go. $40 wasted, I might try it on the Pantah though. Found a couple of very odd things while doing this. I couldn't get the cable removed from the original lever on the bars, I needed more free play to disconnect it so I went looking at the lower connection and its very different from any other Laverda I have seen. It's on the bottom of the case, and different from the spare cable Andy got me from a maker in England. My fitted cable has an upper-end nipple but no fitted lower nipple, its lower nipple has a grub screw with 50mm of cable running past this grub screw attached nipple. What I did notice was this lower lever has some clearance so it can be extended 15mm or maybe a bit more. That's a future option for adding an extension to this lever. Another odd thing was I couldn't get the cable out of the original upper purch and lever slot, the cable was too thick, which made no sense as it must have fitted at some point. And then I noticed this cable had what looked like a 1mm thick Teflon sleeve that could be pushed down the cable leaving the wire bit that slipped through the slot, very odd. It's good to get a handle on how to change a clutch cable if needed.
 
Hi Vince, The solder less nipple set up is pretty much standard setup on 500's. I would advise lock wiring the solder less nipple to the external clutch arm, because if the cable breaks you could loose the nipple.- even with a new cable your stuck without the nipple!
 
Great tip, the new cable I have as a spare cannot be used, how do you slide a grub screw nipple up a cable that already has a fixed nipple there. I guess I will have to cut that fixed nipple off and solder the cable end so it won't fray, on second thoughts Andy had these cables copied from his cable so it should have the correct inner-to-outer spacing and fit into the hooks at the bottom and adjust to clearance on the bars. Better check as what's the point of a spare that needs modifying on the roadside. I have some small cable ties to hold that nipple to the clutch arm if the cable breaks. Love to hear tips like that before it bits me on a trip.
 
Great tip, the new cable I have as a spare cannot be used, how do you slide a grub screw nipple up a cable that already has a fixed nipple there. I guess I will have to cut that fixed nipple off and solder the cable end so it won't fray, on second thoughts Andy had these cables copied from his cable so it should have the correct inner-to-outer spacing and fit into the hooks at the bottom and adjust to clearance on the bars. Better check as what's the point of a spare that needs modifying on the roadside. I have some small cable ties to hold that nipple to the clutch arm if the cable breaks. Love to hear tips like that before it bits me on a trip.
I’d suggest that the little bit of Teflon you found, is a small, broken off section of the inner that extends all the way through the length. Quoted the wrong fucken post, but who cares?
 
That little bit of Teflon was 100mm long or that's as much as I could ease it down the cable, and with it running right up to the nipple, I love saying Nipple, there is no chance of the cable fitting into the slot that leads to the nipple, and that's as suggestive as it sounds. I don't doubt it's a Teflon cable liner so it's probably an after-market Teflon cable that's been modified to fit, they must have pushed it back away from the slot just like I did, pure luck I discovered that trick. I was keen to squirt some lube down the cable till I saw that Teflon bit, apparent you're not supposed to lube Teflon cables? I haven't mentioned the small melted bit of cable outer down near the headers that I found a while back. The cable is now cable Tied away from the exhaust.
 
Hi Vince , Standard cable should have one fixed soldered nipple at one end that fits the clutch lever, the other end nothing, allowing fitment of solderless nipple! When setting up , when operating the lever to its full movement the external clutch arm should be parallel with the internal clutch rods. Go pass that parallel point and you have gone pass the point of maximum effect of releasing the clutch plates.
 
That little bit of Teflon was 100mm long or that's as much as I could ease it down the cable, and with it running right up to the nipple, I love saying Nipple, there is no chance of the cable fitting into the slot that leads to the nipple, and that's as suggestive as it sounds. I don't doubt it's a Teflon cable liner so it's probably an after-market Teflon cable that's been modified to fit, they must have pushed it back away from the slot just like I did, pure luck I discovered that trick. I was keen to squirt some lube down the cable till I saw that Teflon bit, apparent you're not supposed to lube Teflon cables? I haven't mentioned the small melted bit of cable outer down near the headers that I found a while back. The cable is now cable Tied away from the exhaust.
Don't use petroleum based products on Teflon or Nylon lined cables. They collect muck and the liner probably swells.
Use silicon spray.
In fact, I use silicon spray on all my cables, it dries and doesn't collect muck. That applies to unlined cables as well.

Paul
 
I’m no Atlas expert, but the sexual innuendos are noted.
Hi Vince , Standard cable should have one fixed soldered nipple at one end that fits the clutch lever, the other end nothing, allowing fitment of solderless nipple! When setting up , when operating the lever to its full movement the external clutch arm should be parallel with the internal clutch rods. Go pass that parallel point and you have gone pass the point of maximum effect of releasing the clutch plates.

That makes sense.
Don't use petroleum based products on Teflon or Nylon lined cables. They collect muck and the liner probably swells.
Use silicon spray.
In fact, I use silicon spray on all my cables, it dries and doesn't collect muck. That applies to unlined cables as well.

Paul

I’m off to watch reruns of Botched. I’m sure I saw ruptured silicon implants that were leaking and mucky.
 
I forgot to add, I finally shimmed the muffler over far enough to clear the back tyre. It took maybe 8 thick washers on both mounts so close to 15mm to get a fair bit more rear suspension travel past the muffler, right from its first ride it rubbed really badly and it's hard to get a good measure because of the odd muffler shape so I just kept adding washers and even longer mounting bolts to stop the loud grouching sound of the tyre rubbing. And then today I checked the rear chain adjustment and it's now pretty tight when it gets bounced so that needs backing off. I am probably a lot heavier than earlier owners so it's riding lower in its stroke than it should. It's down 15mm too low in the rear sag, but getting a higher seat height isn't going to help. It's probably going to need a stiffer spring eventually. I haven't ridden it hard enough to see if it bottoms badly.
 
I am adding this here as I had no idea there was a lower clutch arm adjuster hidden under the countershaft cover. The joys of no English Manual to study.

What I really need to do is lay the bike on its side and have a bloody good look under the engine at the lower lever, I haven't seen what's happening down there. Laying my body beside it doesn't help to see the whole shebang down there, the lower frame rails block your view. So I will lay it over and take a pic, I haven't felt any lower lever adjusters at all.

Quote, Then, there's an adjuster screw on the lifting mechanism behind the sprocket cover. Make sure that the lifting arm is square to the rod.

That's why I love this place, Thanks Paul great info. I have had that countershaft cover off before looking at replacing or at least cleaning the chain and sprockets but I hadn't noticed when that cover is off you can see 100mm of the lower clutch arm and ITS ADJUSTING SCREW right there in plain sight. I will have a fiddle with that adjuster tomorrow and see if it improves the geometry of the arm.
 
I am adding this here as I had no idea there was a lower clutch arm adjuster hidden under the countershaft cover. The joys of no English Manual to study.

What I really need to do is lay the bike on its side and have a bloody good look under the engine at the lower lever, I haven't seen what's happening down there. Laying my body beside it doesn't help to see the whole shebang down there, the lower frame rails block your view. So I will lay it over and take a pic, I haven't felt any lower lever adjusters at all.

Quote, Then, there's an adjuster screw on the lifting mechanism behind the sprocket cover. Make sure that the lifting arm is square to the rod.

That's why I love this place, Thanks Paul great info. I have had that countershaft cover off before looking at replacing or at least cleaning the chain and sprockets but I hadn't noticed when that cover is off you can see 100mm of the lower clutch arm and ITS ADJUSTING SCREW right there in plain sight. I will have a fiddle with that adjuster tomorrow and see if it improves the geometry of the arm.
There isn't a lower cable adjuster. The cable end simply sits against an abutment on the lower crankcase. Only adjustment possible is with the screwed on cable nipple, there isn't a soldered one.
Paul
 
Step right up step right up and find the Miracle Cure. Is there anything a squirt of Lube in a Can cannot fix, I am now snicking neutral like a knife through butter. I had a look at the mechanism under and in front of the countershaft sprocket and what's there is a vertical shaft that has the clutch cable connection on the bottom end and it connects to the clutch pushrods at the top. This shaft looks to have 2 supporting bearings on top and bott and an adjuster in the middle. The angles looked fine, close to 90 degrees so I thought adjusting wouldn't help. As a last-minute thing, I gave those 2 bearing a squirt and buggar me that lightened the clutch pull a bit so I started it up and tried the gear change. Yesterday with bearly any free play it would creep forward and there was zero chance of getting neutral. Today it's 100% better, with zero creeping forward and it gets neutral dead easily even with a cold motor. A bit of lube must have freed up those bearings.
Today's next job was losing off the drive chain a bit as it felt tight now the muffler doesn't block the rear wheel and it's getting way more suspension travel. What do I find, the left side wheel adjuster doesn't move at all. It's a pretty clever design having an alloy block slide up into the alloy swingarm with the rear calliper also sliding up its mount. So I pulled the wheel and disseized all those stuck bits and added a bunch of Waterproof Trailer Grease so hopefully, it stays free to adjust. So typical old bike stuff helped by the Magic Can of spray lube, BTW it looks like it needs new rear brake pads.
 
I finished off adjusting the chain so it doesn't go tight now I have full rear suspension travel, typical chain adjustment, It took 3 goes, way too much chain play, 1/2 a millimetre tighter and its bow tight. Anyway, that's now sorted so I tried starting the bike and getting neutral again. It was great yesterday, but today using toes snapping strength now there is no fucken chance of getting it out of 1st gear and into neutral. Fucken thing is POSSESSED. It's fast needing a really good flogging and an oil change.
 
It worked on first start yesterday with the same conditions engine heat-wise, it was so nice the way it worked, I hate inconsistency in operation. I have a nagging doubt about the ease of moving the gear lever. On occasion, it's very hard to move and yesterday it was dead easy to move. I know clutch action has a huge influence on this but it's not an exclusive effect. So it's now back to clutch drag, creeping forward and the friction point is really close to the bars and the gear lever won't move up into neutral or second all at idle engine revs. And yesterday it was perfect. Where is that Priest for an Exersism?
 
Yes, it's getting close to trip-ready. I have been thinking about the clutch issue and I have an idea of what's wrong. Triples have 2 clutch adjusts, one on each end of the cable and what you want is 2 or 3mm of handlebar lever free play and that's what I have tried to do. I haven't touched that 3rd adjuster thinking why bother as what would that achieve? But its position looks like it works like an adjustable clutch pushrod. I learned from my failed attempt years ago when I made a pushrod way too soft and had it mut and lose 1mm in length which stopped the clutch from working. I bet my left nut I get at least 1 full turn in on that adjuster making effectively a longer clutch pushrod and getting clutch function back. Something else I noticed today when sitting on the bike doing the chain adjustment. I can now flat-foot the bike on either side, I couldn't do that when the rear tyre was hitting the muffler and the chain was going tight restricting rear suspension travel. When that was happening I measured rear sag and that came out at 16mm too low anyway, it's quite a bit more now so it defiantly needs more rear spring preload and in time a stronger spring. It's going to bottom now for sure.
 
Back
Top